ABOUT US
We are security engineers who break bits and tell stories.
Visit us
doyensec.com
Follow us
@doyensec
Engage us
info@doyensec.com
Blog Archive
© 2026 Doyensec LLC 
Databases are a crucial part of any modern application. Like any external dependency, they introduce additional complexity for the developers building an application. In the real world, however, they are usually considered and used as a black box which provides storage functionality.
This post aims shed light on a particular aspect of the complexity databases introduce which is often overlooked by developers, namely concurrency control. The best way to do that is to start off by looking at a fairly common code pattern we at Doyensec see in our day-to-day work:
func (db *Db) Transfer(source int, destination int, amount int) error {
  ctx := context.Background()

  conn, err := pgx.Connect(ctx, db.databaseUrl)
  defer conn.Close(ctx)

  // (1)
  tx, err := conn.BeginTx(ctx)

  var user User
  // (2)
  err = conn.
    QueryRow(ctx, "SELECT id, name, balance FROM users WHERE id = $1", source).
    Scan(&user.Id, &user.Name, &user.Balance)

  // (3)
  if amount <= 0 || amount > user.Balance {
    tx.Rollback(ctx)
    return fmt.Errorf("invalid transfer")
  }

  // (4)
  _, err = conn.Exec(ctx, "UPDATE users SET balance = balance - $2 WHERE id = $1", source, amount)
  _, err = conn.Exec(ctx, "UPDATE users SET balance = balance + $2 WHERE id = $1", destination, amount)

  // (5)
  err = tx.Commit(ctx)
  return nil
}
Note: All error checking has been removed for clarity.
For the readers not familiar with Go, here’s a short summary of what the code is doing. We can assume that the application will initially perform authentication and authorization on the incoming HTTP request. When all required checks have passed, the db.Transfer function handling the database logic will be called. At this point the application will:
1. Establish a new database transactions
2. Read the source account’s balance
3. Verify that the transfer amount is valid with regard to the source account’s balance and the application’s business rules
4. Update the source and destination accounts’ balances appropriately
5. Commit the database transaction
A transfer can be made by making a request to the /transfer endpoint, like so:
POST /transfer HTTP/1.1
Host: localhost:9009
Content-Type: application/json
Content-Length: 31

{
    "source":1,
    "destination":2,
    "amount":50
}
We specify the source and destination account IDs, and the amount to be transferred between them. The full source code, and other sample apps developed for this research can be found in our playground repo.
Before continuing reading, take a minute and review the code to see if you can spot any issues.
Notice anything? At first look, the implementation seems correct. Sufficient input validation, bounds and balance checks are performed, no possibility of SQL injection, etc. We can also verify this by running the application and making a few requests. We’ll see that transfers are being accepted until the source account’s balance reaches zero, at which point the application will start returning errors for all subsequent requests.
Fair enough. Now, let’s try some more dynamic testing. Using the following Go script, let us try and make 10 concurrent requests to the /transfer endpoint. We’d expect that two request will be accepted (two transfers of 50 with an initial balance of 100) and the rest will be rejected.
func transfer() {
	client := &http.Client{}

	body := transferReq{
		From:   1,
		To:     2,
		Amount: 50,
	}
	bodyBuffer := new(bytes.Buffer)
	json.NewEncoder(bodyBuffer).Encode(body)

	req, err := http.NewRequest("POST", "http://localhost:9009/transfer", bodyBuffer)
	if err != nil {
		panic(err)
	}
	req.Header.Add("Content-Type", `application/json`)
	resp, err := client.Do(req)
	if err != nil {
		panic(err)
	} else if _, err := io.Copy(os.Stdout, resp.Body); err != nil {
		panic(err)
	}
	fmt.Printf(" / status code => %v\n", resp.StatusCode)
}

func main() {
	for i := 0; i < 10; i++ {
		// run transfer as a goroutine
		go transfer()
	}
	time.Sleep(time.Second * 2)
	fmt.Printf("done.\n")
}
However, running the script we see something different. We see that almost all, if not all, of the request were accepted and successfully processed by the application server. Viewing the balance of both accounts with the /dump endpoint will show that the source account has a negative balance.
We have managed to overdraw our account, effectively making money out of thin air! At this point, any person would be asking “why?” and “how?”. To answer them, we first need to take a detour and talk about databases.
Transactions are a way to define a logical unit of work within a database context. Transactions consist of multiple database operations which need to be successfully executed, for the unit to be considered complete. Any failure would result in the transaction being reverted, at which point the developer needs to decide whether to accept the failure or retry the operation. Transactions are a way to ensure ACID properties for database operations. While all properties are important to ensure data correctness and safety, for this post we’re only interested in the “I” or Isolation.
In short, Isolation defines the level to which concurrent transactions will be isolated from each other. This ensures they always operate on correct data and don’t leave the database in an inconsistent state. Isolation is a property which is directly controllable by developers. The ANSI SQL-92 standard defines four isolation levels, which we will take a look at in more detail later onm, but first we need to understand why we need them.
The isolation levels are introduced to eliminate read phenomena or unexpected behaviors, which can be observed when concurrent transactions are being performed on the set of data. The best way to understand them is with a short example, graciously borrowed from Wikipedia.
Dirty reads allow transactions to read uncommitted changes made by concurrent transactions.
-- tx1
BEGIN;
SELECT age FROM users WHERE id = 1; -- age = 20
-- tx2
BEGIN;
UPDATE users SET age = 21 WHERE id = 1;
-- tx1
SELECT age FROM users WHERE id = 1; -- age = 21
-- tx2
ROLLBACK; -- the second read by tx1 is reverted
Non-repeatable reads allow sequential SELECT operations to return different results as a result of concurrent transactions modifying the same table entry.
-- tx1
BEGIN;
SELECT age FROM users WHERE id = 1; -- age = 20
-- tx2
UPDATE users SET age = 21 WHERE id = 1;
COMMIT;
-- tx2
SELECT age FROM users WHERE id = 1; -- age = 21
Phantom reads allow sequential SELECT operations on a set of entries to return different results due to modifications done by concurrent transactions.
-- tx1
BEGIN;
SELECT name FROM users WHERE age > 17; -- returns [Alice, Bob]
-- tx2
BEGIN;
INSERT INTO users VALUES (3, 'Eve', 26);
COMMIT;
-- tx1
SELECT name FROM users WHERE age > 17; -- returns [Alice, Bob, Eve]
In addition the phenomena defined in the standard, behaviors such as “Read Skews”, “Write Skews” and “Lost Updates” can be observed in the real world.
Lost updates occur when concurrent transactions perform an update on the same entry.
-- tx1
BEGIN;
SELECT * FROM users WHERE id = 1;
-- tx2
BEGIN;
SELECT * FROM users WHERE id = 1;
UPDATE users SET name = 'alice' WHERE id = 1;
COMMIT; -- name set to 'alice'
-- tx1
UPDATE users SET name = 'bob' WHERE id = 1;
COMMIT; -- name set to 'bob'
This execution flow results in the change performed by tx2 to be overwritten by tx1.
Read and write skews usually arise when the operations are performed on two or more entries that have a foreign-key relationship. The examples below assume that the database contains two tables: a users table which stores information about a particular user, and a change_log table which stores information about the user who performed the latest change of the target user’s name column:
CREATE TABLE users(
  id INT PRIMARY KEY NOT NULL,
  name TEXT NOT NULL
);

CREATE TABLE change_log(
  id INT PRIMARY KEY NOT NULL,
  updated_by VARCHAR NOT NULL,
  user_id INT NOT NULL,
  CONSTRAINT user_fk FOREIGN KEY (user_id) REFERENCES users(id)
);
If we assume that we have the following sequence of execution:
-- tx1
BEGIN;
SELECT * FROM users WHERE id = 1; -- returns 'old_name'
-- tx2
BEGIN;
UPDATE users SET name = 'new_name' WHERE id = 1;
UPDATE change_logs SET updated_by = 'Bob' WHERE user_id = 1;
COMMIT;
-- tx1
SELECT * FROM change_logs WHERE user_id = 1; -- return Bob
the view of tx1 transaction is that the user Bob performed tha last change on the user with ID: 1, setting their name to old_name.
In the sequence of operations shown below, tx1 will perform its update under the assumption that the user’s name is Alice and there were no prior changes on the name.
-- tx1
BEGIN;
SELECT * FROM users WHERE id = 1; -- returns Alice
SELECT * FROM change_logs WHERE user_id = 1; -- returns an empty set
-- tx2
BEGIN;
SELECT * FROM users WHERE id = 1;
UPDATE users SET name = 'Bob' WHERE id = 1; -- new name set
COMMIT;
-- tx1
UPDATE users SET name = 'Eve' WHERE id = 1; -- new name set
COMMIT;
However, tx2 performed its changes before tx1 was able to complete. This results in tx1 performing an update based on state which was changed during its execution.
Isolation levels are designed to guard against zero or more of these read phenomena. Let’s look at the them is more detail.
Read Uncommitted (RU) is the lowest isolation level provided. At this level, all phenomena discussed above can be observed, including reading uncommitted data, as the name suggests. While transactions using this isolation level can result in higher throughput in highly concurrent environments, it does mean that concurrent transactions will likely operate with inconsistent data. From a security standpoint, this is not a desirable property of any business-critical operation.
Thankfully, this it not a default in any database engine, and needs to be explicitly set by developers when a creating a new transaction.
Read Committed (RC) builds on top of the previous level’s guarantee and completely prevents dirty reads. However, it does allow other transactions to modify, insert, or delete data between individual operations of the running transaction, which can result in non-repeatable and phantom reads.
Read Committed is the default isolation level in most database engines. MySQL is an outlier here.
In similar fashion, Repeatable Read (RR) improves the previous isolation level, while adding a guarantee that non-repeatable reads will also be prevented. The transaction will view only data which was committed at the start of the transactions. Phantom reads can still be observed at this level.
Finally, we have the Serializable (S) isolation level. The highest level is designed to prevent all read phenomena. The result of concurrently executing multiple transactions with Serializable isolation will be equivalent to them being executed in serial order.
Now that we have that covered, let’s circle back to the original example. If we assume that the example was using Postgres and we’re not explicitly setting the isolation level, we’ll be using the Postgres default: Read Committed. This setting will protect us from dirty reads, and phantom or non-repeatable reads are not a concern, since we’re not performing multiple reads within the transaction.
The main reason why our example is vulnerable boils down to concurrent transaction execution and insufficient concurrency control. We can enable database logging to easily see what is being executed on the database level when our example application is being exploited.
Pulling the logs for our example, we can see something similar to:
 1. [TX1] LOG:  BEGIN ISOLATION LEVEL READ COMMITTED
 2. [TX2] LOG:  BEGIN ISOLATION LEVEL READ COMMITTED
 3. [TX1] LOG:  SELECT id, name, balance FROM users WHERE id = 2
 4. [TX2] LOG:  SELECT id, name, balance FROM users WHERE id = 2
 5. [TX1] LOG:  UPDATE users SET balance = balance - 50 WHERE id = 2
 6. [TX2] LOG:  UPDATE users SET balance = balance - 50 WHERE id = 2
 7. [TX1] LOG:  UPDATE users SET balance = balance + 50 WHERE id = 1
 8. [TX1] LOG:  COMMIT
 9. [TX2] LOG:  UPDATE users SET balance = balance + 50 WHERE id = 1
10. [TX2] LOG:  COMMIT
What we initially notice is that the individual operations of a single transaction are not executed as a single unit. Their individual operations are interweaved, contradicting how the initial transaction definition described them (i.e., a single unit of execution). This interweaving occurs as a result of transactions being executed concurrently.
Databases are designed to execute their incoming workload concurrently. This results in an increased throughput and ultimately a more performant system. While implementation details can vary between different database vendors, at a high level concurrent execution is implemented using “workers”. Databases define a set of workers whose job is to execute all transactions assigned to them by a component usually named “scheduler”. The workers are independent of each other and can be conceptually thought of as application threads. Like application threads, they are subject to context switching, meaning that they can be interrupted mid-execution, allowing other workers to perform their work. As a result we can end up having partial transaction execution, resulting in the interweaved operations we saw in the log output above. As with multithreaded application code, without proper concurrency control, we run the risk of encountering data races and race conditions.
Going back to the database logs, we can also see that both transactions are trying to perform an update on the same entry, one after the other (lines #5 and #6). Such concurrent modification will be prevented by the database by setting a lock on the modified entry, protecting the change until the transaction that made the change completes or fails. Databases vendors are free to implement any number of different lock types, but most of them can be simplified to two types: shared and exclusive locks.
Shared (or read) locks are acquired on table entries read from the database. They are not mutually exclusive, meaning multiple transactions can hold a shared lock on the same entry.
Exclusive (or write) locks, as the name suggests are exclusive. Acquired when a write/update operation is performed, only one lock of this type can be active per table entry. This helps prevent concurrent changes on the same entry.
Database vendors provide a simple way to query active locks at any time of the transactions execution, given you can pause it or are executing it manually. In Postgres for example, the following query will show the active locks:
SELECT locktype, relation::regclass, mode, transactionid AS tid, virtualtransaction AS vtid, pid, granted, waitstart FROM pg_catalog.pg_locks l LEFT JOIN pg_catalog.pg_database db ON db.oid = l.database WHERE (db.datname = '<db_name>' OR db.datname IS NULL) AND NOT pid = pg_backend_pid() ORDER BY pid;
A similar query can be used for MySQL:
SELECT thread_id, lock_data, lock_type, lock_mode, lock_status FROM performance_schema.data_locks WHERE object_name = '<db_name>';
For other database vendors refer to the appropriate documentation.
The isolation level used in our example (Read Committed) will not place any locks when data is being read from the database. This means that only the write operations will be placing locks on the modified entries. If we visualize this, our issue becomes clear:

The lack of locking on the SELECT operation allows for concurrent access to a shared resource. This introduces a TOCTOU (time-of-check, time-of-use) issue, leading to an exploitable race condition. Even though the issue is not visible in the application code itself, it becomes obvious in the database logs.
Different code patterns can allow for different exploit scenarios. For our particular example, the main difference will be how the new application state is calculated, or more specifically, which values are used in the calculation.
In the original example, we can see that the new balance calculations will happen on the database server. This is due to how the UPDATE operation is structured. It containins a simple addition/subtraction operation, which will be calculated by the database using the current value of the balance column at time of execution. Putting it all together, we end up with an execution flow shown on the graph below.

Using the database’s default isolation level, the SELECT operation will be executed before any locks are created and the same entry will be returned to the application code. The transaction which gets its first UPDATE to execute, will enter the critical section and will be allowed to execute its remaining operations and commit. During that time, all other transactions will hang and wait for the lock to be released. By committing its changes, the first transaction will change the state of the database, effectively breaking the assumption under which the waiting transaction was initiated on. When the second transaction executes its UPDATEs, the calculations will be performed on the updated values, leaving the application in an incorrect state.
Working with stale values happens when the application code reads the current state of the database entry, performs the required calculations at the application layer and uses the newly calculated value in an UPDATE operation. We can perform a simple refactoring to our initial example and move the “new value” calculation to the application layer.
func (db *Db) Transfer(source int, destination int, amount int) error {
  ctx := context.Background()
  conn, err := pgx.Connect(ctx, db.databaseUrl)
  defer conn.Close(ctx)

  tx, err := conn.BeginTx(ctx)

  var userSrc User
  err = conn.
    QueryRow(ctx, "SELECT id, name, balance FROM users WHERE id = $1", source).
    Scan(&userSrc.Id, &userSrc.Name, &userSrc.Balance)

  var userDest User
  err = conn.
    QueryRow(ctx, "SELECT id, name, balance FROM users WHERE id = $1", destination).
    Scan(&userDest.Id, &userDest.Name, &userDest.Balance)

  if amount <= 0 || amount > userSrc.Balance {
    tx.Rollback(ctx)
    return fmt.Errorf("invalid transfer")
  }

  // note: balance calculations moved to the application layer
  newSrcBalance := userSrc.Balance - amount
  newDestBalance := userDest.Balance + amount

  _, err = conn.Exec(ctx, "UPDATE users SET balance = $2 WHERE id = $1", source, newSrcBalance)
  _, err = conn.Exec(ctx, "UPDATE users SET balance = $2 WHERE id = $1", destination, newDestBalance)

  err = tx.Commit(ctx)
  return nil
}
If two or more concurrent requests call the db.Transfer function at the same time, there is a high probability that the initial SELECT will be executed before any locks are created. All function calls will read the same value from the database. The amount verification will pass successfully and the new balances will be calculated. Let’s see how does this scenario affect out database state if we run the previous test case:

At first glance, the database state doesn’t show any inconsistencies. That is because both transactions preformed their amount calculation based on the same state and both executed UPDATE operations with the same amounts. Even though the database state was not corrupted, it’s worth bearing in mind that we were able to execute the transaction more times that what the business logic should allow. For example, an application built using a microservice architecture might implement business logic such as:

If Service T assumes that all incoming requests from the main application are valid, and does not perform any additional validation itself, it will happily process any incoming requests. The race condition described before allows us to exploit such behavior and call the downstream Service T multiple times, effectively performing more transfers that the business requirements would allow.
This pattern can also be (ab)used to corrupt the database state. Namely, we can perform multiple transfers from the source account to different destination accounts.

With this exploit, both concurrent transactions will initially see a source balance of 100, which will pass the amount verification.
If you run the sample application locally, with a database running on the same machine, you will likely see that most, if not all, of the requests made to the /transfer endpoint will be accepted by the application server. The low latency between client, application server and database server allow all requests to hit the race window and successfully commit. However, real-world application deployments are much more complex, running in cloud environments, deployed using Kubernetes clusters, placed behind reverse proxies and protected by firewalls.
We were curious to see how difficult is to hit the race window in a real-world context. To test that we set up a simple application, deployed in an AWS Fargate container, alongside another container running the selected database.
Testing was focused on three databases: Postgres, MySQL and MariaDB.
The application logic was implemented using two programming languages: Go and Node. These languages were chosen to allow us to see how their different concurrency models (Go’s goroutines vs. Node’s event loop) impact exploitability.
Finally, we specified three techniques of attacking the application:
1. simple multi-threaded loop
2. last-byte sync for HTTP/1.1
3. single packet attacks for HTTP/2.0
All of these were performed using BurpSuite’s extensions: “Intruder” for (1) and “Turbo Intruder” for (2) and (3).
Using this setup, we attacked the application by performing 20 requests using 10 threads/connections, transferring an amount of 50 from Bob (account ID 2 with a starting balance of 200) to Alice. Once the attack was done, we noted the number of accepted requests. Given a non-vulnerable application, there shouldn’t be more than 4 accepted requests.
This was performed 10 times, for each combination of application/database/attack method. The number of successfully processed requests was noted. From those numbers we conclude if a specific isolation level is exploitable or not. Those results can be found here.
Our testing showed that if this pattern is present in an application, it is very likely that it can be exploited. In all cases, except for the Serializable level, we were able to exceed the expected number of accepted requests, overdrawing the account. The number of accepted requests varies between different technologies, but the fact that we were able to exceed it (and in some cases, to a significant degree) is sufficient to demonstrate the exploitability of the issue.
If an attacker is able to get a large number of request to the server in the same instant, effectively creating conditions of a local access, the number of accepted requests jumps up by a significant amount. So, to maximize the possibility of hitting the race window, testers should prefer methods such as last-byte sync or the single packet attack.
One outlier is Postgres’ Repeatable Read level. The reason it’s not vulnerable is that it implements an isolation level called Snapshot Isolation. The guarantees provided by this isolation level sit between Repeatable Read and Serializable, ultimately providing sufficient protection and mitigating the race conditions for our example.
The languages concurrency modes did not have any notable impact on the exploitability of the race condition.
On a conceptual level, the fix only requires the start of the critical section to be moved to the beginning of the transaction. This will ensure that the transaction which first reads the entry gets exclusive access to it and is the only one allowed to commit. All others will wait for its completion.
Mitigation can be implemented in a number of ways. Some of them require manual work, while others come out of the box, provided by the database of choice. Let’s start by looking at the simplest and generally preferred way: setting the transaction isolation level to Serializable.
As mentioned before, the isolation level is a user/developer controlled property of a database transaction. It can be set by simply specifying it when creating a transaction:
BEGIN TRANSACTION SET TRANSACTION ISOLATION LEVEL SERIALIZABLE
This may slightly vary from database to database, so it’s always best to consult the appropriate documentation. Usually ORMs or database drivers provide an application level interface for setting the desired isolation level. Postgres’ Go driver pgx allows users to do the following:
tx, err := conn.BeginTx(ctx, pgx.TxOptions{IsoLevel: pgx.Serializable})
It is worth noting that Serizalizable, being the highest isolation level, may have an impact of the performance of your application. However, its use can be limited to only the business-critical transaction. All other transactions can remain unchanged and be executed with the database’s default isolation level or any appropriate level for that particular operation.
One alternative to this method is implementing pessimistic locking via manual locking. The idea behind this method is that the business-critical transaction will obtain all required locks at the beginning and only release them when the transaction completes or fails. This ensures that no other concurrently executing transaction will be able to interfere. Manual locking can be performed by specifying the FOR SHARE or FOR UPDATE options your SELECT operations:
SELECT id, name, balance FROM users WHERE id = 1 FOR UPDATE
This will instruct the database to place a shared or exclusive lock, respectively, to all entries returned by the read operation, effectively disallowing any modification to it until the lock is released. This method can, however, be error prone. There is always a possibility that other operations may get overlooked or new ones will be added without the FOR SHARE / FOR UPDATE option, potentially re-introducing the data race. Additionally, scenarios such as the one shown below, may be possible at lower isolation levels.

The graph shows a scenario where ‘tx2’ performs validation on a value which becomes stale after tx1 commits, and ends up overwriting the update performed by tx1, leading to a Lost Update.
Finally, mitigation can also be implemented using optimistic locking. The conceptual opposite of pessimistic locking, optimistic locking expects that nothing will go wrong and only performs conflict detection at the end of the transaction. If a conflict is detected (i.e., underlining data was modified by a concurrent transaction), the transaction will fail and will need to be retried. This method is usually implemented using a logic clock, or a table column, whose value must not change during the execution of the transaction.
The simplest way to implement this is by introducing a version column in your table:
CREATE TABLE users(
  id INT PRIMARY KEY NOT NULL AUTO_INCREMENT,
  name TEXT NOT NULL,
  balance INT NOT NULL,
  version INT NOT NULL AUTO_INCREMENT
);
The value of the version column must then be always verified when performing any write/update operations to the database. If the value changed, the operation will fail, failing the entire transaction.
UPDATE users SET balance = 100 WHERE id = 1 AND version = <last_seen_version>
If the application uses an ORM, setting the isolation level would usually entails calling a setter function, or supplying it as a function parameter. On the other hand, if the application constructs database transactions using raw SQL statements, the isolation level will be supplied as part of the transaction’s BEGIN statement.
Both those methods represent a pattern which can be search for using tools such as Semgrep. So, if we assume that our application is build using Go and uses the pgx to access to data stored in a Postgres database, we can use the following Semgrep rules to detect instances of unspecified isolation levels.
rules:
  - id: pgx-sql-tx-missing-isolation-level
    message: "SQL transaction without isolation level"
    languages:
      - go
    severity: WARNING
    patterns:
      - pattern: $CONN.Exec($CTX, $BEGIN)
      - metavariable-regex:
          metavariable: $BEGIN
          regex: ("begin transaction"|"BEGIN TRANSACTION")
rules:
  - id: pgx-tx-missing-options
    message: "Postgres transaction options not set"
    languages:
      - go
    severity: WARNING
    patterns:
      - pattern: $CONN.BeginTx($CTX)
rules:
  - id: pgx-tx-missing-options-isolation
    message: "Postgres transaction isolation level not set"
    languages:
      - go
    severity: WARNING
    patterns:
      - pattern: $CONN.BeginTx($CTX, $OPTS)
      - metavariable-pattern:
          metavariable: $OPTS
          patterns:
            - pattern-not: >
                $PGX.TxOptions{..., IsoLevel:$LVL, ...}
All these patterns can be easily modified to suit you tech-stack and database of choice.
It’s important to note that rules like these are not a complete solution. Integrating them blindly into an existing pipeline will result in a lot of noise. We would rather recommend using them to build an inventory of all transactions the application performs, and use that information as a starting point to review the application and apply hardening if it is required.
To finish up, we should emphasize that this is not a bug in database engines. This is part of how isolation levels were designed and implemented and it is clearly described in both the SQL specification and dedicated documentation for each database. Transactions and isolation levels were designed to protect concurrent operations from interfering with each other. Mitigations against data races and race conditions, however, are not their primary use case. Unfortunately, we found that this is a common misconception.
While usage of transactions will help guard the application from data corruptions under normal circumstances, it is not sufficient to mitigate data races. When this insecure pattern is introduced in business-critical code (account management functionality, financial transactions, discount code application, etc.), the likelihood of it being exploitable is high. For that reason, review your application’s business-critical operations and verify that they are doing proper data locking.
This research was presented by Viktor Chuchurski (@viktorot) at the 2024 OWASP Global AppSec conference in Lisbon. The recording of that presentation can be found here and the presentation slides can be downloaded here.
Playground code can be found on Doyensec’s GitHub.
If you would like to learn more about our other research, check out our blog, follow us on X (@doyensec) or feel free to contact us at info@doyensec.com for more information on how we can help your organization “Build with Security”.
The table below shows which isolation level allowed race condition to happen for the databases we tested as part of our research.
| RU | RC | RR | S | |
|---|---|---|---|---|
| MySQL | Y | Y | Y | N |
| Postgres | Y | Y | N | N |
| MariaDB | Y | Y | Y | N |
To provide users with a safer browsing experience, the IETF proposal named “Incrementally Better Cookies” set in motion a few important changes to address Cross-Site Request Forgery (CSRF) and other client-side issues. Soon after, Chrome and other major browsers implemented the recommended changes and introduced the SameSite attribute. SameSite helps mitigate CSRF, but does that mean CSRF is dead?
While auditing major web applications, we realized that Client Side Path-Traversal (CSPT) can be actually leveraged to resuscitate CSRF for the joy of all pentesters.
This blog post is a brief introduction to my research. The detailed findings, methodologies, and in-depth analysis are available in the whitepaper.
This research introduces the basics of Client-Side Path Traversal, presenting sources and sinks for Cross-Site Request Forgery. To demonstrate the impact and novelty of our discovery, we showcased vulnerabilities in major web messaging applications, including Mattermost and Rocket.Chat, among others.
Finally, we are releasing a Burp extension to help discover Client-Side Path-Traversal sources and sinks.
Thanks to the Mattermost and Rocket.Chat teams for their collaboration and authorization to share this.
Every security researcher should know what a path traversal is. This vulnerability gives an attacker the ability to use a payload like ../../../../ to read data outside the intended directory. Unlike server-side path traversal attacks, which read files from the server, client-side path traversal attacks focus on exploiting this weakness in order to make requests to unintended API endpoints.
While this class of vulnerabilities is very popular on the server side, only a few occurrences of Client-Side Path Traversal have been widely publicized. The first reference we found was a bug reported by Philippe Harewood in the Facebook bug bounty program. Since then, we have only found a few references about Client-Side Path Traversal:
Client Side Path-Traversal has been overlooked for years. While considered by many as a low-impact vulnerability, it can be actually used to force an end user to execute unwanted actions on a web application.
This research evolved from exploiting multiple Client-Side Path Traversal vulnerabilities during our web security engagements. However, we realized there was a lack of documentation and knowledge to understand the limits and potential impacts of using Client-Side Path Traversal to perform CSRF (CSPT2CSRF).
While working on this research, we figured out that one common bias exists. Researchers may think that user input has to be in the front end. However, like with XSS, any user input can lead to CSPT (think DOM, Reflected, Stored):
When evaluating a source, you should also consider if any action is needed to trigger the vulnerability or if it’s triggered when the page is loaded. Indeed, this complexity will impact the final severity of the vulnerability.
The CSPT will reroute a legitimate API request. Therefore, the attacker may not have control over the HTTP method, headers and body request.
All these restrictions are tied to a source. Indeed, the same front end may have different sources that perform different actions (e.g., GET/POST/PATCH/PUT/DELETE).
Each CSPT2CSRF needs to be described (source and sink) to identify the complexity and severity of the vulnerability.
As an attacker, we want to find all impactful sinks that share the same restrictions. This can be done with:

Some scenarios of exploiting CSPT with a GET sink exist:
However, open redirects are now hunted by many security researchers, and finding an XSS in a front end using a modern framework may be hard.
That said, during our research, even when stage-changing actions weren’t implemented directly with a GET sink, we were frequently able to exploit them via CSPT2CSRFs, without having the two previous prerequisites.
In fact it is often possible to chain a CSPT2CSRF having a GET sink with another state-changing CSPT2CSRF.
1st primitive: GET CSPT2CSRF:
id param in the query2nd primitive: POST CSPT2CSRF:
id from the JSON dataTo chain these primitives, a GET sink gadget must be found, and the attacker must control the id of the returned JSON. Sometimes, it may be directly authorized by the back end, but the most common gadget we found was to abuse file upload/download features. Indeed, many applications exposed file upload features in the API. An attacker can upload JSON with a manipulated id and target this content to trigger the CSPT2CSRF with a state-changing action.
In the whitepaper, we explain this scenario with an example in Mattermost.
This research was presented last week by Maxence Schmitt (@maxenceschmitt) at OWASP Global Appsec Lisbon 2024. The slides can be found here.
This blog post is just a glimpse of our extensive research. For a comprehensive understanding and detailed technical insights, please refer to the whitepaper.
Along with this whitepaper, we are releasing a BURP extension to find Client-Side Path Traversals.
We feel CSPT2CSRF is overlooked by many security researchers and unknown by most front-end developers. We hope this work will highlight this class of vulnerabilities and help both security researchers and defenders to secure modern applications.
If you would like to learn more about our other research, check out our blog, follow us on X (@doyensec) or feel free to contact us at info@doyensec.com for more information on how we can help your organization “Build with Security”.
No one can argue with the convenience that single sign-on (SSO) brings to users or the security and efficiency gains organizations reap from the lower administrative overhead. Gone are the days of individually managing multiple user accounts across numerous services. That said, have we just put all our eggs in one proverbial basket with regards to our SSO implementations? The results of our latest research remind us of why the saying cautions against doing this.
To help organizations assess their exposure in the event of an IdP compromise, we’re publishing a whitepaper that walks through these potential impacts. It examines how they differ depending on the privileges involved with the compromise. This includes the surprising impacts that even an unprivileged IdP account can have, all the way up to the complete disaster caused by a fully compromised IdP.
As part of our continuing collaboration with Teleport, our Francesco Lacerenza (@lacerenza_fra) explored these scenarios and how they apply to it specifically. If you’re not familiar with it, “The Teleport Access Platform is a suite of software and managed services that delivers on-demand, least-privileged access to infrastructure on a foundation of cryptographic identity and Zero Trust…”, thereby integrating robust authentication and authorization throughout an infrastructure.
As our motto is “Build with Security”, we help organizations build more secure environments, so we won’t leave you hanging with nightmares about what can go wrong with your SSO implementation. As part of this philosophy, the research behind our whitepaper included creating a number of Teleport hardening recommendations to protect your organization and limit potential impacts, in even the worst of scenarios. We also provide detailed information on what to look for in logs when attempting to detect various types of attacks. For those seeking the TL;DR, we are also publishing a convenient hardening checklist, which covers our recommendations and can be used to quickly communicate them to your busy teams.
Be sure to download the whitepaper (here) and our checklist (here) today! If you would like to learn more about our other research, check out our blog, follow us on X (@doyensec) or feel free to contact us at info@doyensec.com for more information on how we can help your organization “Build with Security”.
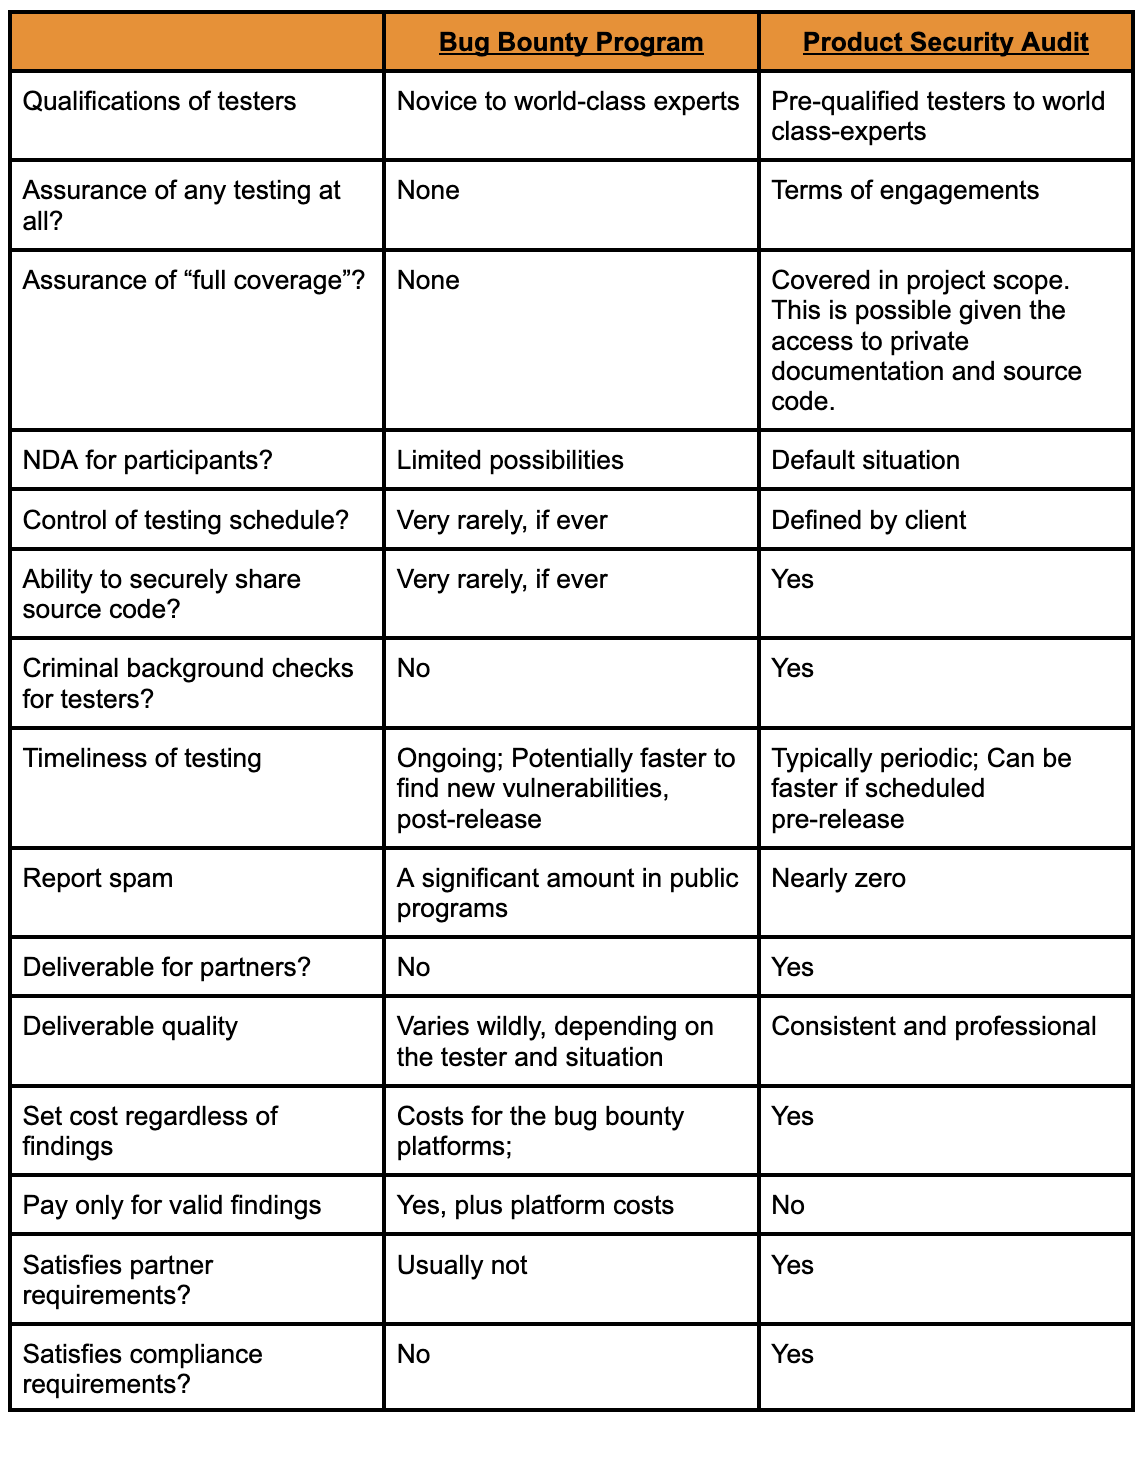
Every so often we see people discussing whether they still need to have product security audits (commonly referred to as pentests) because they have a bug bounty program. While the answer to this seems clear to us, it nonetheless is a recurring topic of discussion, particularly in the information security corners of social media. We’ve decided to publish our thoughts on this topic to clarify it for those who might still be unsure.

What we refer to as a product security audit is a time-bound project, where one or more engineers focus on a particular application exclusively. The testing is performed by employees of an application security firm. This work is usually scoped ahead of time and billed at flat hourly/daily rates, with the total cost known to the client prior to commencing.
These can be white box (i.e., access to source code and documentation) or black box (i.e., no source code access, with or without documentation), or somewhere in the middle. There is usually a well-defined scope and often preliminary discussions on points of interest to investigate more closely than others. Frequently, there will also be a walkthrough of the application’s functionality. More often than not, the testing takes place in a predefined set of days and hours. This is typically when the client is available to respond to questions, react in the event of potential issues (e.g., a site going down) or possibly to avoid peak traffic times.
Because of the trust that clients have in professional firms, they will often permit them direct access to their infrastructure and code - something that is generally never done in a bug bounty program. This empowers the testers to find bugs that are potentially very difficult to find externally and things that may be out of scope for dynamic tests, such as denial-of-service vulnerabilities. Additionally, with this approach, it’s common to discover one vulnerability, only to then quickly discover it’s a systemic issue specifically because of the access to the code. With this access, it is also much easier to identify things like vulnerable dependencies, often buried deep in the application.
Once the testing is complete, the provider will usually supply a written report and may have a wrap-up call with the client. There may also be a follow-up (retest) to ensure a client’s attempts at remediation have been successful.
What is most commonly referred to as a bug bounty program is typically an open-ended, ongoing effort where the testing is performed by the general public. Some companies may limit participation to a smaller group, permitting participation on whatever criteria they wish, with past performance in other programs being a commonly used factor.
Most programs define a scope of things to be tested and the vulnerability types that they are interested in receiving reports on. The client typically sets the payout amounts they are offering, with escalating rewards for more impactful discoveries. The client is also free to incentivize testing on certain areas through promotions (e.g., double bounties on their new product). Most bug bounty programs are exclusively black box, with no source code or documentation provided to the participating testers.
In most programs, there are no limits as to when the testing occurs. The participants determine if and when they perform testing. Because of this, any outages caused by the testing are usually treated as either normal engineering outages or potentially as security incidents. Some programs do ask their testers to identify their traffic via various means (e.g., passing a unique header) to more easily understand what they’re seeing in logs, if questions arise.
The bug bounty program’s concept of reporting is commonly individual bug reports, with or without a pre-formatted submission form. It is also common for programs to request that the person submitting the report validate the fix.
While not the focus of this post, we felt it was necessary to also acknowledge that there are hybrid approaches available. These offerings combine various aspects of both a bug bounty program and focused product security audits. We hope this post will inform the reader well enough to ensure they select the approach and mix of services that is right for their organization and fully understand what each entails.
From the definitions, the two approaches seem reasonably similar, but when we go below the surface, the differences become more apparent.
It’s not fair to paint any group with a broad brush, but there are some clear differences between who typically works in a product security audit versus a bug bounty program. Both approaches can result in great people testing an application and both could potentially result in participants lacking the professionalism and/or skill set you hoped for.
When a firm is retained to perform testing for a client, the firm is staking their reputation on the client’s satisfaction. Most reputable firms will attempt to provide clients with the best people they have available, ideally considering their specific skills for the engagement. The firm assumes the responsibility to screen their employees’ technical abilities, usually through multiple rounds of testing and interviewing prior to hiring, along with ongoing supervision, training and mentoring. Clients are also often provided with summaries of the engineers’ résumés, with the option to request alternate testers, if they feel their background doesn’t match with the project. Lastly, providers are also usually required to perform criminal background checks on their staff to meet client requirements.
A Bug Bounty program usually has very minimal entry requirements. Typically this just means that the participants are not from embargoed countries. Participants could be anyone from professionals looking to make extra money, security researchers, college students or even complete novices looking to build a résumé. While theoretically a client may draw more eyes to their project than in a typical audit, that’s not guaranteed and there are no assurances of their qualifications. Katie Moussouris, a well-known CEO of a bug bounty consultancy, is quoted underscoring this point, saying “Their latest report shows most registered users are basically either fake or unskilled”. Further, per their own statistics, one of the largest platforms stated that only about one percent of their participants “were really doing well”. So, despite large potential numbers, the small percentage of productive participants will be stretched thinly across thousands of programs, at best. In reality, the top participants tend to aggregate around programs they feel are the most lucrative or interesting.
When a client hires a quality firm to perform a product security audit, they’re effectively getting that firm’s collective body of knowledge. This typically means that their personnel have others within the company they can interact with if they encounter problems or need assistance. This also means that they likely have a proprietary methodology they adhere to, so clients should expect thorough and consistent results. Internal peer review and other quality assurance processes are also usually in place to ensure satisfactory results.
Generally, there are limitations on what a client wants or is able to share externally. It is common that a firm and client sign mutual NDAs, so neither party is allowed to disclose information about the audit. Should the firm leak information, they can potentially be held legally liable.
In a bug bounty program, each tester makes their own rules. They may overlap each other, creating repeated redundant tests, or they may compliment each other, giving the presumed advantage of many eyes. There is generally no way for a client to know what has or has not been tested. Clients may also find test accounts and data littered throughout the app (e.g., pop-up alerts everywhere), whereas professional testers are typically more restrained and required to not leave such remnants.
Most bug bounty programs don’t require a binding NDA, even if they are considered “private”. Therefore, clients are faced with a decision as to what and how much to share with the program participants. As a practical matter, there is little recourse if a participant decides to share information with others.
When a client hires a firm, they should expect a well-written professional report. Most firms have a proprietary reporting format, but will usually also provide a machine-readable report upon request. In most cases, clients can preview a sample report prior to hiring a firm, so they can get a very clear picture of the deliverables.
Reports from professional audits are typically subjected to several rounds of quality control prior to being delivered to clients. This will typically include a technical review or validation of reported issues, in addition to language and grammar editing to ensure reports are readable and professionally constructed. Additionally, quality firms also understand the fact that the results may be reviewed by a wide audience at their clients. They will therefore invest the time and effort to construct them in such a way that an audience, with a wide range of technical knowledge, are all able to understand the results. Testers are also typically required to maintain testing logs and quality documentation of all issues (e.g., screenshots - including requests and responses). This ensures clear findings reports and reproduction steps along with all the supporting materials.
Through personalized relationships with clients and potentially their source code, firms have the opportunity to understand what is important to them, which things keep them up at night and which things they aren’t concerned about. Through kickoff meetings, ongoing direct communication and wrap-up meetings, firms build trust and understanding with clients. This allows them to look at vulnerabilities of all severity levels and understand the context for the client. This could result in simply saving the client’s time or recognizing when a medium severity issue is actually a critical issue, for that client’s organization.
Further, repeated testing allows a client to tangibly demonstrate their commitment to security and how quickly they remediate issues. Additionally, product security audits conducted by experienced engineers, especially those with source code access, can highlight long-term improvements and hardening measures that can be taken, which would not generally be a part of a bug bounty program’s reports.
In a bug bounty program, the results are unpredictable, often seemingly driven mainly by the participants’ focus on payouts. Most companies end up inundated with effectively meaningless reports. Whether valid or not, they are often unrealistic, overhyped, known CVEs or previously known bugs, or issues the organization doesn’t actually care about. It is rare that results fully meet expectations, but not impossible. Submissions tend to cluster around things pushing (often quite imaginatively) to be considered critical or high severity, to gain the largest payouts or the low hanging fruits detected by automated scanners, usually reported by the lower rated participants looking for any type of payouts, no matter how trivial. The reality is that clients need to pay a premium to get the “good researchers” to participate, but on public programs that itself can also cause a significant uptick in “spam” reports.
Bug bounty reports are typically not formatted in a consistent manner and not machine-readable for ingestion into defect tracking software. Historically, there have been numerous issues that have arisen from reports which were difficult to triage due to language issues, poor grammar or bad proof-of-concept media (e.g., unhelpful screenshots, no logs, meandering videos). To address this, some platforms have gone as far as to incentivize participants to provide clear and easily readable reports via increased payouts, or positive reviews which impact the reporters’ reputation scores.
A professional audit is something that produces a deliverable that a client can hand to a third-party, if necessary. While there is a fixed cost for it, regardless of the results, this documented testing is often required by partner companies and for compliance reasons. Furthermore, when using a reputable firm, a client may find it easier to pass the security requirements of their partners. Lastly, should there be an incident, a client can attest to their due diligence and potentially lessen their legal liability.
A bug bounty provides no assurances as to the amount of the application that is tested (i.e., the “coverage”). It neither produces an acceptable deliverable that can be offered to third parties, nor does it attest to the quality of the skills of those testing the application(s). Further, bug bounty programs don’t typically satisfy any compliance requirements with respect to testing requirements.
In the following table, we perform a side-by-side comparison of the two approaches to make the differences clearer.
Which approach an organization decides to take will vary based on many factors including budget, compliance requirements, partner requirements, time-sensitivity and confidentiality requirements. For most organizations, we feel the correct approach is a balanced one.
Ideally, an organization should perform recurring product security audits at least quarterly and after major changes. If budgets don’t permit that frequency of testing, the typical compromise is annually, at an absolute minimum.
Bug bounty programs should be used to fill the gaps between rigorous security audits, whether those audits are performed by internal teams or external partners. This is arguably the need they were designed to fill, rather than replacing recurring professional testing.